Tools / Drills
User Manual for Ronix 2250K Electric Impact Drill
Quick guide for the Ronix 2250K Electric Impact Drill. Includes setup, operation, safety instructions, and technical specifications.
Quick answers from the manual
Quick answer
- The Ronix 2250K is an 850W electric impact drill with a 13mm keyed chuck. It features variable speed control, hammer/drill modes, and a side handle for stability. p. 3, 8
Key actions
- Assemble side handle: Rotate lower part anti-clockwise, slide over chuck, position, and tighten. p. 9
- Insert drill bit: Unplug tool, open chuck jaws, insert bit, tighten chuck. p. 9
First start
- Ensure voltage matches, attach side handle, insert bit, and set mode switch. p. 9
Show 4 more answers Show less
Problems and fixes
Overheating
Run tool without load for 2 minutes.
p. 10Maintenance and reset
- Clean the drilling machine with a clean cloth and a brush. Ensure that the ventilation slits are not blocked. p. 10
Technical specifications
| Parameter | Value | Meaning | Pages |
|---|---|---|---|
| Power | 850W | Motor power rating | p. 3 |
| Chuck Size | 13mm | Maximum bit shank diameter | p. 3 |
| No-Load Speed | 0-3000 RPM | Rotational speed range | p. 3 |
Where to find it in the PDF
- Technical Specifications p. 3
- Part List Diagram p. 4
- Operation Instructions p. 9, 10
Table of contents
Manual images
Click an image to enlargeQuick guide from the manual
The Ronix 2250K is an 850W electric impact drill designed for drilling in wood, metal, and masonry. This guide covers essential setup, operation, and maintenance procedures to ensure safe and efficient use.
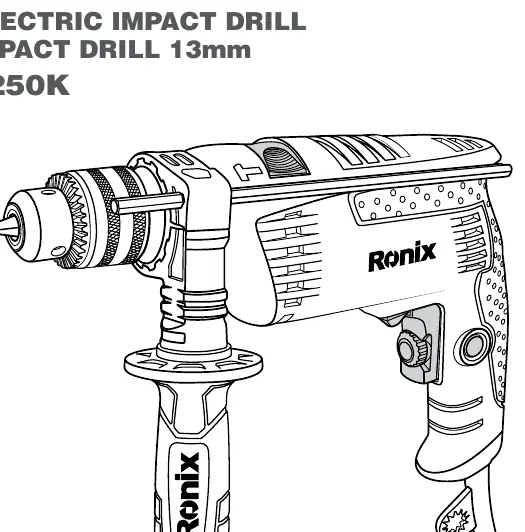
Technical Specifications
- Model: 2250K
- Power: 850W
- Voltage: 220-240V (50-60Hz)
- Chuck Size: 13mm (Keyed)
- No-Load Speed: 0-3000 RPM
- Max Capacity: 20mm (Wood), 13mm (Steel/Concrete)
- Weight: 2kg
Assembly and Setup
Installing the Side Handle: Rotate the lower part of the side handle anti-clockwise to loosen it. Slide the handle over the drill chuck onto the flange behind it. Position the handle as desired and tighten by rotating the lower part clockwise.
Inserting a Drill Bit: Ensure the tool is disconnected from the power supply. Turn the ring of the drill chuck until the clamping jaws are open wide enough to insert the bit. Insert the bit and tighten the chuck securely.
Adjusting the Bit Stop: The side handle includes a retainer for the depth gauge (bit stop). Insert the drill bit, then push the bit stop forward until it aligns with the end of the drill bit. Pull it back to the desired drilling depth and secure it.
Operation
Switching On/Off: Press the operating switch to start the machine. The speed is controlled by the pressure applied to the switch and the speed regulator wheel. Release the switch to stop.
Continuous Operation: While holding the operating switch, press the locking button. To stop, press the operating switch again and release.
Mode Selection: Use the hammer/drilling switch to toggle between standard drilling (wood/metal) and hammer drilling (masonry).
Direction Control: Use the direction switch to change rotation direction for driving screws or removing jammed bits. Do not change direction while the machine is running.
Safety and Maintenance
Safety Warnings: Always wear eye and ear protection. Keep the work area clean and well-lit. Do not operate in explosive atmospheres. Ensure the tool is disconnected before making adjustments or changing accessories.
Overload Protection: Do not force the tool. If the machine becomes too hot, run it without a load for two minutes to cool down. Keep ventilation slits clear of debris.
Maintenance: Clean the tool with a clean cloth and brush. Ensure the tool is serviced by qualified personnel using identical replacement parts.
Manufacturer information
Ronix Tools
Practical help
Common problems
Tool overheating
Run the machine without a load for two minutes to allow the motor to cool down.
Drill bit jammed
Use the direction switch to reverse the rotation and carefully remove the bit.
Overload/Loss of power
Reduce pressure on the tool. Excessive force reduces speed and can damage the motor.
Before use
- Verify that the mains voltage matches the tool's rated voltage.
- Ensure the operating switch is in the off position before plugging in.
- Check that the drill bit is correctly sized and securely tightened in the chuck.
- Ensure the side handle is securely attached.
- Wear appropriate personal protective equipment (eye protection, ear protection, dust mask).
Show more Show less
Specs in practice
- Chuck Size (13mm)
- The maximum diameter of the drill bit shank that the chuck can accommodate.
- No-Load Speed (0-3000 RPM)
- The rotational speed range of the drill when not under load, adjustable via the regulator wheel.
- Hammer Drilling Mode
- Adds a percussion action to the rotation, necessary for drilling into masonry or concrete.
Images and diagrams
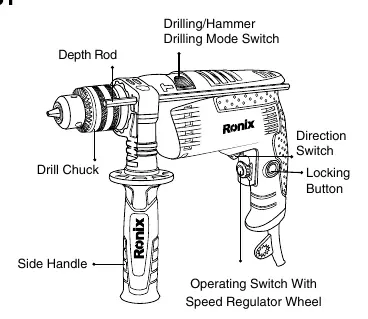
- Drilling/Hammer Drilling Mode Switch: Located on top, toggles between standard rotation and impact action.
- Direction Switch: Located near the trigger, selects forward or reverse rotation.
- Speed Regulator Wheel: Integrated into the operating switch to limit maximum speed.
Model compatibility
- Designed for 220-240V AC power supply.
- Use only with compatible 13mm drill bits.

Manual page author
David Miller
Documentation analyst