Tools / Drills
Genesis THOR 230 TKL LITE Keyboard User Manual
Quick guide for the Genesis THOR 230 TKL LITE mechanical keyboard. Learn how to install, replace switches, customize backlight modes, and reset settings.
Quick answers from the manual
Quick answer
- To install the Genesis THOR 230 TKL LITE, connect it to a USB port and wait 15 seconds for drivers. Download the software from genesis-zone.com for advanced settings. p. 4, 5
Key actions
- Factory Reset p. 5
- Swap Arrow Functions p. 5
First start
- Initial Connection p. 4
Show 4 more answers Show less
Problems and fixes
Switch not working after replacement
Check if legs are correctly installed in PCB holes and not bent.
p. 5Maintenance and reset
- Factory Reset p. 5
Technical specifications
| Parameter | Value | Meaning | Pages |
|---|---|---|---|
| Compatibility | Windows 7/8/10/11, Android | Supported operating systems | p. 4 |
Where to find it in the PDF
- Installation and Usage p. 4, 5
Table of contents
Manual images
Click an image to enlargeQuick Guide
The Genesis THOR 230 TKL LITE is a mechanical keyboard designed for gaming. This guide covers installation, maintenance, and customization.
Installation

- Connect the keyboard cable to a free USB port on your computer.
- Wait approximately 15 seconds for the drivers to install automatically upon the first connection.
- Download the dedicated software from www.genesis-zone.com to configure advanced features.
- Run the setup.exe file from the installation folder and follow the on-screen instructions.
Switch Replacement
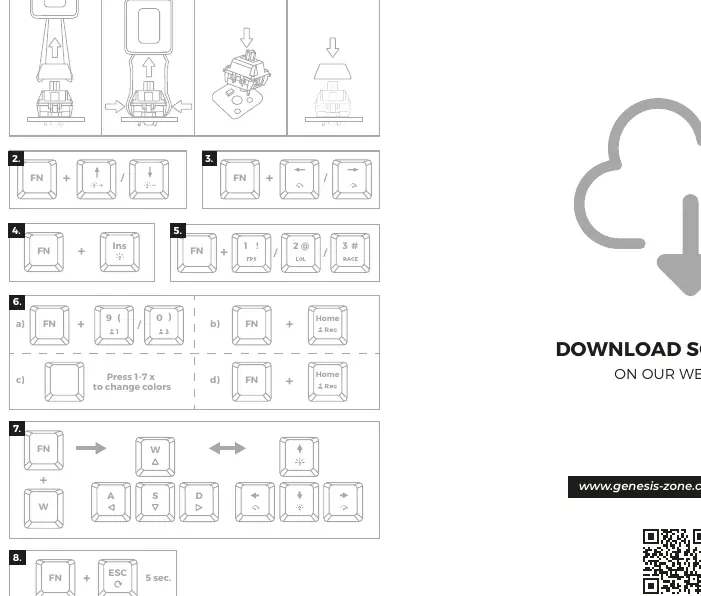
The keyboard supports hot-swappable switches. Follow these steps to replace a switch:
- Remove the keycap by pulling it vertically upwards.
- Insert the metal clamp under the switch body as shown in the diagram.
- Press the clamp arms against the switch and pull vertically upwards.
- Insert the replacement switch vertically into the PCB holes and press gently.
- Reattach the keycap and connect the keyboard to the computer.
Note: If the switch does not work after replacement, ensure the switch legs are correctly aligned with the PCB holes and are not bent.
Backlight Settings
- Brightness: Press Fn + Arrow Up/Down to adjust the brightness level.
- Speed: Press Fn + Arrow Left/Right to change the speed of backlight effects.
- Mode Change: Press Fn + Ins to cycle through 20 backlight modes.
- Game Modes: Press Fn + 1/2/3 to switch between 3 game-specific backlight modes.
- Custom Mode:
- Select a custom mode by pressing Fn + 9/0.
- Press Fn + Home to start recording (LED indicator will flash).
- Press the keys you wish to illuminate (you can cycle through 7 colors for each key).
- Press Fn + Home to finish recording and save settings.
Other Functions
- Arrow Function Swap: Press Fn + W to swap the arrow key functions with the W, A, S, D keys.
- Factory Reset: Press and hold Fn + Esc for 5 seconds to restore all settings to default.
Official resources from the manual
Practical help
Common problems
Switch does not work after replacement
Check if the switch legs are correctly installed in the PCB holes and ensure they are not bent.
Keyboard not detected immediately
Wait approximately 15 seconds after the first connection for the drivers to install.
Before use
- Connect the keyboard to a free USB port.
- Wait 15 seconds for driver installation.
- Download the software from the official website for advanced features.
- Ensure the computer is running Windows 7/8/10/11 or Android.
Show more Show less
Specs in practice
- USB Connection
- Standard wired connection for data and power.
- Hot-swappable
- Allows replacing mechanical switches without soldering.
Images and diagrams
- The diagram on page 2 illustrates the switch removal process using the included metal clamp.
- The diagram on page 2 provides a visual reference for key combinations (Fn + keys) for backlight and function control.
Model compatibility
- Compatible with Windows 7, 8, 10, 11.
- Compatible with Android devices.

Manual page author
Michael Turner
Technical manual editor