Tools / Drills
User Manual for Ronix 2214K Impact Drill
Quick guide for the Ronix 2214K 13mm Impact Drill. Includes specifications, safety instructions, bit installation, operation modes, and maintenance tips.
Quick answers from the manual
Quick answer
- The Ronix 2214K is a 750W impact drill with a 13mm keyed chuck. It features variable speed control, a lock-on button for continuous operation, and a mode selector for hammer or standard drilling. p. 2
Key actions
- Installing a bit: Insert bit, tighten chuck by hand, then use the chuck key in all three holes. p. 6
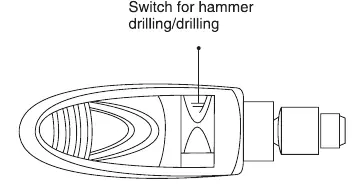
- Selecting mode: Slide the lever right for hammer drilling, left for rotation only. p. 8
First start
- Ensure the tool is switched off, plug into a 220-240V outlet, and select the desired mode before starting. p. 6, 8
Show 4 more answers Show less
Problems and fixes
Tool not running
Check power supply and switch position.
p. 8
Bit slipping
Tighten chuck key in all three holes.
p. 6Maintenance and reset
- Regularly clean air vents, check for loose screws, and inspect cord insulation. p. 8
Technical specifications
| Parameter | Value | Meaning | Pages |
|---|---|---|---|
| Power | 750W | Motor power rating | p. 2 |
| No-Load Speed | 0-2800 RPM | Rotational speed range | p. 2 |
Where to find it in the PDF
- Specifications and Parts List p. 2
- Safety Warnings p. 3, 4, 5
- Operation Instructions p. 6, 7, 8
Table of contents
Manual images
Click an image to enlargeImportant Information
The Ronix 2214K is a 750W impact drill designed for drilling in various materials. This manual provides essential safety guidelines, operating instructions, and maintenance procedures. Always ensure the tool is unplugged before performing any adjustments, such as changing drill bits or maintenance tasks.
Specifications
- Model: 2214K
- Voltage: 220-240V, 50-60Hz
- Power: 750W
- No-Load Speed: 0-2800 RPM
- Chuck Type: Keyed, 13mm
- Max Capacity (Concrete/Steel): 13mm
- Max Capacity (Wood): 25mm
Parts List
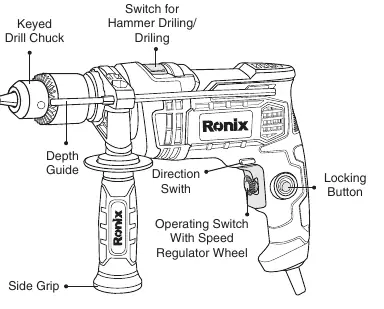
The drill features a keyed chuck, a side grip for stability, a depth guide for uniform drilling, a direction switch, an operating switch with a speed regulator wheel, and a locking button for continuous operation.
Safety Rules
- General Safety: Keep the work area clean and well-lit. Do not operate in explosive atmospheres.
- Electrical Safety: Ensure the plug matches the outlet. Do not modify the plug. Avoid contact with earthed surfaces.
- Personal Safety: Wear eye protection and appropriate safety gear. Keep hair and loose clothing away from moving parts.
- Operation: Hold the tool firmly with both hands using the side grip. If the drill bit contacts hidden wiring, the exposed metal parts may become live.
Operation
Installing and Removing the Bit
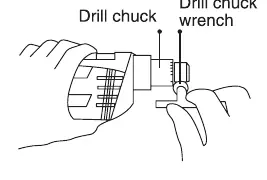
- Insert the bit into the chuck as far as it will go.
- Tighten the chuck by hand.
- Use the chuck key in each of the three holes to tighten the chuck clockwise. Ensure all three holes are tightened evenly.
- To remove, turn the chuck key counterclockwise in one hole, then loosen by hand.
Side Handle and Depth Gauge
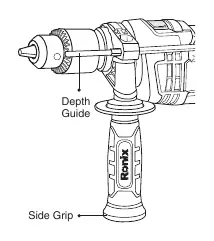
The side grip can be adjusted by loosening it counterclockwise, moving it to the desired position, and tightening it clockwise. The depth gauge can be inserted into the grip base and adjusted to drill holes of a uniform depth.
Switch Action and Mode Selection
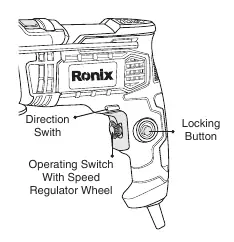
Pull the switch trigger to start the tool; speed increases with pressure. For continuous operation, pull the trigger and push the lock button. To select the action mode, use the lever on top: slide right for hammer drilling, slide left for rotation only.
Maintenance
- Keep air vents clean to prevent obstruction.
- Regularly check for loose screws.
- Inspect the cord insulation for damage.
- If the tool requires repair or carbon brush replacement, contact a Ronix Service center.
Manufacturer information
Ronix Tools
Practical help
Common problems
Drill bit slips during operation
Ensure the chuck is tightened evenly using the chuck key in all three holes.
Tool overheating
Clean the air vents regularly to ensure proper airflow.
Tool not working correctly
Check carbon brushes and contact a Ronix Service center for inspection.
Before use
- Ensure the tool is unplugged before changing bits.
- Verify the side grip is securely tightened.
- Check that the correct action mode (hammer or drill) is selected.
- Ensure the drill bit is sharp and undamaged.
- Check that the power cord is not damaged.
Show more Show less
Specs in practice
- No-Load Speed
- The speed of the drill without a load, adjustable from 0 to 2800 RPM via trigger pressure.
- Max Capacity
- The maximum diameter the drill can effectively bore into specific materials (Concrete/Steel 13mm, Wood 25mm).
Images and diagrams
- The keyed chuck requires the chuck key to be inserted into all three holes for secure bit retention.
- The mode selector lever is located on top of the tool; slide right for hammer drilling and left for rotation only.
Model compatibility
- Designed for 220-240V, 50-60Hz power supply.

Manual page author
Michael Turner
Technical manual editor