Power / Batteries & Chargers
User Manual for Goal Zero Yeti 1000X Portable Power Station
Comprehensive user guide for the Goal Zero Yeti 1000X Portable Power Station. Learn how to charge, operate, maintain, and troubleshoot your power station, including solar charging tips, port usage, and safety guidelines.
Table of contents
Manual images
Click an image to enlargeQuick Guide and Safety
Before using or storing your Goal Zero Yeti 1000X, plug it into a wall outlet until fully charged. Keep the unit plugged in when not in use to ensure it is always ready. Ensure proper ventilation while in use and do not obstruct fan openings. Do not operate in wet conditions or stack items on top of the unit. The unit generates potentially lethal AC power; use it with the same caution as a standard wall outlet.

Charging Your Yeti
You can charge the Yeti using the included 120W AC Wall Charger (approx. 9 hours) or via solar panels. When charging, the battery segments on the LCD display will blink. Once fully charged, all segments will remain solid.
- Wall Charging: Plug the included AC wall charger into the input port.
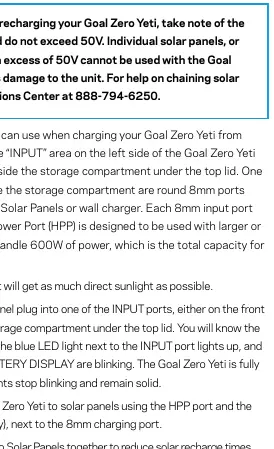
- Solar Charging: Use the 8mm input or the High Power Port (HPP). Do not exceed 50V when using solar panels. The HPP port supports up to 600W, while 8mm ports support up to 150W.
- Prioritization: If multiple inputs are connected, the unit prioritizes: 1. Front HPP, 2. Front 8mm, 3. Under-the-lid 8mm. Solar and AC inputs cannot be combined.
Using the Power Station
Press the power button above each port section to activate it. A white LED light indicates the port is on. Turn off ports when not in use to conserve power.
Cold Weather Usage
Cold temperatures can impact battery capacity. If operating in sub-zero conditions, keep the unit in an insulated cooler connected to a power source. The unit will not charge below freezing for safety; it will display a thermometer icon and "COLD" warning.
LCD Display and Buttons
The LCD screen displays input/output wattage, time to empty/full, and battery level. Use the UNIT button to scroll through settings and the LIGHT button for the display backlight. To perform a factory reset, hold UNITS and INFO for 5 seconds.
Storage and Maintenance
If you cannot keep the unit plugged in, fully charge it every 3-6 months and store it in a cool, dry place. Failure to maintain the battery can result in damage and void the warranty.
Troubleshooting
If the unit is not charging or responding, try a reset by holding the UNITS and INFO buttons for 3 seconds. If you see a red light on a port button, it indicates an overload; push the button again to reset. If the unit displays a thermometer icon with "HOT" or "COLD", allow the unit to reach a safe temperature before resuming use.
Manufacturer information
Goal Zero
Practical help
Common problems
Unit not charging to 100%
Cycle the battery a few times; the unit will dial in its charge parameters.
Unit not responding or odd behavior
Perform a reset by holding the 'Units' and 'Info' buttons for 3 seconds.
Overload or temperature warning icons
Check if power draw exceeds port limits. If temperature icons appear, allow the unit to cool down or warm up before use.
Before use
- Charge fully before first use
- Ensure ventilation around fan openings
- Check device power requirements
- Verify solar panel voltage is under 50V
- Keep unit in a dry, well-ventilated area
Specs in practice
- 1500W AC Inverter
- Maximum continuous power output for AC devices (3000W surge).
Images and diagrams
- Front panel shows input/output ports and LCD screen
- Storage compartment contains additional 8mm input port
Model compatibility
- Solar panels must not exceed 50V
- Do not chain 3rd party panels without proper knowledge
- Use only Goal Zero expansion modules

Manual page author
Emily Carter
User documentation editor
Prepares concise manual descriptions and highlights the most useful setup, operation, and maintenance information for readers.