Electronics / Microphones
User Manual for SYNCO G1(A2) Wireless Lavalier Microphone
Quick guide for the SYNCO G1(A2) wireless lavalier microphone. Learn how to pair, install, adjust gain, and configure camera audio settings for optimal recording.
Quick answers from the manual
Quick answer
- The SYNCO G1(A2) is a wireless microphone system that pairs automatically. Connect the receiver to your camera or phone using the included 3.5mm cables and adjust the gain on the receiver to optimize audio levels. p. 2
Key actions
- Pairing the devices p. 2
- Adjusting gain p. 2
First start
- Charge the devices fully, power on by holding the power button for 2 seconds, and connect to your recording device. p. 2
Problems and fixes
System not pairing
Use the pairing button on the receiver.
p. 2Maintenance and reset
- Keep in a clean, dry environment; use a soft, dry cloth for cleaning. p. 2
Technical specifications
| Parameter | Value | Meaning | Pages |
|---|---|---|---|
| Wireless Transmission | Digital 2.4GHz | Frequency band used for wireless signal. | p. 2 |
| Battery Life | 5H | Operating time on a full charge. | p. 2 |
Where to find it in the PDF
- Camera Settings and Warranty p. 1
- Product Operations and Specs p. 2
Table of contents
Quick guide from the manual
The SYNCO G1(A2) is a 2.4GHz wireless lavalier microphone system. To get started, ensure both the transmitter (TX) and receiver (RX) are fully charged using the provided USB-C cable. Power on the devices by long-pressing the power button for 2 seconds. The system pairs automatically upon power-on. Connect the receiver to your recording device using the appropriate 3.5mm cable (TRS for cameras, TRRS for phones) and adjust the gain levels on the receiver to match your recording environment.
Product Overview
The system consists of two transmitters and one receiver. The transmitters feature a built-in microphone, power button, reset button, and low-cut filter. The receiver includes a power button, reset button, channel A/B gain controls, 3.5mm audio output, and a 3.5mm monitoring jack.
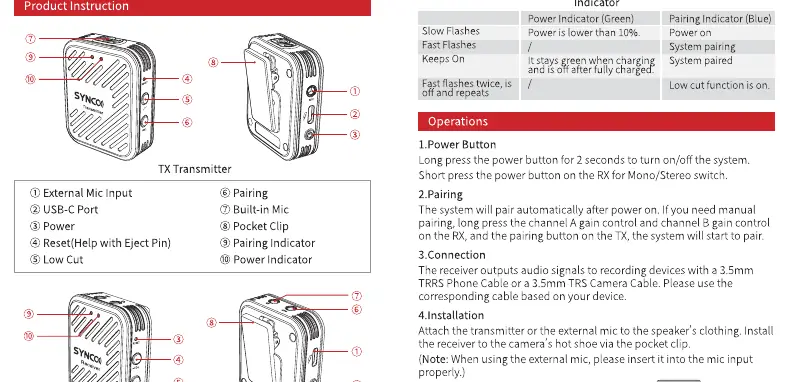
Operations
- Powering On/Off: Long press the power button for 2 seconds.
- Pairing: The devices pair automatically. If pairing is lost, use the pairing button on the receiver to re-establish the connection.
- Gain Control: The receiver allows for 4 levels of gain adjustment. Press the gain control buttons to cycle through the levels.
- Installation: Attach the transmitter to the speaker's clothing using the clip. Connect the receiver to the camera or phone using the included cables.
Camera Audio Settings
To achieve the best audio quality, it is recommended to adjust the recording level on your camera. Generally, cameras have high-gain preamps, so setting the camera's recording level to 1/2 or 1/3 of its range is recommended. The manual provides specific examples for Sony, Canon, and Panasonic cameras, emphasizing the need to manually set the audio input level to avoid noise.
Specifications
- Wireless Transmission: 2.4GHz
- Working Distance: 164ft/50m (LOS area)
- Latency: 12.5ms
- Battery Life: 5 hours
- Battery Type: Built-in Lithium Battery
- Audio Output: 1/8" (3.5mm) TRS
Care and Maintenance
Keep the product in a clean, dry, and dust-free environment. Avoid exposure to corrosive chemicals, liquids, and heat sources. Use a soft, dry cloth for cleaning. Do not attempt to disassemble the product, as this voids the warranty.
Practical help
Common problems
System not pairing
Use the pairing button on the receiver to manually re-establish the connection.
Audio is too noisy or distorted
Adjust the camera's internal recording level to 1/2 or 1/3 of the total range and adjust the gain on the SYNCO receiver.
Before use
- Charge both TX and RX units fully via USB-C.
- Verify the correct cable is used (TRS for cameras, TRRS for phones).
- Power on both units and check indicator lights.
- Set camera audio input to manual mode.
- Test audio levels before recording.
Specs in practice
- Working Distance
- Up to 50m (164ft) in line-of-sight conditions.
- Battery Life
- Provides approximately 5 hours of continuous operation.
Images and diagrams
- The TX unit features a built-in mic, power button, and clip.
- The RX unit features gain control buttons, monitoring jack, and output port.
Model compatibility
- Compatible with cameras using 3.5mm TRS input.
- Compatible with smartphones using 3.5mm TRRS input.

Manual page author
Emily Carter
User documentation editor
Prepares concise manual descriptions and highlights the most useful setup, operation, and maintenance information for readers.