HVAC / Heat Pumps
User Manual for Goldair 1500W Micathermic Heater GMH210
Quick guide for the Goldair 1500W Micathermic Heater GMH210. Includes assembly instructions, safety precautions, operating modes, thermostat settings, and maintenance tips.
Table of contents
Manual images
Click an image to enlargeQuick guide from the manual
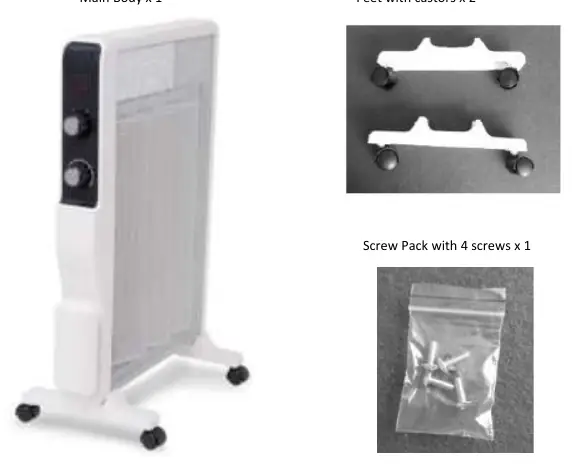
The Goldair 1500W Micathermic Heater is designed for indoor household use. Before operating, ensure the unit is fully assembled with the feet and castors attached. Maintain a minimum distance of 1 metre from the front, sides, and rear of the appliance to all objects, including curtains and textiles. Do not use this heater with external timers, programmers, or remote-control systems, as this poses a fire risk if the unit is covered or positioned incorrectly.
Assembly instructions
The heater must not be used without the feet and castors fitted. The unit is supplied with '1 way screws' for permanent installation of the feet, which is a safety requirement.
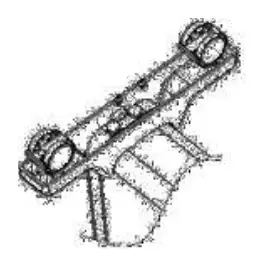
- Carefully turn the main body upside-down on a scratch-free, stable surface.
- Align the 2 holes in the foot with the 2 holes in the base of the appliance.
- Insert the screws into the center of the holes and attach firmly with a screwdriver.
- Repeat the process for the second foot.
- Turn the appliance the right way up.
Warning: Operate the appliance in a normal upright position only. Any other position could create a hazardous situation.
Operating your heater
Ensure the heater is on a flat, stable, heat-resistant surface. Before plugging into the mains, check that the heat control switch is in the Off (O) position.
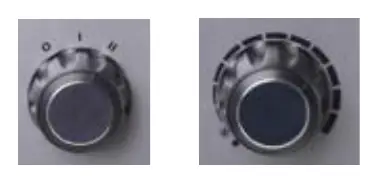
Heat control switch
- O: Power Off
- I: Low Heat
- II: High Heat
Thermostat operation
- Rotate the thermostat knob clockwise to the maximum position.
- When the room reaches a comfortable temperature, slowly turn the knob anti-clockwise until the heater turns off (you will hear a click).
- The heater will now cycle on and off to maintain the set comfort level.
Safety devices
The appliance includes three protection mechanisms:
- Tilt switch: Automatically turns the appliance off if it is not in the correct operating position.
- Resettable thermal link: Disconnects power at a pre-set overheat temperature; it will reset automatically after cooling down.
- Thermal fuse: Permanently disconnects the appliance in case of severe overheating (non-resettable).
Care and cleaning
Regular maintenance ensures trouble-free operation:
- Always unplug the heater and allow it to cool down completely before cleaning.
- Remove dust and fluff deposits regularly by vacuuming the air vents and grills.
- Wipe the exterior with a damp cloth (not wet).
- Do not use abrasive cleaning products, petrol, thinners, or polishing agents.
- Do not immerse the appliance in any liquids.
Manufacturer information
Goldair
Practical help
Common problems
Heater releases odour or smoke on first use
This is a normal occurrence caused by the initial heating of the heating elements and should not occur again.
Heater turns off unexpectedly
Check if the tilt switch was activated or if the thermal link tripped due to overheating. Ensure the unit is upright and not covered.
Heater does not work
Ensure it is plugged in, the switch is on, and the thermostat is set correctly. If it still fails, contact the Customer Services Team.
Before use
- Ensure all packaging is removed from the unit
- Check for transport damage
- Assemble feet and castors using the provided 1-way screws
- Place on a flat, stable, heat-resistant surface
- Ensure hands are dry before handling the plug or unit
Specs in practice
- 220-240VAC 50Hz
- Required voltage and frequency for the power supply.
Images and diagrams
- The heat control switch has three positions: O (Off), I (Low Heat), and II (High Heat).
- The thermostat knob is used to set the desired temperature level.
Model compatibility
- For indoor household use only.
- Do not use with external timers, programmers, or remote-control systems.
- Do not use in small rooms occupied by persons unable to leave on their own.

Manual page author
Emily Carter
User documentation editor
Prepares concise manual descriptions and highlights the most useful setup, operation, and maintenance information for readers.