Lighting / Fixtures
Golden Lighting 1067-OSF Piper Modern Natural Black Outdoor Flush Mount Light
Installation and assembly guide for the Golden Lighting 1067-OSF Piper series, covering both pendant and semi-flush mount configurations.
Table of contents
Product Overview
The Golden Lighting 1067-OSF Piper is a versatile lighting fixture designed for modern interiors. This unit offers two distinct installation methods: as a hanging pendant or as a semi-flush mount fixture, allowing for flexibility in various room heights and styles. The fixture features a durable construction with glass shades that provide ambient lighting.
Safety Information
Installation must be performed by an accredited professional. Always ensure the power supply is completely shut off at the fuse or circuit breaker before beginning any work. Do not exceed the maximum wattage specified for the bulbs to prevent overheating and potential fire hazards. Use only the recommended bulb types.
Installation Preparation
Carefully unpack the fixture and identify all components. Ensure you have the mounting strap assembly, canopy, and necessary hardware. Decide whether you will install the unit as a pendant or a semi-flush mount, as the assembly steps differ for each configuration. For pendant installation, measure the desired height and adjust the chain length accordingly. For semi-flush installation, ensure the mounting strap is securely attached to the junction box.
Wiring and Assembly
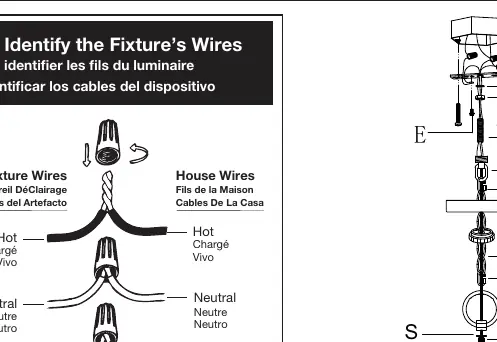
Wiring should be performed with the assistance of another person to support the fixture's weight. Connect the fixture wires to the house supply wires: hot to hot (smooth/black), neutral to neutral (ribbed/white), and ground to ground (green/copper). Ensure all wire connections are secure and twisted in the same direction before applying wire connectors. Tuck all wires neatly into the junction box.
Finishing Touches
Once wired, secure the canopy to the ceiling. For pendant models, tighten the canopy loop collar. For semi-flush models, secure the canopy with the provided decorative nuts. Slide the glass shades over the sockets and secure them with the socket rings. Install the light bulbs, ensuring they do not exceed the maximum wattage. Finally, apply a clear silicone rubber caulking around the canopy edge to seal the gap between the fixture and the mounting surface, providing a weather-resistant finish.
Manufacturer information
Golden Lighting
Practical help
Common problems
Fixture does not light up after installation
Check all wire connections to ensure they are secure and correctly matched (hot to hot, neutral to neutral). Verify that the circuit breaker is turned on.
Canopy does not sit flush against the ceiling
Adjust the length of the mounting screws or the nipple height to ensure the canopy fits snugly against the mounting surface.
Before use
- Shut off power at the circuit breaker
- Verify all parts are present in the package
- Choose between pendant or semi-flush installation
- Measure desired hanging height
- Ensure an assistant is available to support the fixture weight
- Confirm bulb wattage does not exceed the maximum limit
Images and diagrams
- Diagram (1) illustrates the pendant installation process including chain and canopy loop assembly.
- Diagram (2) illustrates the semi-flush installation process using the mounting strap and decorative nuts.
- The wiring diagram shows the correct color-coding for hot, neutral, and ground connections.
Model compatibility
- Fixture can be installed as a pendant or semi-flush mount.
- Compatible with standard junction boxes.

Manual page author
Michael Turner
Technical manual editor
Reviews PDF manuals for structure, safety notes, and practical product details so readers can find the right information quickly.