Lighting / Fixtures
Golden Lighting 1087-3P Annette 3-Light Schoolhouse Pendant Light
Installation and assembly guide for the Golden Lighting 1087-3P Annette 3-Light Brushed Champagne Bronze Schoolhouse Pendant Light, including wiring instructions and safety guidelines.
Table of contents
Product Overview
The Golden Lighting 1087-3P Annette is a 3-light schoolhouse pendant fixture designed to provide both ambient and task lighting. Its classic design makes it a versatile choice for various interior spaces, including kitchens and dining areas. Proper installation is essential for both safety and optimal performance.
Safety and Preparation
Before beginning the installation, ensure that the power supply is completely shut off at the circuit breaker or fuse box. All installation work should be performed by an accredited professional. Carefully unpack the fixture and identify all components provided in the package. Ensure you have all necessary tools, such as a screwdriver and wire connectors, before starting.
Installation Steps
The installation process begins by preparing the mounting strap. Attach the mounting screws to the strap and secure it to the junction box. Next, determine the desired hanging height by selecting the appropriate number of rods. Thread the fixture wires through the rods before connecting them to the fixture and the canopy. Once the height is set, secure the ring frame and glass shade to the fixture arms using the provided screws.
Wiring the Fixture
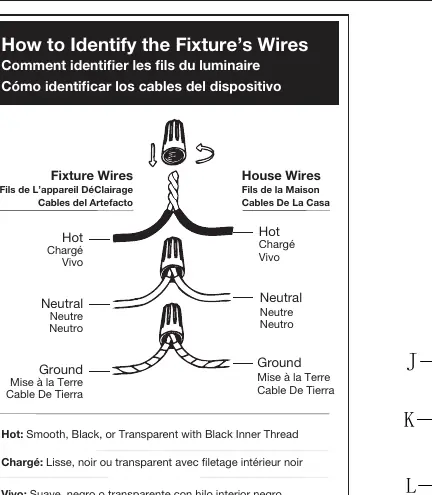
Wiring should be done with the help of an assistant to support the weight of the fixture. Connect the fixture wires to the house supply wires using wire connectors. Match the hot wire (smooth, black, or transparent with black inner thread) to the house hot wire, the neutral wire (ribbed, white, or transparent with white inner thread) to the house neutral wire, and the ground wire (copper, bare metal, green, or transparent with green inner thread) to the house ground wire. If no house ground wire is present, secure the fixture ground wire to the ground screw on the mounting bracket.
Finishing and Maintenance
After wiring, tuck the connections into the junction box and secure the canopy to the ceiling using the decorative nuts. Slide the candle sleeves over the sockets and install the specified light bulbs. Do not exceed the maximum recommended wattage. Once installed, turn the power back on to test the fixture. For maintenance, keep the glass shade clean and periodically check that all mounting hardware remains secure.
Manufacturer information
Golden Lighting
Practical help
Common problems
Fixture is too long or too short
Adjust the number of rods used. To shorten, slide excess rods off the wires and trim the wires, leaving 8-10 inches for connection.
No ground wire in junction box
Locate the ground screw (E) on the mounting bracket and wrap the fixture's ground wire around it, then tighten securely.
Before use
- Shut off power at the circuit breaker
- Verify all parts are present in the yellow bag
- Ensure an assistant is available to support the fixture weight
- Confirm the junction box can support the fixture weight
- Check that the correct light bulbs are available
Images and diagrams
- The wiring diagram illustrates the correct connection of hot, neutral, and ground wires using wire connectors.
- The assembly diagram shows the sequence of mounting the strap, rods, canopy, and glass shade components.
- The identification guide helps distinguish between hot, neutral, and ground wires based on their physical characteristics.
Model compatibility
- Use only the specified bulbs; do not exceed the maximum wattage.
- Fixture is designed for indoor use.

Manual page author
Michael Turner
Technical manual editor
Reviews PDF manuals for structure, safety notes, and practical product details so readers can find the right information quickly.