Lighting / Fixtures
Installation Guide for Golden Lighting 0511-BA3 Vanity Light
Step-by-step installation instructions for the Golden Lighting 0511-BA3 vanity light. This guide covers wiring identification, mounting procedures, and final assembly to ensure a safe and correct installation.
Table of contents
Manual images
Jump to the sectionQuick guide from the manual
This document provides instructions for installing the Golden Lighting 0511-BA3 vanity light. Before beginning, ensure the power is shut off at the circuit breaker. The fixture arrives pre-assembled, requiring only mounting and wiring. Always have an assistant support the weight of the fixture during the wiring process.
Safety and Preparation
Installation should be performed by an accredited professional. Before starting:
- Shut off the power supply at the fuse or circuit breaker.
- Remove the old fixture and the old mounting strap from the wall.
- Unpack the new fixture and locate the yellow bag containing all parts.
- Ensure you have the necessary tools, including a screwdriver.
Wiring Identification
Properly identifying wires is critical for safety. Match the fixture wires to the house wires as follows:
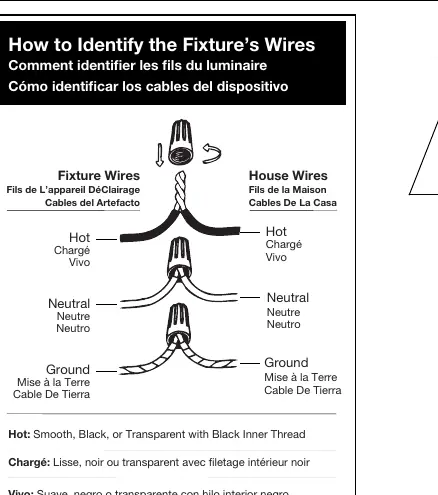
- Hot Wire: Smooth, black, or transparent with black inner thread.
- Neutral Wire: Ribbed, white, or transparent with white inner thread.
- Ground Wire: Copper, bare metal, green, or transparent with green inner thread.
Installation Steps
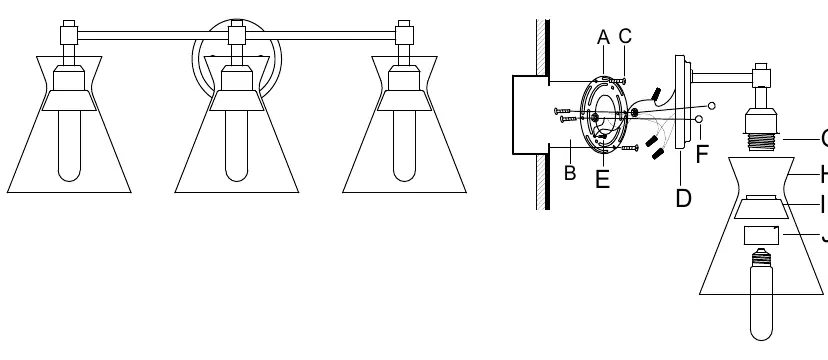
- Prepare Mounting Strap: Attach the mounting strap (A) to the junction box using mounting screws (C). Ensure the strap is level.
- Connect Wires: With an assistant supporting the fixture, connect the fixture wires to the house wires using wire connectors. Twist the ends of the wire pairs together and secure with a connector, ensuring all twists are in the same direction.
- Grounding: If there is no house ground wire, wrap the fixture ground wire around the ground screw (E) on the mounting bracket and tighten.
- Secure Backplate: Place the backplate (D) over the mounting strap (A) so that mounting screws (B) protrude through the holes. Secure with decorative nuts (F) until the fixture is snug against the wall.
- Final Assembly: Hold the shades (H) up to the sockets (G) and secure them using the socket cover (I) and socket ring (J). Adjust the glass to be horizontal and vertical.
- Install Bulbs: Install the appropriate light bulbs (not provided) into the sockets (G), ensuring you do not exceed the maximum recommended wattage.
Manufacturer information
Golden Lighting
Practical help
Common problems
Fixture is not hanging straight
Ensure the mounting strap (A) is level and the backplate (D) is properly aligned with the mounting screws (B) before tightening the decorative nuts.
No ground wire in the junction box
Locate the ground screw (E) on the mounting bracket and wrap the fixture's ground wire around it, then tighten securely.
Before use
- Turn off power at the circuit breaker.
- Verify all parts are present in the yellow bag.
- Have an assistant ready to support the fixture weight during wiring.
- Ensure the junction box is secure.
- Check that you have the correct light bulbs (not provided) within the wattage limit.
Specs in practice
- Neutral Wire
- Ribbed, white, or transparent with white inner thread.
Images and diagrams
- The wiring diagram illustrates the correct connection of fixture wires to house wires using wire connectors.
- The assembly diagram shows the sequence of parts: mounting strap, backplate, decorative nuts, socket, shade, and bulb.
Model compatibility
- Use only specified bulbs.
- Do not exceed the maximum recommended wattage.

Manual page author
David Miller
Documentation analyst
Organizes user manual content into clear summaries, with attention to model details, product context, and everyday usability.