Lighting / Fixtures
Golden Lighting 1088-M Adeline 1-Light Pendant Installation Manual
Comprehensive installation and assembly guide for the Golden Lighting 1088-M Adeline 1-Light pendant fixture, including wiring diagrams and safety guidelines.
Table of contents
Product Overview
The Golden Lighting 1088-M Adeline is a stylish 1-light pendant fixture designed to enhance the aesthetic of your home. This manual provides detailed instructions for the proper assembly, wiring, and installation of the fixture to ensure both safety and optimal performance.
Safety Information
Installation must be performed by an accredited professional. Always shut off the power supply at the fuse or circuit breaker before beginning any work. Ensure that you use only the specified light bulbs and do not exceed the maximum recommended wattage for the socket.
Preparing for Installation
Carefully unpack the fixture and identify all components. Remove the old fixture and mounting hardware from the junction box. Prepare the mounting strap assembly by attaching the nipple and canopy loop. Test the canopy height against the ceiling to ensure a proper fit, adjusting the nipple and loop as necessary before proceeding.
Assembling the Fixture
Determine the desired hanging height by selecting the appropriate number of rods. Feed the fixture wires through the rods and connect them securely. Attach the rod assembly to the canopy loop using the provided chain link connector. Ensure all connections are tight and the wires are pulled taut through the rods.
Wiring the Fixture
Have an assistant support the weight of the fixture during the wiring process. Connect the fixture wires to the house supply wires: hot to hot (black/smooth), neutral to neutral (white/ribbed), and ground to ground (green/copper). Secure all connections with wire connectors, ensuring they are twisted in the same direction. If no house ground wire is present, attach the fixture ground wire to the green ground screw on the mounting bracket.
Finishing the Installation
Once wired, tuck the connections into the junction box. Attach the glass shade to the holder and secure it with the decorative ring. Raise the canopy to the ceiling and tighten the canopy loop collar to secure the fixture in place. Finally, install the appropriate light bulb and restore power to test the unit.
Manufacturer information
Golden Lighting
Practical help
Common problems
Fixture does not light up after installation
Check if the bulb is properly installed, ensure the power is on at the breaker, and verify that all wire connections are secure and correct.
Canopy does not sit flush against the ceiling
Adjust the height of the nipple and canopy loop on the mounting strap until the canopy fits snugly.
Before use
- Shut off power at the circuit breaker
- Verify all parts are present in the package
- Ensure you have the correct light bulb type
- Confirm the junction box can support the fixture weight
- Have an assistant available for installation
Specs in practice
- Neutral Wire
- Completes the circuit; identified by white, ribbed, or transparent wire with white inner thread.
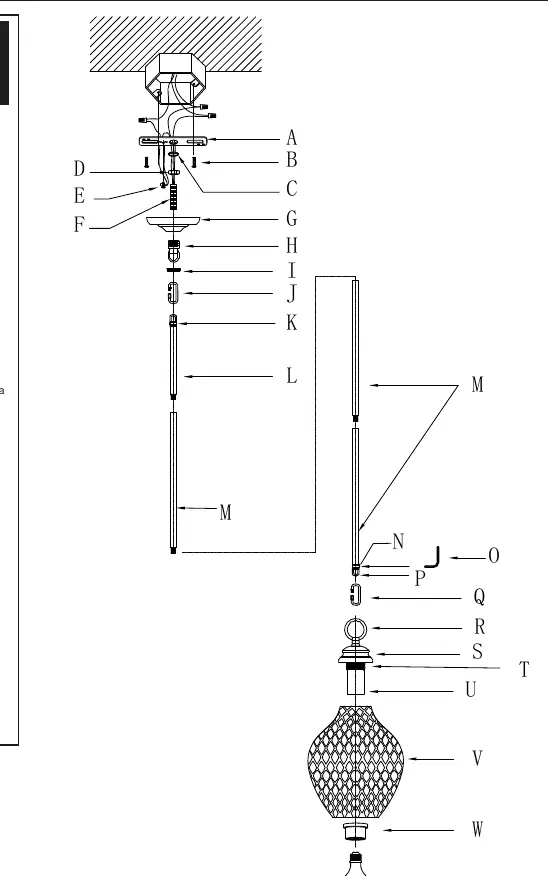
Images and diagrams
- The wiring diagram illustrates the correct pairing of fixture wires to house wires using wire connectors.
- The assembly diagram shows the sequence of components from the mounting strap down to the glass shade and bulb.
Model compatibility
- Use only bulbs that meet the fixture's wattage specifications.
- Ensure the junction box is suitable for pendant light installation.

Manual page author
Emily Carter
User documentation editor
Prepares concise manual descriptions and highlights the most useful setup, operation, and maintenance information for readers.