Lighting / Outdoor Landscape
Golden Lighting 1094-OWM Outdoor Wall Light Installation Guide
Comprehensive installation and assembly instructions for the Golden Lighting 1094-OWM outdoor wall light fixture, including wiring diagrams and safety guidelines.
Table of contents
Product Overview
The Golden Lighting 1094-OWM is a stylish outdoor wall light designed to enhance the aesthetic and functionality of your home exterior. This fixture arrives pre-assembled, making the installation process straightforward for an accredited professional. Proper installation is essential to ensure both safety and the longevity of the product.
Safety Information
Before beginning any installation work, it is critical to shut off the power supply at the main fuse or circuit breaker panel. All electrical work must be performed by a qualified and accredited professional to prevent electrical shock or fire hazards. Always use only the specified light bulbs and ensure that the maximum wattage rating of the fixture is never exceeded.
Installation Preparation
Carefully unpack the fixture and locate the yellow bag containing all necessary hardware. Remove any old mounting straps from the wall. The mounting strap provided contains multiple sets of threaded holes; select the pair that aligns with your junction box and the fixture's backplate. Secure the mounting strap to the junction box using the provided screws, ensuring the mounting screws are horizontal and properly aligned.
Wiring the Fixture
For safety, have an assistant support the weight of the fixture while you complete the electrical connections. Connect the fixture wires to the house supply wires using wire connectors. Match the wires as follows: hot to hot (smooth, black, or transparent with black inner thread), neutral to neutral (ribbed, white, or transparent with white inner thread), and ground to ground (copper, bare metal, green, or transparent with green inner thread). If no house ground wire is present, secure the fixture ground wire to the ground screw on the mounting bracket.
Finishing the Installation
Once the wiring is secure, tuck the wires into the junction box and place the backplate over the mounting screws. Secure the backplate using the decorative nuts and washers. Attach the glass shade to the lamp holder and secure it with the socket ring. Install the appropriate light bulb. Finally, apply a silicone sealant around the gap between the fixture enclosure and the mounting surface to prevent water ingress, while leaving a small gap at the bottom to allow for drainage.
Manufacturer information
Golden Lighting
Practical help
Common problems
Fixture does not light up after installation
Verify that the power is turned on at the circuit breaker and check that the light bulb is properly installed and functional.
Water leaking into the fixture
Ensure that silicone sealant was applied correctly around the top and sides of the fixture, leaving the bottom gap open for drainage.
Before use
- Shut off power at the circuit breaker
- Verify all parts are present in the yellow bag
- Ensure the mounting strap is securely attached to the junction box
- Confirm wire connections are tight and secured with connectors
- Check that the light bulb wattage does not exceed the maximum rating
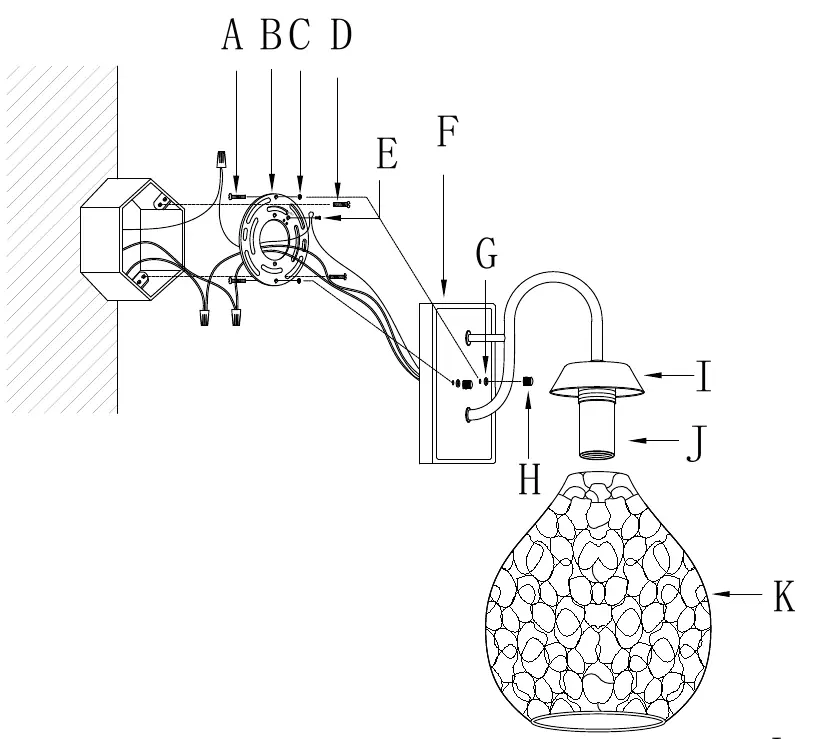
Images and diagrams
- The wiring diagram illustrates the correct connection of hot, neutral, and ground wires.
- The assembly diagram shows the sequence of mounting the strap, backplate, glass shade, and socket ring.
- The identification guide helps distinguish between hot, neutral, and ground wires based on their physical characteristics.
Model compatibility
- Designed for outdoor wall mounting.
- Requires an existing junction box for installation.

Manual page author
David Miller
Documentation analyst
Organizes user manual content into clear summaries, with attention to model details, product context, and everyday usability.