Lighting / Outdoor Landscape
Golden Lighting 1099-OWS Outdoor Wall Light Installation Guide
Comprehensive installation and safety guide for the Golden Lighting 1099-OWS outdoor wall light, including wiring instructions and maintenance tips.
Table of contents
Product Overview
The Golden Lighting 1099-OWS is a stylish outdoor wall light designed to enhance the aesthetic and functionality of your home exterior. This fixture arrives fully assembled, allowing for a straightforward installation process. It is designed to provide reliable ambient lighting while withstanding outdoor conditions when installed correctly.
Safety and Preparation
Before beginning the installation, ensure that all power is shut off at the circuit breaker or fuse box. Installation should only be performed by an accredited professional to ensure safety and compliance with local electrical codes. Carefully unpack the fixture and locate all included hardware. Ensure you have the necessary tools, including a screwdriver, to complete the mounting process.
Installation Steps
The installation begins by securing the mounting strap to your junction box. Ensure the mounting screws are horizontal and properly aligned with the fixture's backplate. Once the strap is secure, have an assistant support the weight of the fixture while you connect the electrical wires. Connect the hot, neutral, and ground wires according to the provided wiring diagram, ensuring all connections are secure and properly insulated with wire connectors. If your junction box lacks a ground wire, use the provided ground screw on the mounting bracket to secure the fixture's ground wire.
After wiring, place the backplate over the mounting strap and secure it using the decorative nuts and washers. Adjust the lampshade level by loosening the small adjustment screw with the provided tool, then tighten it firmly once the desired position is achieved. Attach the glass shade set to the socket and secure it with the socket ring. Finally, install the appropriate light bulb, ensuring you do not exceed the maximum wattage specified for the fixture.
Maintenance and Sealing
To protect your fixture from moisture, apply a silicone sealant caulking around the gap between the enclosure and the mounting surface. It is critical to leave a small gap unsealed at the bottom of the fixture to allow for the drainage of any water that may accumulate inside. Regularly inspect the fixture for any signs of wear or damage to maintain its performance and safety over time.
Manufacturer information
Golden Lighting
Practical help
Common problems
Fixture does not light up after installation
Check if the power is turned on at the breaker, verify all wire connections are secure, and ensure the light bulb is functional and properly installed.
Water accumulation inside the fixture
Ensure a small gap was left unsealed at the bottom of the fixture during the silicone caulking process to allow for proper drainage.
Before use
- Shut off power at the circuit breaker.
- Verify all parts are present in the package.
- Ensure the junction box is compatible with the mounting strap.
- Have an assistant available to support the fixture weight during wiring.
- Confirm the light bulb wattage does not exceed the maximum rating.
- Prepare silicone sealant for weatherproofing.
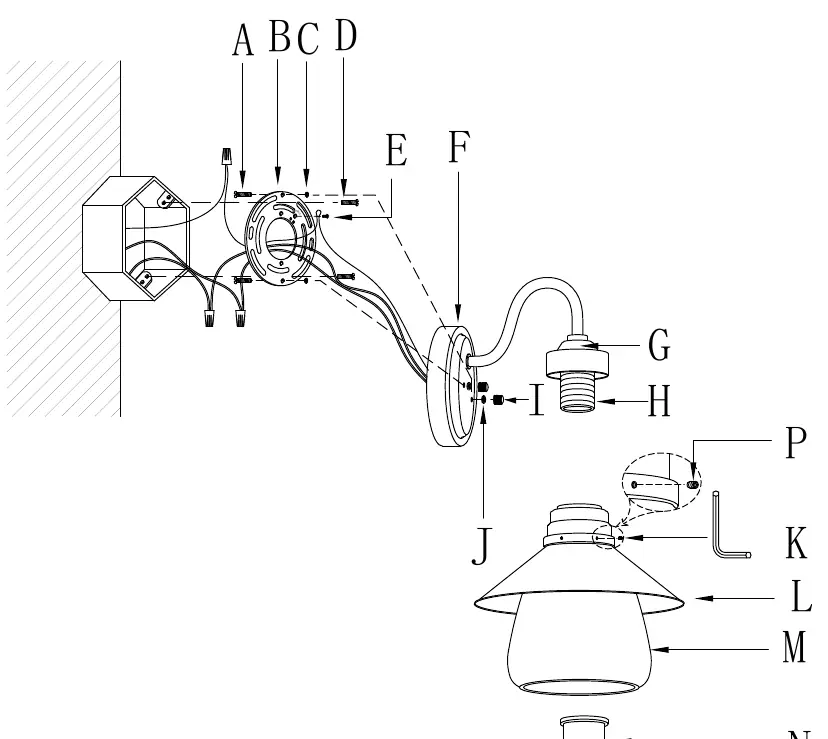
Images and diagrams
- The wiring diagram illustrates the correct connection of hot, neutral, and ground wires between the house supply and the fixture.
- The assembly diagram shows the sequence of mounting the strap, backplate, and glass shade components.
- The adjustment screw (P) is highlighted for leveling the lampshade.
Model compatibility
- Installation must be performed by an accredited professional.
- Use only specified bulb types and wattages.
- Ensure the mounting surface is suitable for outdoor wall-mounted fixtures.

Manual page author
Emily Carter
User documentation editor
Prepares concise manual descriptions and highlights the most useful setup, operation, and maintenance information for readers.