Lighting / Fixtures
Golden Lighting Kinsley 2-Light Semi-Flush Ceiling Fixture (0865-FM)
Installation and assembly guide for the Kinsley 2-Light Semi-Flush Ceiling Fixture. Includes wiring instructions, safety precautions, and mounting steps for a professional-grade installation.
Table of contents
Product Overview
The Golden Lighting Kinsley 0865-FM is a 2-light semi-flush ceiling fixture designed to provide both ambient and task lighting. This elegant fixture is delivered pre-assembled, allowing for a straightforward installation process. It is designed to be mounted directly to a standard junction box, providing a clean and secure look for your ceiling.
Safety Information
Important: All installation work must be performed by an accredited professional. Before beginning any work, ensure that the power supply is completely shut off at the fuse or circuit breaker. Never exceed the maximum recommended wattage for the light bulbs used in this fixture.
Preparing for Installation
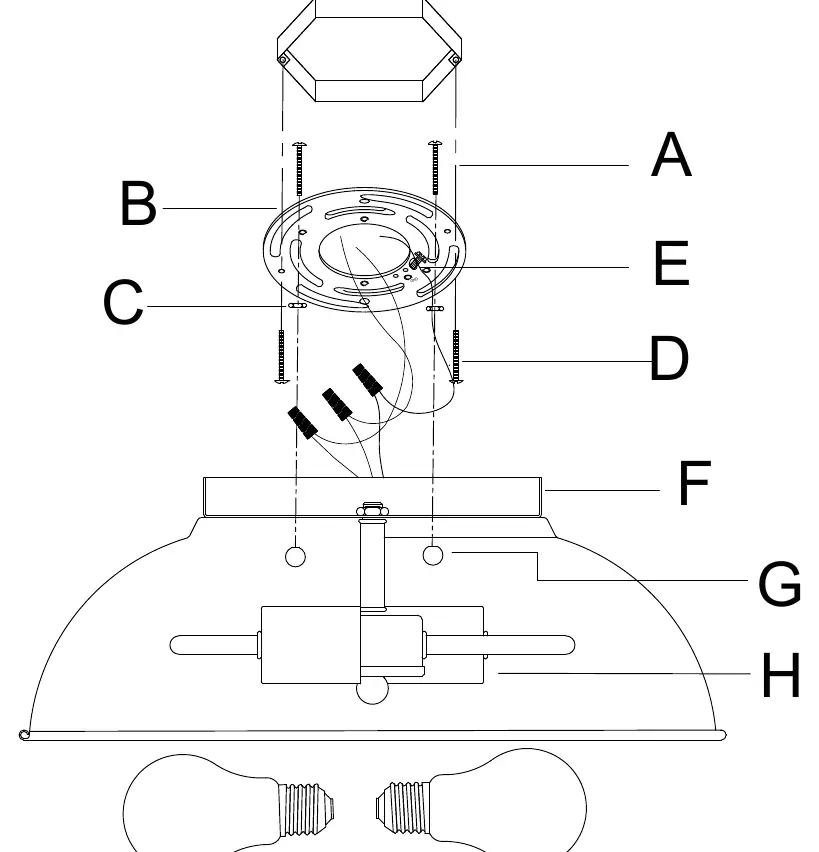
Carefully unpack the fixture and locate the yellow parts bag. Before mounting, remove the old fixture and the existing mounting strap from the wall or ceiling. Ensure the new mounting strap (B) is properly aligned with the junction box holes. Use the provided mounting screws (A & D) to secure the strap firmly to the junction box. Test the canopy (F) against the mounting strap to ensure the screws protrude correctly before final installation.
Wiring and Connection
For safety, have an assistant support the weight of the fixture during the wiring process. Connect the fixture wires to the house supply wires using the following color-coding:
- Hot: Connect to the black, smooth, or transparent wire with a black inner thread.
- Neutral: Connect to the white, ribbed, or transparent wire with a white inner thread.
- Ground: Connect to the green, copper, or transparent wire with a green inner thread.
If no house ground wire is present, use the provided ground screw (E) on the mounting bracket to secure the fixture's ground wire. Ensure all wire connections are twisted together securely and covered with appropriate wire connectors.
Finishing the Installation
Once the wiring is complete, tuck the wires neatly into the junction box. Align the canopy (F) with the mounting screws (A) and lift it until it sits flush against the ceiling. Secure the canopy using the decorative nuts (G). Finally, install the appropriate light bulbs into the sockets (H) according to the fixture's specifications, turn the power back on, and test the light.
Manufacturer information
Golden Lighting
Practical help
Common problems
Fixture does not light up after installation
Check if the power is on at the circuit breaker, ensure bulbs are screwed in correctly, and verify that all wire connections are secure and properly matched.
Canopy does not sit flush against the ceiling
Adjust the length of the mounting screws (A) by tightening or loosening the nuts (C) on the mounting strap until the canopy fits snugly.
Before use
- Shut off power at the circuit breaker.
- Verify all parts are present in the yellow bag.
- Ensure the junction box is secure.
- Have an assistant ready to hold the fixture.
- Identify house wires (Hot, Neutral, Ground).
- Confirm bulb wattage does not exceed the maximum limit.
Images and diagrams
- A: Mounting screws
- B: Mounting strap
- C: Nuts for mounting screws
- D: Junction box screws
- E: Ground screw
Model compatibility
- Requires a standard junction box for mounting.
- Compatible with dimmers if used with dimmable bulbs.

Manual page author
David Miller
Documentation analyst
Organizes user manual content into clear summaries, with attention to model details, product context, and everyday usability.