Garden / Lawn Mowers
Operator Manual for Greenworks PRO 19-inch 60V Lawn Mower MO60L08
Quick guide for the Greenworks PRO 19-inch 60V Lawn Mower (MO60L08). Includes assembly, operation, maintenance, troubleshooting, and technical specifications.
Quick answers from the manual
Quick answer
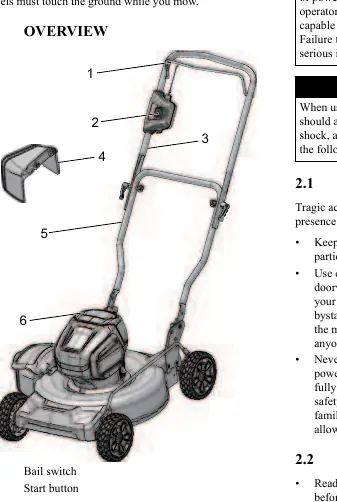
- To start the Greenworks PRO 19-inch 60V Lawn Mower, insert the safety key, press and hold the start button, and pull the bail switch toward the handle bar. p. 10
Key actions
- Start the mower p. 10
- Stop the mower p. 10
- Adjust cutting height p. 9
First start
- Unpack and assemble handle p. 8, 9
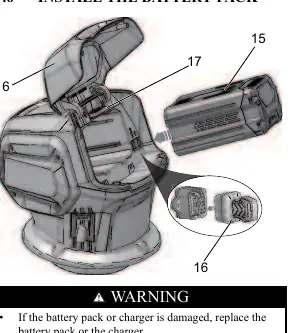
- Install battery p. 10
Problems and fixes
Machine cuts grass unevenly
Examine mowing area or move wheels to a higher position.
p. 12Maintenance and reset
- Blade replacement p. 11
Technical specifications
| Parameter | Value | Meaning | Pages |
|---|---|---|---|
| Voltage | 60 V | Operating voltage | p. 12 |
| Deck size | 19" | Cutting width | p. 12 |
Where to find it in the PDF
- Installation p. 8, 9
- Operation p. 10, 11
- Maintenance p. 11
- Troubleshooting p. 12
Table of contents
Manual images
Click an image to enlargeQuick guide from the manual
This manual provides instructions for the safe operation and maintenance of the Greenworks PRO 19-inch 60V Lawn Mower. Always remove the battery pack and safety key before performing any maintenance, cleaning, or adjustments to prevent accidental starting.
Assembly
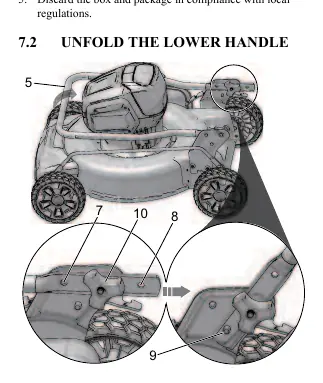
Unfolding the lower handle: Push the lower handle ends inward to release them from the brackets, pull up, and engage the bottom handle hole with the lock pin on both sides. Tighten the handle knobs.
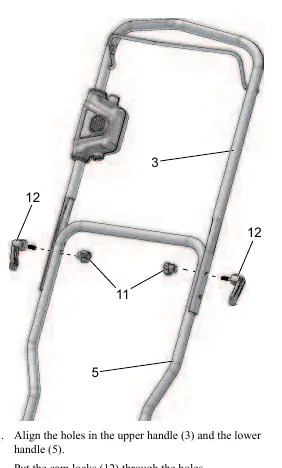
Installing the upper handle: Align the holes in the upper and lower handles, insert the cam locks, and tighten the knobs on both sides.
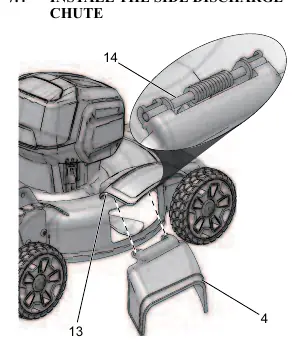
Side discharge chute: Open the side discharge door, align the recesses of the chute below the pivot, and close the door. Ensure the mulch plug is installed if using the side discharge.
Operation
Starting the machine: Insert the safety key, press and hold the start button, and pull the bail switch toward the handle bar. Release the start button to begin mowing.
Stopping the machine: Simply release the bail switch.
Slope operation: Do not mow on slopes greater than 15 degrees. Always mow across the face of the slope, never up and down. Use extreme caution when changing direction.
Maintenance
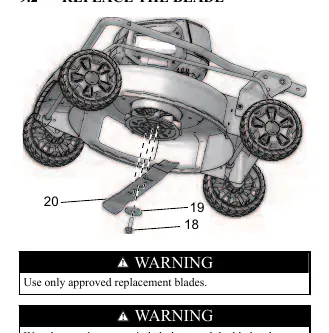
Blade replacement: Stop the machine, remove the battery and safety key, and turn the mower on its side. Use a piece of wood to block the blade, remove the mounting bolt and spacer, and replace the blade. Ensure the arrows on the fan engage the holes on the blade.
Cleaning: Keep the machine free of grass and debris. Do not use water or a hose to clean the mower; use a dry cloth.
Storage
Remove the battery and safety key. Clean the machine thoroughly. Ensure the motor is cool before storing in a dry area out of reach of children.
Manufacturer information
Greenworks
Practical help
Common problems
Machine does not start
Check if the battery is charged, ensure the safety key is inserted, and check if the bail switch is defective.
High vibration
The blade may be unbalanced or worn. Replace the blade.
Machine stops during mowing
Blade height may be too low, battery is out of power, or the motor is overheated. Increase blade height, charge battery, or let the machine cool.
Before use
- Check for loose or damaged parts (screws, nuts, bolts)
- Ensure the battery is fully charged
- Clear the lawn of stones, sticks, and debris
- Wear eye protection
- Verify the blade is sharp and balanced
Specs in practice
- No load speed
- 3300 RPM
- Cutting height
- Adjustable between 1 1/4 and 4 inches
Images and diagrams
- Overview of controls including bail switch, start button, and battery door
- Handle unfolding and locking mechanism
- Side discharge chute installation
- Blade assembly and replacement procedure
Model compatibility
- Compatible with Greenworks battery models: LB602, LB6025, LB603, LB604, LB605, LB606 and other BAC series.
- Compatible with charger models: CAC801, CH60DP01, CH60R00, 60DPC10A and other CAC series.

Manual page author
Michael Turner
Technical manual editor
Reviews PDF manuals for structure, safety notes, and practical product details so readers can find the right information quickly.