Tools / Saws
User Manual for Greenworks 2600502 13 Amp 20-Inch Corded Snow Thrower
Quick guide for the Greenworks 2600502 13 Amp 20-Inch Corded Snow Thrower. Includes assembly instructions, operation tips, maintenance procedures, and troubleshooting.
Quick answers from the manual
Quick answer
- The Greenworks 2600502 is a 13 Amp corded snow thrower. To start, hold the safety switch button and pull the bail lever. Always use an outdoor-rated extension cord. p. 8
Key actions
- Start the machine p. 8
- Adjust discharge chute p. 9
First start
- Assemble handles, chute deflector, and control rod before connecting to power. p. 7, 8
Problems and fixes
Machine does not start
Check switch, extension cord connection, and power outlet.
p. 11Technical specifications
| Parameter | Value | Meaning | Pages |
|---|---|---|---|
| Voltage | 120 V, 60 Hz, 13 A | Power requirements | p. 12 |
Where to find it in the PDF
- Installation p. 7, 8
- Operation p. 8, 9
- Maintenance p. 10, 11
Table of contents
Manual images
Click an image to enlargeQuick guide from the manual
This manual provides instructions for the Greenworks 2600502 13 Amp 20-Inch Corded Snow Thrower. Key operations include proper assembly of the handles and chute, using an outdoor-rated extension cord with the cord retainer, and safe operation techniques. Always inspect the area for foreign objects before use and wear appropriate winter clothing.
Assembly and Installation
Before operating, ensure the machine is fully assembled:
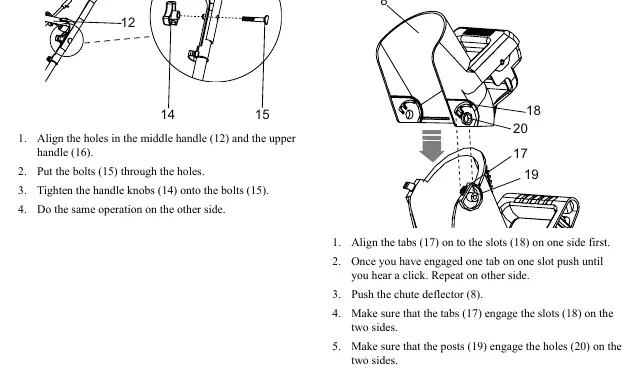
- Upper and Middle Handle: Align holes in the handles, insert bolts, and tighten with handle knobs.
- Chute Deflector: Align tabs with slots on the chute and push until you hear a click. Ensure posts engage the holes.
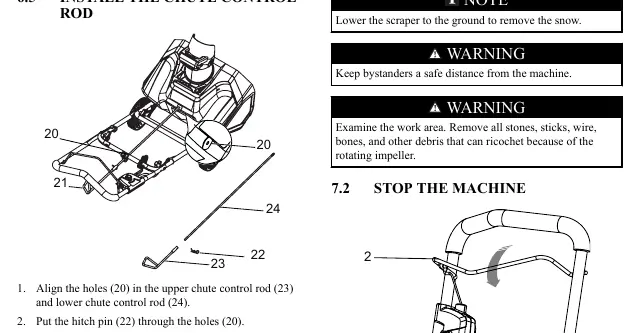
- Chute Control Rod: Align holes in the upper and lower control rods, secure with the hitch pin, and insert the rod into the bracket on the deck.
Operation
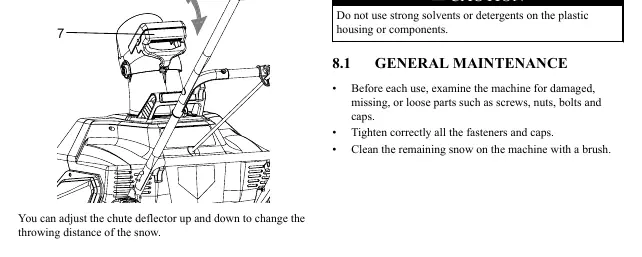
To start the machine, hold the safety switch button and pull the bail lever. To stop, simply release the bail lever. Use the grip handle to adjust the discharge chute 180 degrees and the trigger on the chute deflector to adjust the throwing distance.
Maintenance
Regular maintenance is essential for longevity:
- General: Before each use, check for loose or damaged parts and tighten fasteners.
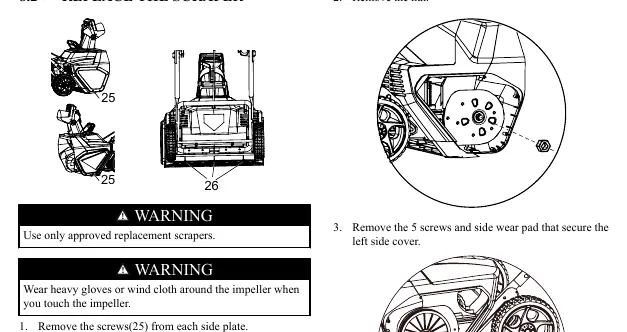
- Scraper Replacement: Remove screws from side plates, remove the old scraper, install the new one, and secure with mounting screws.
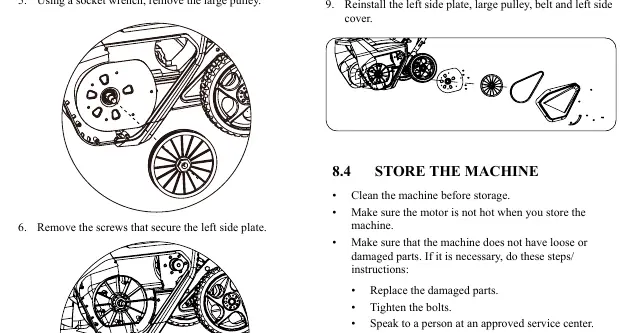
- Impeller Replacement: Requires removing side covers, the belt, and the large pulley to access the impeller.
- Storage: Clean the machine, ensure the motor is cool, and store in a dry, locked-up place.
Troubleshooting
If the machine fails to start, check the switch, ensure the extension cord is connected to both the machine and a live 120V AC outlet. If the handle is not in position, adjust the height and ensure knobs are aligned. If the impeller does not turn while the engine is on, check for a damaged belt.
Technical Data
- Voltage: 120 V, 60 Hz, 13 A
- No load speed: 2,600 RPM
- Clearing width: 20 inches (50.8 cm)
- Clearing depth: 10 inches (25.4 cm)
- Weight: 32.2 lbs (14.6 kg)
Manufacturer information
Greenworks
Practical help
Common problems
Handle not in position
Adjust the height of the handle and ensure that the knobs and bolts are aligned correctly.
Machine does not start
Check if the switch is defective, ensure the extension cord is connected to the plug, and verify the power outlet is live (120V AC).
Engine is on, but impeller does not turn
The belt may be damaged; replace the belt.
A thin layer of snow stays behind
The scraper is likely damaged; replace the scraper.
Before use
- Inspect the area for stones, sticks, wires, and other foreign objects.
- Check for loose or damaged parts (screws, nuts, bolts).
- Ensure the extension cord is suitable for outdoor use.
- Verify the scraper is in good condition.
- Ensure the motor is not hot before storage.
Specs in practice
- Clearing width
- The width of the path the snow thrower clears in one pass (20 inches).
- Clearing depth
- The maximum depth of snow the machine is designed to clear (10 inches).
Images and diagrams
- Exploded view shows part numbers for ordering replacements.
- Handle installation diagrams show bolt and knob placement.
- Chute deflector diagram shows tab and slot alignment.
Model compatibility
- Requires 120V AC, 60Hz power source.
- Use only extension cords designated for outdoor use (marked 'W-A' or 'W').

Manual page author
Emily Carter
User documentation editor
Prepares concise manual descriptions and highlights the most useful setup, operation, and maintenance information for readers.