Furniture / Home Furnishing
User Manual for Hampton Bay 16-Inch Stand Fan FS40-21MA
Quick guide for the Hampton Bay 16-Inch Stand Fan (Model FS40-21MA). Includes assembly instructions, safety warnings, operation settings, and fuse replacement procedures.
Table of contents
Manual images
Click an image to enlargeQuick guide from the manual
This document provides instructions for the Hampton Bay 16-Inch Stand Fan (Model FS40-21MA). For questions, missing parts, or service, contact Hampton Bay Customer Service at 1-855-HD-HAMPTON or visit HAMPTONBAY.COM.
Important Safety Warnings:
- This appliance has a polarized plug; if it does not fit, contact a qualified electrician.
- Do not use with any solid-state speed control device.
- The product contains overload protection (fuse). If the fuse blows, unplug the unit and replace it according to the servicing instructions.
- Do not operate the fan with a damaged cord or plug.
- Keep out of reach of children and do not leave the fan running unattended.
- Household use only.
Assembly
Cross Stand & Column Unit:
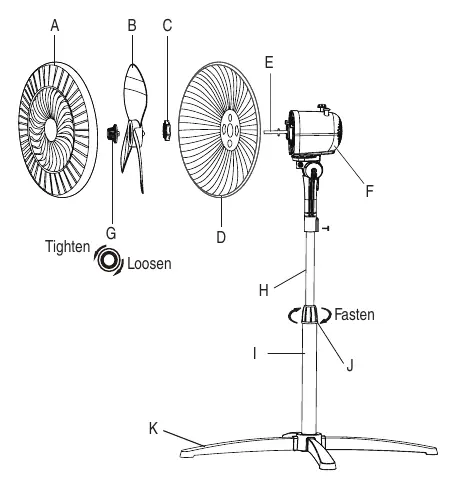

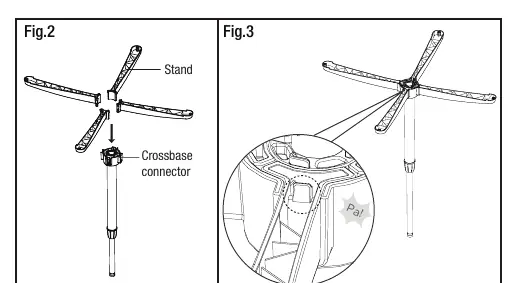
- Insert the pole assembly into the crossbase connector from top to bottom. Ensure it is installed in place (check the through hole at the bottom of the connector).
- Insert the 4 stands into the crossbase connector until fixed.
- Loosen the height adjustment ring on the extension pole to adjust the internal pole to the desired height, then fasten the ring.
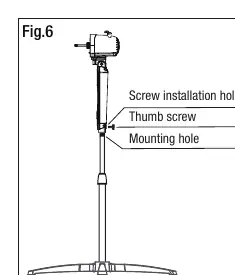
- Attach the head unit to the internal pole by loosening the thumb screw on the bottom of the head unit, placing it on the pole, and tightening the screw in alignment with the groove.
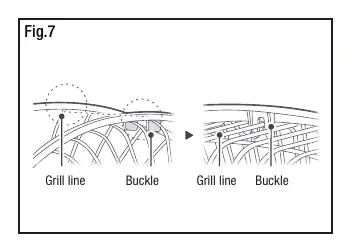
Front and Rear Guard Installation:
- Align the front grill buckle with the top line of the rear grill.
- Press the grill with both hands in sequence until you hear a click.
- Secure the self-locking installation.
Operation
- Speed Control: Use the knob switch: 0 (Off), 1 (Low), 2 (Medium), 3 (High).
- Oscillation: Push down or pull up the clutch knob on the motor housing to start or stop oscillation.
- Tilt Adjustment: Push the grilles lightly upward or downward to the desired direction.
- Height Adjustment: Loosen the height adjustment ring, adjust the pole height, and firmly re-tighten the ring.
Maintenance and Cleaning
Cleaning:
- Always unplug the fan before cleaning.
- Clean plastic parts with mild soap and a damp cloth or sponge.
- Remove soap film with clean water.
- Ensure no water or liquid enters the motor.
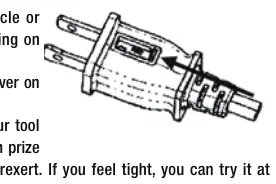
Fuse Replacement:
- Unplug the fan.
- Slide open the fuse access cover on the top of the attachment plug.
- Use a tool to carefully pry the fuse out of the slot.
- Replace only with a 2.5 Amp, 125 Volt fuse.
- Slide the fuse cover closed.
Official resources from the manual
Manufacturer information
Hampton Bay
Practical help
Common problems
Fan does not run
Check if the fuse in the plug is blown. Replace with a 2.5 Amp, 125 Volt fuse if necessary.
Fuse blows repeatedly
This indicates a short-circuit or overload. Discard the product or return it to an authorized service facility.
Fan head does not oscillate
Check the position of the clutch knob on the motor housing. Push down or pull up to toggle oscillation.
Before use
- Ensure the fan is placed on a stable surface to avoid overturning.
- Verify the plug fits the outlet correctly (polarized plug).
- Check that all parts (grill, blade, poles, stand) are present and assembled.
- Ensure the rotor guard is fully assembled and not removed.
- Confirm the power cord is not routed under carpets or furniture.
Specs in practice
- Speed Settings
- 0 (Off), 1 (Low), 2 (Medium), 3 (High).
Images and diagrams
- Fig. 1-3: Assembly of the cross stand and column unit.
- Fig. 6: Attaching the head unit to the internal pole.
- Fig. 7-9: Installing the front and rear grill guards.
- Fuse replacement diagram: Shows how to slide the fuse cover on the plug.
Model compatibility
- Do not use with any solid-state speed control device.
- For household use only.
- Do not use in windows where rain may create an electrical hazard.

Manual page author
Michael Turner
Technical manual editor
Reviews PDF manuals for structure, safety notes, and practical product details so readers can find the right information quickly.