Plumbing / Showers & Tubs
Installation and User Guide for Hansgrohe Locarno Diverter Tub Spout 04814XX0 / 04815XX0
Quick guide for installing and maintaining the Hansgrohe Locarno diverter tub spout (models 04814XX0 and 04815XX0). Includes installation steps for 1/2" and 3/4" NPT, cleaning tips, and warranty information.
Table of contents
Manual images
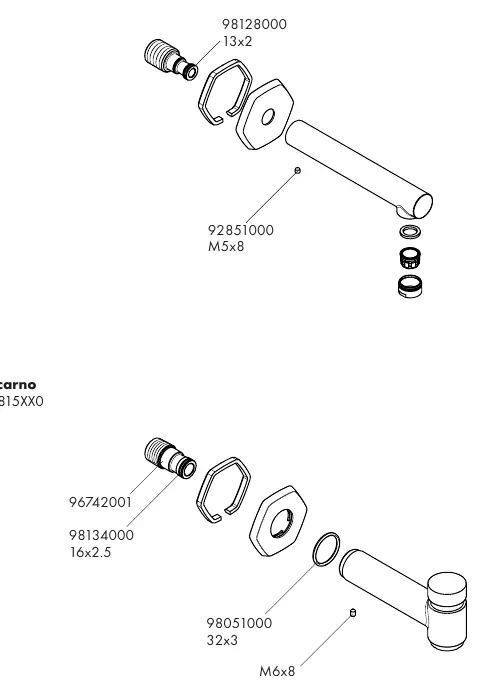
Click an image to enlargeQuick guide from the manual
This document provides installation and maintenance instructions for the Hansgrohe Locarno diverter tub spout, models 04814XX0 and 04815XX0. Important: Model 04815XX0 is designed exclusively for use with a pressure balance valve. Do not use it with a thermostatic mixing valve or the Hansgrohe Pressure Balance Valve with 2-Way Diverter. For best results, Hansgrohe recommends that this unit be installed by a licensed, professional plumber.
Installation Considerations
Before beginning, ensure you have all necessary tools and supplies. The installation requires a pipe fitting recessed 3/8" (10 mm) behind the surface of the finished wall. Always seal the wall around the mounting piece with waterproof sealant to prevent water damage.
Tools Required
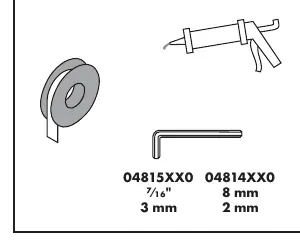
- Plumber's tape
- Waterproof sealant
- Allen wrench (7/16" or 8 mm, depending on the model)
Installation (1/2" NPT)
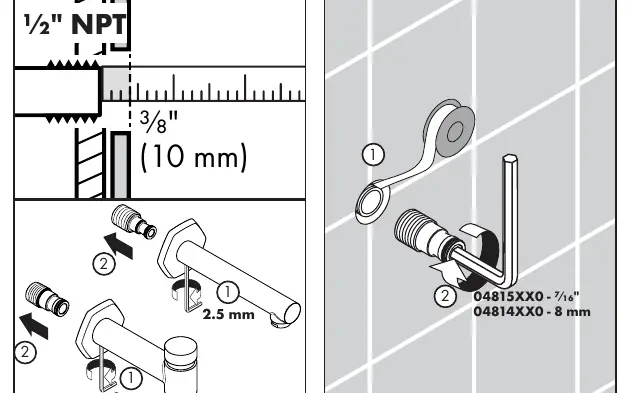
- Ensure the 1/2" NPT male nipple is recessed 3/8" (10 mm) behind the finished wall.
- Loosen the screw and remove the mounting piece from the spout.
- Wrap the threads on the nipple with plumber's tape.
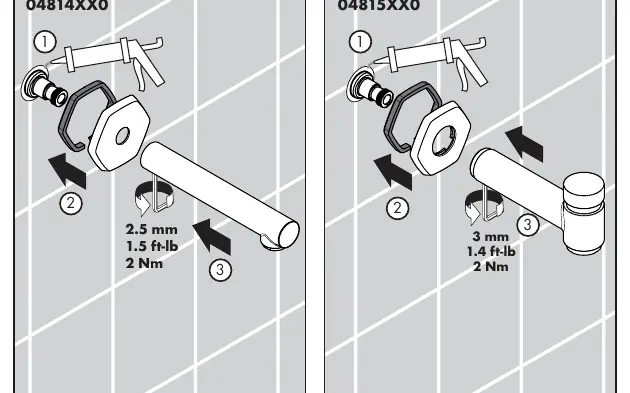
- Install the mounting piece. Tighten using the appropriate Allen wrench (7/16" for 04815XX0 or 8 mm for 04814XX0).
- Seal the wall around the mounting piece with waterproof sealant.
- Install the spout and tighten the screw.
Installation (3/4" NPT)
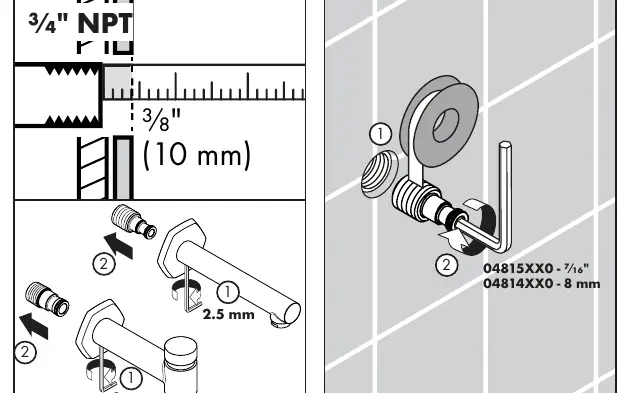
- Ensure the 3/4" female threaded pipe fitting is recessed 3/8" (10 mm) behind the finished wall.
- Loosen the screw and remove the mounting piece from the spout.
- Wrap the mounting piece with plumber's tape.
- Install the mounting piece. Tighten using the appropriate Allen wrench (7/16" for 04815XX0 or 8 mm for 04814XX0).
- Seal the wall around the mounting piece with waterproof sealant.
- Install the spout and tighten the screw.
Cleaning and Maintenance
To maintain the product finish and functionality:
- Clean the product when needed to prevent mineral scale and soap residue buildup.
- Use a cleaning agent specifically intended for the product type.
- Do not use: Cleaners containing hydrochloric acid, formic acid, lye, or acetic acid; abrasive powders, pads, or brushes; steam cleaners; or "no-rinse" cleaning agents.
- Do not spray cleaners directly onto the product; spray onto a soft cloth or sponge instead.
- Rinse thoroughly with clear water and polish dry after cleaning.
- Do not store cleaning agents under the product (e.g., in a vanity unit) as fumes may cause damage.
Warranty
Hansgrohe, Inc. offers a limited warranty on its products. The warranty does not cover damage resulting from misuse, outdoor use, freezing water, excessive water pressure, pipe corrosion, or the use of improper cleaning agents. For warranty service or questions, contact Hansgrohe Technical Service at 800-334-0455.
Manufacturer information
Hansgrohe SE
Practical help
Common problems
04815XX0 Compatibility
Must be used with a pressure balance valve only. Do not use with a thermostatic mixing valve or Hansgrohe Pressure Balance Valve with 2-Way Diverter.
Water Damage
Failure to seal the wall around the mounting piece with waterproof sealant may result in water damage.
Before use
- Ensure installation is performed by a licensed, professional plumber.
- Verify the pipe fitting is recessed 3/8" (10 mm) behind the finished wall.
- Have the correct Allen wrench ready (7/16" for 04815XX0 or 8 mm for 04814XX0).
- Obtain plumber's tape and waterproof sealant.
- Keep the receipt as proof of purchase for warranty claims.
Images and diagrams
- Installation diagrams illustrate the required recess depth of 3/8" (10 mm) for both 1/2" and 3/4" NPT connections.
- The diagrams show the specific Allen wrench sizes required for each model during the mounting piece installation.
- The sealing diagram highlights the necessity of applying waterproof sealant around the mounting piece.
Model compatibility
- 04815XX0 is restricted to pressure balance valves only.
- Warranty is limited to products purchased from authorized sellers in the US or Canada.

Manual page author
Michael Turner
Technical manual editor
Reviews PDF manuals for structure, safety notes, and practical product details so readers can find the right information quickly.