Plumbing / Sinks Faucets
Installation and User Guide for Hansgrohe SAM Set Plus 04527XX0
Complete installation, operation, and maintenance guide for the Hansgrohe SAM Set Plus 04527XX0 shower system. Includes step-by-step mounting instructions, safety warnings, and cleaning tips.
Table of contents
Manual images
Jump to the sectionImportant Information
The Hansgrohe SAM Set Plus 04527XX0 is a shower system designed for use in existing shower installations. For best results, Hansgrohe recommends that this product be installed by a licensed, professional plumber. Please read these instructions thoroughly before beginning installation and ensure you have all necessary tools.
Installation Considerations
- Wall Compatibility: The included toggle bolts are suitable for tile or other solid surface walls. They are not suitable for acrylic or fiberglass shower enclosures; contact the enclosure manufacturer for recommended mounting hardware.
- Temperature Safety: To prevent scald injury, the maximum output temperature of the shower valve must not exceed 120°F (49°C). In Massachusetts, the limit is 112°F (44°C).
- Backflow Protection: Protection against backflow is provided by a check valve and a self-resetting diverter.
Tools Required
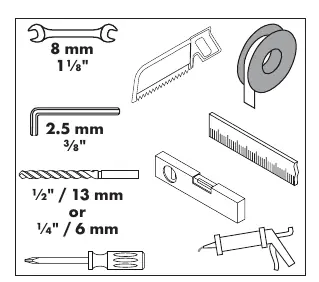
- 8 mm / 1 1/8" wrench
- 2.5 mm / 3/8" hex key
- 1/2" / 13 mm or 1/4" / 6 mm drill bit
- Level
- Waterproof sealant
- Plumbers thread tape
Installation Steps
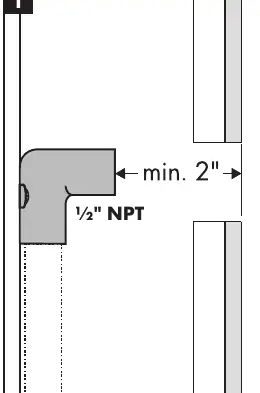

Rough-in
This unit requires a properly anchored 1/2" NPT elbow (not included), a minimum of 2" (50 mm) behind the surface of the finished wall. Wrap the NPT threads on the mounting nipple with plumbers thread tape and screw the nipple into the elbow.
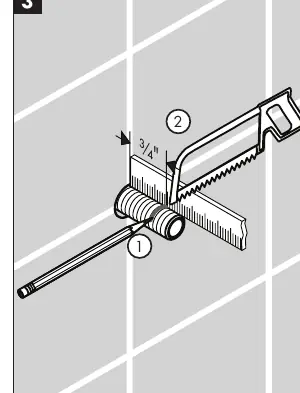
Mounting
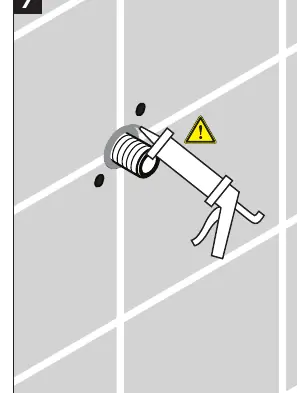
Mark a point on the nipple 3/4" (20 mm) from the surface of the finished wall and cut the nipple at that point. Install the mounting piece. Ensure the mounting piece is level and mark the positions for the screw holes. Drill the holes, taking care not to drill into water lines. Seal the wall around the nipple using waterproof sealant. If using toggle bolts, remove the bolt from the strap toggle, slide the metal channel into the hole, pull the straps to secure the channel against the wall, and slide the cap forward until the flange is flush with the wall surface. Break the straps even with the cap flange.
Final Assembly
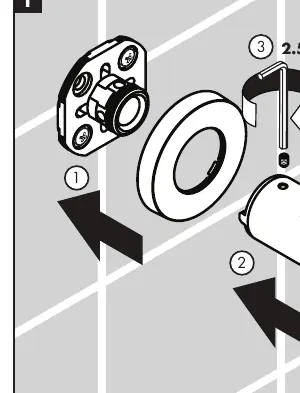
Position the mounting piece over the nipple and caps, then install it using the provided bolts. Install the escutcheon, then install the SAM Set Plus unit and tighten the set screw.
User Instructions
The diverter on the SAM Set Plus does not turn the water off. It is not possible to use the showerhead and the handshower simultaneously. If the diverter does not toggle, turn the water off at the valve to reset the diverter to the showerhead position.
Maintenance and Cleaning
Cleaning: Prevent mineral scale and soap residue buildup by cleaning when necessary. Do not use cleaning agents containing hydrochloric acid, formic acid, lye, or acetic acid, as these will damage the product. Do not use abrasive powders, pads, brushes, steam cleaners, or "no-rinse" cleaning agents. Spray cleaners onto a soft cloth or sponge, not directly onto the product. Rinse thoroughly with clear water after cleaning.
Check Valve Maintenance: If the check valve requires maintenance, it can be accessed and cleaned as shown in the maintenance diagrams.
Manufacturer information
Hansgrohe SE
Practical help
Common problems
Diverter does not toggle
Turn the water off at the valve to reset the diverter to the showerhead position.
Mineral scale buildup
Clean the product using a soft cloth and a mild, non-abrasive cleaner. Do not use acidic or abrasive cleaners.
Before use
- Ensure you have a 1/2" NPT elbow properly anchored behind the wall.
- Verify the wall type is suitable for the included toggle bolts (tile/solid surface).
- Ensure you have the required tools: 8mm/1 1/8" wrench, 2.5mm/3/8" hex key, drill, level, sealant, and thread tape.
- Check that the shower valve output temperature is set to 120°F (49°C) or lower (112°F/44°C in MA).
- Inspect the product for any damage or visible defects before installation.
Specs in practice
- Max Output Temperature
- Must not exceed 120°F (49°C) to prevent scalding; 112°F (44°C) in Massachusetts.
- NPT Elbow Requirement
- Requires a 1/2" NPT elbow anchored at least 2" (50 mm) behind the finished wall surface.
Images and diagrams
- Tools required for installation.
- Rough-in requirements for the NPT elbow.
- Steps for cutting the mounting nipple and installing the mounting piece.
- Installation procedure for toggle bolts.
- Final assembly steps including escutcheon and set screw.
Model compatibility
- Not intended for use as a grab bar.
- Do not hang items from the shower arm or wallbar.
- Toggle bolts are not suitable for acrylic or fiberglass enclosures; contact the manufacturer for alternatives.
- Handshower holder (slider) should not be used with handshowers having a spray face larger than 125 mm (5").

Manual page author
Michael Turner
Technical manual editor
Reviews PDF manuals for structure, safety notes, and practical product details so readers can find the right information quickly.