Plumbing / Sinks Faucets
Installation and User Guide for Hansgrohe Locarno 04822XX0 Shower Valve Trim
Complete installation and user guide for the Hansgrohe Locarno 04822XX0 shower valve trim. Includes technical specifications, step-by-step installation procedures, rotational limit stop adjustment, maintenance tips, and troubleshooting.
Table of contents
Manual images
Jump to the sectionQuick Guide and Safety Information
The Hansgrohe Locarno 04822XX0 is a shower valve trim designed for use with the iBox Universal Plus model 01850181 (not included). For best results, installation should be performed by a licensed, professional plumber. To prevent scald injury, the maximum output temperature of the shower mixing valve must not exceed 120°F (49°C). In Massachusetts, this limit is 112°F (44°C). Always ensure the rotational limit stop is correctly adjusted to prevent scalding.
Technical Specifications
- Water pressure: Recommended 15-75 PSI (0.1-0.5 MPa); Maximum 145 PSI (1 MPa).
- Hot water temperature: Recommended 120°-140°F (49°-60°C); Maximum 176°F (80°C).
- Flow rate: 5.5 GPM (20.8 l/min) at 44 PSI.
- Compatibility: Requires iBox Universal Plus model 01850181.
Installation Steps
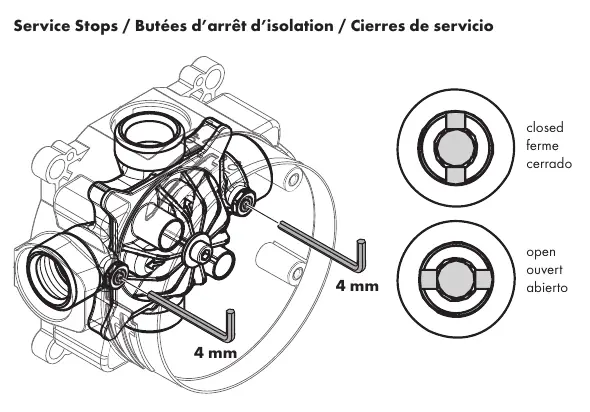
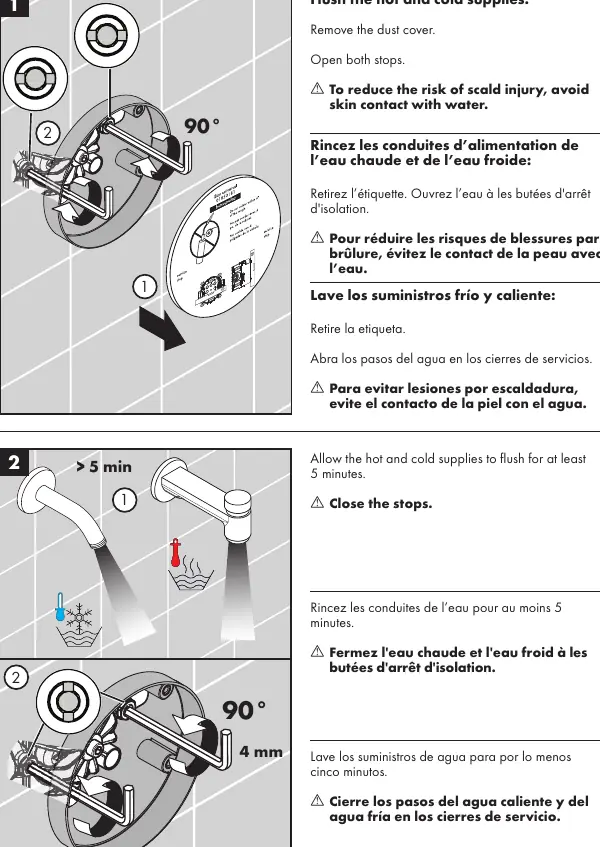

- Prepare the iBox: Ensure the iBox Universal Plus is installed. Use a 4 mm Allen wrench to open and close the service stops on the hot and cold inlets.
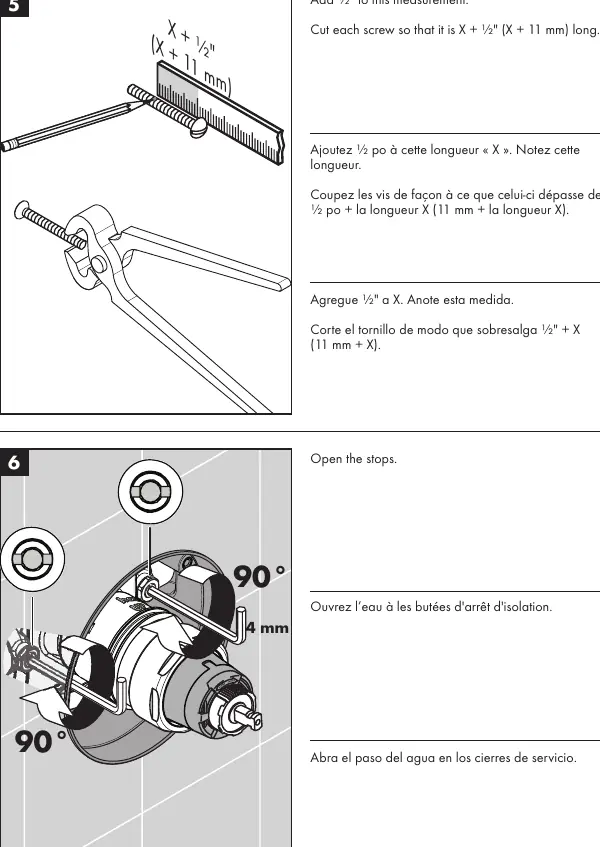
- Flush the supplies: Remove the dust cover. Open the stops and allow hot and cold water to flush for at least 5 minutes to clear debris. Close the stops.
- Install the function block: Insert the function block into the iBox and tighten the screws using a 4 mm Allen wrench.
- Measure and cut screws: Measure the distance (X) from the front of the plaster shield to the screw-in flanges. Add 1/2 inch (11 mm) to this measurement and cut the screws to length.
- Install trim: Install the carrier plate. Place the adapter and handle on the stem.
- Test the valve: Turn the handle counter-clockwise to test the valve. Ensure cold water flows first and becomes warmer as the handle is turned.
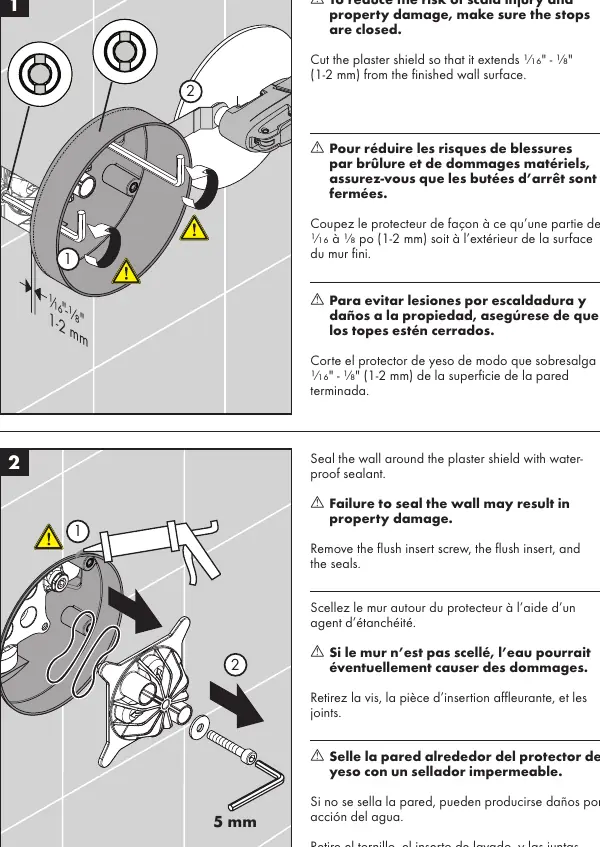
- Final assembly: Turn off the water, remove the handle and adapter. Lubricate the O-ring on the cartridge with white plumbing grease. Install the sleeve and escutcheon. Reinstall the adapter and handle, securing with the screw. Apply waterproof sealant around the plaster shield.
Adjusting the Rotational Limit Stop
To reduce the risk of scald injury, adjust the rotational limit stop if the maximum output temperature exceeds 120°F (49°C) or local plumbing codes. Pull the white rotational limit stop outward. Rotate clockwise to decrease the maximum temperature or counter-clockwise to increase it. Ensure the stop is fully retracted when finished.
Maintenance and Cleaning
Clean the showerhead if water volume decreases over time. Inspect the cartridge and check valves at least once per year. Replace the cartridge if it is dirty, worn, or leaking. Do not use abrasive cleaners, steam cleaners, or cleaning agents containing hydrochloric, formic, or acetic acid. Rinse the product with clean water after each use to prevent mineral buildup.
Troubleshooting
If the showerhead or tub spout drips for a short period after the valve is closed, this is normal clearing and does not indicate a problem. If the valve leaks constantly, the cartridge may be dirty or worn and should be replaced. If the output temperature does not match the handle markings, adjust the rotational limit stop or reverse the cartridge if hot and cold supplies are reversed.
Manufacturer information
Hansgrohe SE
Practical help
Common problems
Insufficient water flow
Check water pressure, clean the showerhead, or replace the cartridge if check valves are dirty.
Crossflow (hot water in cold supply or vice versa)
Replace the cartridge as check valves may be dirty or worn.
Output temperature does not match handle markings
Adjust the rotational limit stop or reverse the cartridge if supplies are reversed.
Handle is hard to turn or noisy
Replace the cartridge.
Constant dripping after valve is closed
Replace the cartridge.
Before use
- Ensure iBox Universal Plus model 01850181 is installed.
- Have a 4 mm Allen wrench available.
- Verify water pressure is within 15-75 PSI.
- Ensure you have waterproof sealant for the wall.
- Flush hot and cold water supplies for at least 5 minutes before final installation.
Specs in practice
- Water Pressure
- Recommended 15-75 PSI for optimal performance; do not exceed 145 PSI.
- Hot Water Temp
- Recommended 120°-140°F; ensure local codes are followed when setting water heater.
Images and diagrams
- Service stops are located on the iBox Universal Plus and are operated with a 4 mm Allen wrench.
- The rotational limit stop is adjusted by pulling it outward and rotating it.
- The cartridge can be reversed if hot and cold water supplies are swapped.
Model compatibility
- Requires iBox Universal Plus rough valve model 01850181 (not included).
- Designed for use with shower heads rated at 1.1 GPM or higher.

Manual page author
Emily Carter
User documentation editor
Prepares concise manual descriptions and highlights the most useful setup, operation, and maintenance information for readers.