Lighting / Outdoor Landscape
User Manual for Harbor Breeze 10951-15-1BZ LED Path Light
Quick guide for the Harbor Breeze 10951-15-1BZ LED Path Light. Includes installation steps, battery replacement instructions, troubleshooting tips, and maintenance advice.
Table of contents
Manual images
Click an image to enlargeQuick Guide
The Harbor Breeze LED Path Light is a solar-powered outdoor light. To begin using the product, ensure all parts are present, remove the battery pull tab, and place the unit in a location with full, direct sunlight. The light is designed to turn on automatically when it is dark outside.
Package Contents
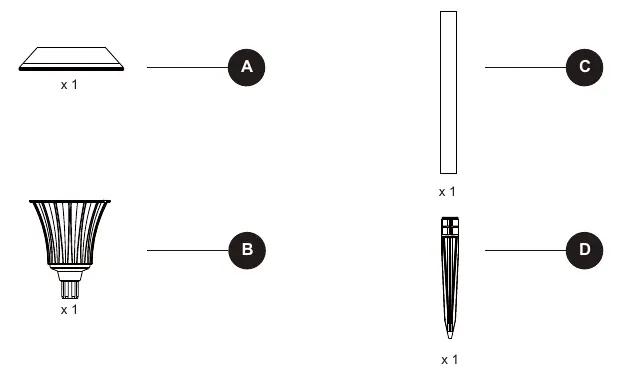
- Solar top housing
- Stake assembly
- Ground stake
- Rechargeable battery (pre-installed)
Installation
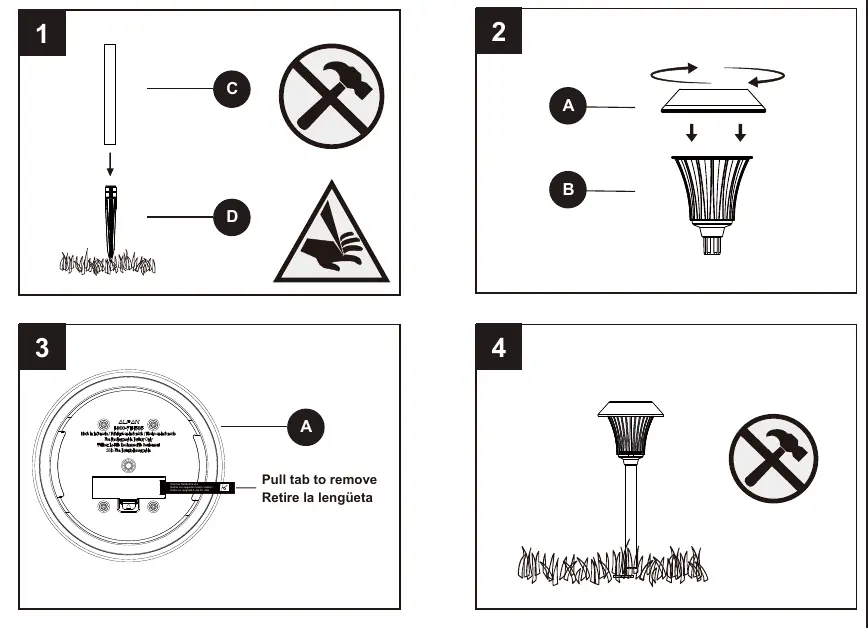
- Assemble the light by connecting the solar top housing to the stake assembly.
- Attach the ground stake to the bottom of the assembly.
- Pull the battery tab from the solar top housing to activate the light.
- Insert the stake firmly into the ground.
Choosing the Right Location
For optimal performance, select a location that receives full, direct sunlight throughout the day. Shady areas will prevent the battery from charging fully, resulting in shorter operating times at night. Avoid placing the light near other nighttime light sources, such as street or porch lights, as this may prevent the automatic sensor from activating the light.
Care & Maintenance
- Cleaning: Clean the solar panel regularly with a damp cloth. Do not use chemicals or abrasives. Keep the panel free of snow, dirt, and debris.
- Battery Replacement: If the light stops working or operates for a short duration, the battery may need replacement. Use only 14500 600mAh Li-ion rechargeable batteries.
- Relocation: When moving the light, carefully detach it from the ground. Be cautious of the pointed edge on the ground stake.
Troubleshooting
- Light does not work: Ensure the battery is charged by placing the unit in direct sunlight for three sunny days. Check that the solar top housing is not under any direct light source during testing.
- Short operating time: Ensure the light is in a sunnier location and that the solar panel is clean.
- Battery issues: If the battery is weak or no longer holds a charge, replace it with a new 14500 600mAh Li-ion battery.
Safety Information
Read the entire manual before assembly. Do not use alkaline, carbon-zinc, or Ni-Cd batteries. Only use Li-ion rechargeable batteries. Do not mix battery types. Do not open, short circuit, or mutilate batteries. Dispose of batteries in accordance with local regulations.
Practical help
Common problems
Light stops working after a period of time
Ensure the battery is adequately charged by placing the unit in direct sunlight for three sunny days, or replace the battery.
Light only operates for a short duration
Move the light to a sunnier location and ensure the solar panel is free of debris.
Light does not turn on at night
Ensure the solar top housing is not under any direct light source (like street lights) that might interfere with the light sensor.
Before use
- Verify all parts are present against the package contents list.
- Ensure the battery is installed correctly with proper polarity.
- Remove the pull tab from the battery compartment.
- Select a location with full, direct sunlight.
- Clean the solar panel with a damp cloth.
Specs in practice
- Battery Type
- 14500 600mAh Lithium-ion (Li-ion) rechargeable battery.
- Assembly Time
- Estimated 3-5 minutes; no tools required.
Images and diagrams
- The installation overview shows the assembly of the solar top housing to the stake.
- The battery compartment is located under the solar top housing; ensure the pull tab is removed before use.
Model compatibility
- Use only 14500 600mAh Li-ion rechargeable batteries.
- Do not use alkaline, carbon-zinc, or Ni-Cd batteries.
- Do not mix battery types.

Manual page author
Emily Carter
User documentation editor
Prepares concise manual descriptions and highlights the most useful setup, operation, and maintenance information for readers.