Automotive / Towing Accessories
User Manual for Haul-Master 12V Electric A-Frame Trailer Jack
Quick guide for the Haul-Master 12V Electric A-Frame Trailer Jack (Model 58203). Includes installation, wiring, operation, maintenance, and safety instructions.
Table of contents
Manual images
Click an image to enlargeQuick Guide
This manual provides instructions for the Haul-Master 12V Electric A-Frame Trailer Jack. Always ensure the trailer wheels are chocked before operating the jack. The jack is designed for A-frame trailers and requires a 12V power source. If the jack fails to operate, check the wiring and the built-in circuit breaker, which resets automatically.
Safety Information
- Rated Capacity: Do not exceed 3,500 lb.
- Surface: Use only on flat, level, hard surfaces.
- Towing: Always fully retract the jack before towing.
- Manual Override: The jack can be operated manually using the included crank if power is lost.
- Personal Safety: Wear ANSI-approved safety goggles during use. Keep clear of the jack and tongue when applying or releasing a load.
Specifications
- Weight Capacity: 3,500 lb.
- Travel Length: 22-1/2 inches.
- Lift Range: 9 to 31-1/2 inches.
- Application: A-frame trailers.
Installation
Mounting
- Block trailer wheels and support the A-frame with jack stands.
- Disconnect the trailer battery ground cable.
- Remove the existing jack if replacing one.
- Remove the Lock Pin and slide out the Footpad.
- Remove paint from around one bolt hole on the jack and the trailer tongue to ensure proper grounding.
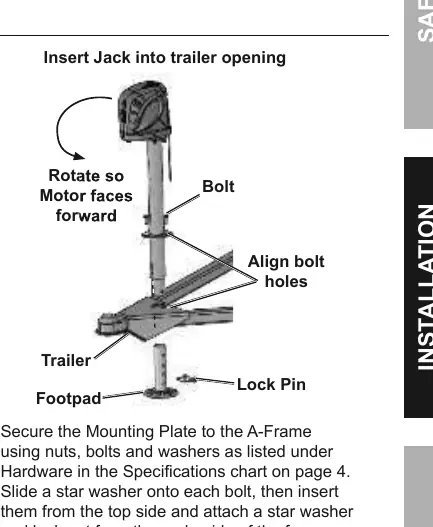
- Insert the Outer Tube into the A-frame opening with the Motor Housing facing forward.
- Secure the Mounting Plate to the A-frame using nuts, bolts, and washers. Use a torque wrench to ensure tightness.
- Replace the Footpad and insert the Lock Pin.
Wiring
- Disconnect the trailer battery ground cable.
- Connect the BLACK wire lead directly to the positive (+) terminal of the battery.
- Connect the WHITE ground wire to the negative (-) battery terminal.
- Reconnect the trailer battery ground cable.
Operation
Mounting the Trailer
- Chock the trailer wheels.
- If using electric power, test the Directional Switch.
- Push the Directional Switch up to raise the trailer to the hitch level.
- Back the vehicle to the trailer and mount it onto the hitch.
- Retract the jack until the trailer weight is transferred to the vehicle.
- Fully retract the jack to the STOP label before towing.
Manual Operation
- Disconnect power to the jack.
- Remove the Protective Cap on top of the jack.
- Insert the Crank onto the Drive Shaft.
- Rotate the Crank counterclockwise to raise or clockwise to lower the trailer.
Maintenance
- Before Each Use: Inspect for loose hardware, misalignment, binding, or cracked parts.
- Cleaning: If exposed to salt water, wash with fresh water and lubricate moving parts with light oil.
- After Use: Wipe external surfaces with a clean cloth.
Practical help
Common problems
Motor does not run
Check wiring connections and ensure the battery is charged. The jack has a built-in circuit breaker that resets automatically if amperage is too high.
LED lights not working
Ensure the jack is properly wired and receiving power.
Jack will not lift
Verify the load does not exceed the 3,500 lb capacity and ensure the jack is on a stable, level surface.
Before use
- Inspect for loose hardware or damaged parts.
- Ensure trailer wheels are chocked.
- Verify the jack is installed on a flat, level surface.
- Check that the battery ground cable is disconnected before wiring.
- Confirm the jack is fully retracted before towing.
Specs in practice
- Weight Capacity
- Maximum load the jack can lift is 3,500 lb.
- Travel Length
- The total distance the jack can extend is 22-1/2 inches.
Images and diagrams
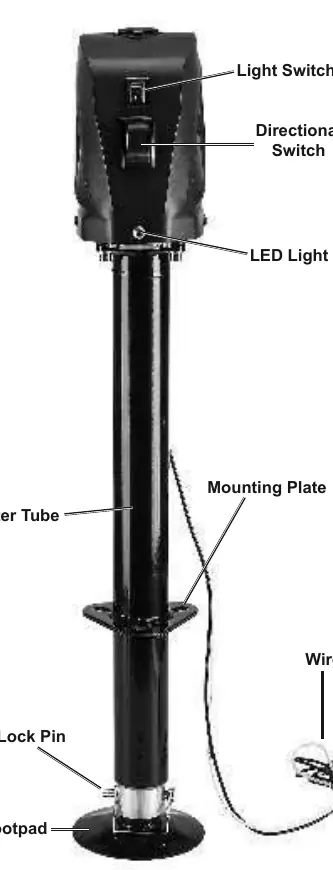
- Components diagram identifies the Light Switch, Directional Switch, LED Light, and Mounting Plate.
- Mounting diagram shows the orientation of the motor housing and bolt hole alignment.
- Manual operation diagram illustrates removing the protective cap to access the drive shaft for the crank.
Model compatibility
- Designed specifically for A-frame trailers.
- Requires 12V DC power source.
- Not for use with aircraft.

Manual page author
David Miller
Documentation analyst
Organizes user manual content into clear summaries, with attention to model details, product context, and everyday usability.