Automotive / Towing Accessories
Electric Winch Warrior 135PHS12 / 135PHA12 User Manual
Comprehensive user manual for the Warrior 135PHS12 and 135PHA12 electric winches. This guide covers assembly, mounting, safe operating procedures, rigging techniques, maintenance, and troubleshooting to ensure optimal performance and...
Table of contents
Manual images
Click an image to enlargeQuick Guide from the Manual
This manual provides essential instructions for the safe operation and maintenance of the Warrior 135PHS12 and 135PHA12 electric winches. Key safety requirements include:
- Intermittent Use Only: Allow the winch to cool down between uses. Do not use for constant duty applications.
- No Lifting People: Never use the winch to lift or move people. Do not use as an overhead hoist.
- Cable Safety: Maintain a minimum of five wraps of cable around the drum barrel for pulling and holding the rated load. Never step over a cable under load.
- Load Management: For loads over 70% of rated line pull, use a snatch block to double the line and reduce load on the winch.
Getting to Know Your Winch
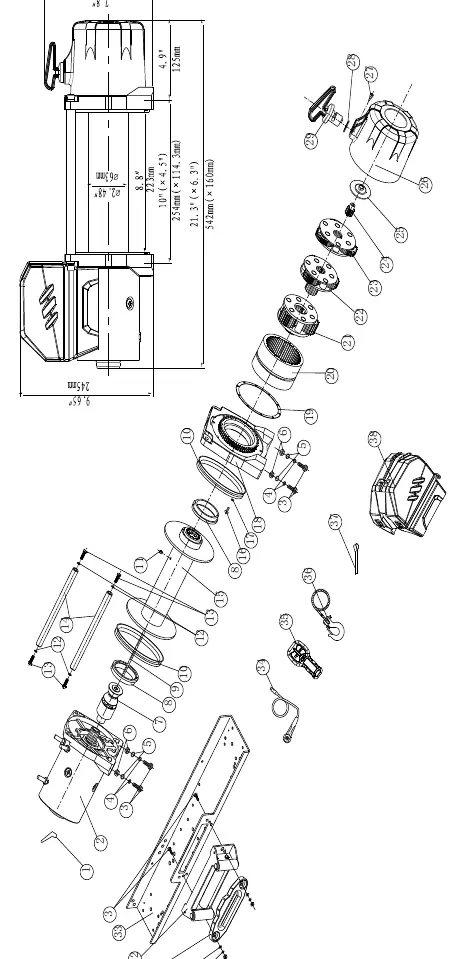
The winch consists of several key components:
- Motor: Powered by a 12V or 24V battery.
- Winch Drum: The cylinder where the wire rope is stored.
- Free Spooling Clutch: Allows manual disengagement of the drum for free spooling.
- Roller Fairlead: Guides the wire rope onto the drum and minimizes abrasion.
- Remote Switch: Allows operation from a safe distance.
Assembly and Mounting
The winch is designed with a standard bolt pattern. Ensure the mounting surface is flat to allow proper alignment of the motor, drum, and gear housing.
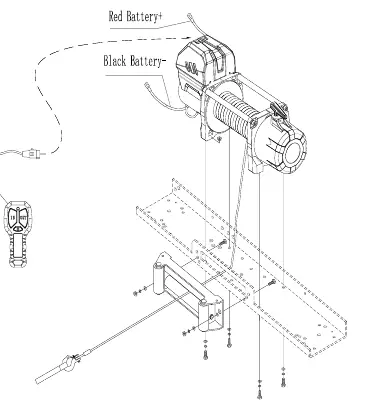
- Connect the roller fairlead to the mounting channel using the provided M10 cap screws, flat washers, lock washers, and locknuts.
- Assemble the winch to the mounting channel by pulling the clutch knob to the "CLUTCH OUT" position, feeding the wire rope through the fairlead, and securing the winch with the remaining hardware.
- Connect the battery and motor leads according to the wiring diagram.
- Assemble the clevis hook to the cable.
- Check for proper drum rotation by engaging the clutch and testing the "cable out" function. If the drum collects cable instead of releasing it, reverse the motor leads.
Operating Instructions
Follow these steps for safe winching:
- Preparation: Put on gloves, disengage the clutch, and pull out the required length of cable using the hand saver hook.
- Rigging: Secure the clevis hook to an anchor point using a sling, chain, or snatch block. Never attach the hook back onto the wire rope.
- Operation: Engage the clutch, connect the remote, and start the vehicle engine to maintain battery power. Stand clear of the cable and operate the switch.
- Completion: Once the vehicle is on stable ground, secure it, release tension on the wire rope, and disconnect the remote.
Replacing the Wire Rope
If the rope is worn or damaged, it must be replaced:
- Set the clutch to "CLUTCH OUT" and extend the cable to its full length.
- Remove the old cable assembly and attach the new one, securing it with the M8x10 screw.
- Ensure the new cable wraps in the same rotation direction as the old one (leaving the drum from the bottom).
- Retract the cable, ensuring the first five wraps are tight and free of kinks.
Maintenance
- Periodically check the tightness of mounting bolts and electrical connections.
- Keep the winch clean and free of dirt or corrosion.
- Do not attempt to disassemble the gearbox; it is sealed at the factory and lubricated with high-temperature lithium grease.
Troubleshooting
If the winch fails to operate, check the following:
- Motor does not turn: Check switch assembly connection, battery cable connections, or potential water ingress.
- Drum does not turn: Ensure the clutch is fully engaged.
- Motor runs slowly: Check for insufficient current or voltage; operate with the vehicle engine running.
- Motor overheating: Allow the winch to cool down periodically.
Practical help
Common problems
Motor does not turn on
Check switch assembly connection, tighten battery cable connections, or check for water in the motor.
Cable drum does not turn
Ensure the clutch is fully engaged in the 'IN' position.
Motor runs slowly or lacks power
Ensure the vehicle engine is running to provide sufficient voltage and check battery cable connections.
Winch overheating
The winch is for intermittent use; allow it to cool down between pulls.
Before use
- Inspect wire rope for fraying or damage.
- Check that all mounting bolts are tight.
- Ensure electrical connections are clean and tight.
- Test-run the winch in both directions for 1-2 seconds.
- Verify the clutch is engaged before operation.
- Ensure at least 5 wraps of cable remain on the drum.
Specs in practice
- Rated line pull
- 13500 lbs (6123 kgs) - the maximum load the winch is designed to pull on the first layer of cable.
- Gear reduction ratio
- 265:1 - the ratio of motor rotations to drum rotations, providing high torque.
- Intermittent use
- The winch is not designed for constant duty; it requires cooling periods between heavy pulls.
Images and diagrams
- Mounting drawing: Illustrates the connection of the winch to the mounting channel and the wiring of the switch and battery.
- Rigging techniques: Shows correct anchor points, use of snatch blocks, and how to avoid acute angles.
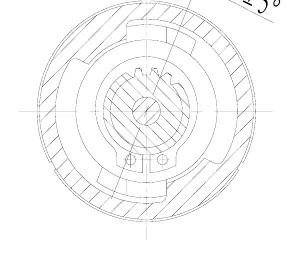
- Brake adjustment: Details the method for adjusting the brake angle using the spline gear sleeve.
Model compatibility
- Compatible with 12V or 24V DC power systems.
- Designed for use with specific mounting channels; ensure the surface is flat.
- Use only manufacturer-recommended replacement wire rope.

Manual page author
Michael Turner
Technical manual editor
Reviews PDF manuals for structure, safety notes, and practical product details so readers can find the right information quickly.