Tools / Power Tools
User Manual for Daytona 3 Ton Floor Jack DS300S
Quick guide for the Daytona 3 Ton Floor Jack DS300S. Includes setup, operation, maintenance, troubleshooting, and safety instructions.
Table of contents
Manual images
Click an image to enlargeImportant Safety and Setup Information
Before using the Daytona 3 Ton Floor Jack, read all safety instructions. This device is for lifting only; always support the vehicle with jack stands immediately after lifting. Use only on hard, level surfaces. Do not exceed the rated capacity of 6,000 lbs (3 Tons). Always wear ANSI-approved safety goggles and heavy-duty work gloves during use.
Overview of the Floor Jack
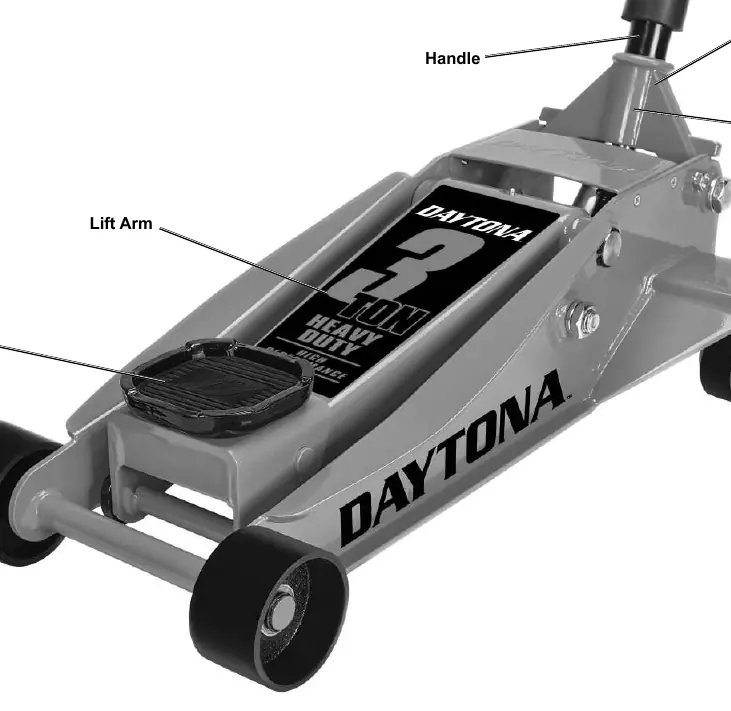
The jack consists of a Saddle, Lift Arm, Handle, Handle Socket, and Handle Release. Familiarize yourself with these components before operation.
Setup and Preparation
Removing Shipping Block
The Handle Socket is held down by a plastic block under tension. Wear safety goggles, hold the Handle Socket down, remove the block, and carefully swing the Handle Socket up until tension is released.
Attaching the Handle
- Slide the Upper Handle into the Lower Handle until it clicks.
- Pull the Handle Release and insert the grooved end into the Handle Socket.
- Release the Handle Release and pull up on the handle to ensure it is secure.
Bleeding Trapped Air
If the jack feels spongy or does not lift properly, bleed the air:
- Remove the screws on the Cover Plate and swing it open.
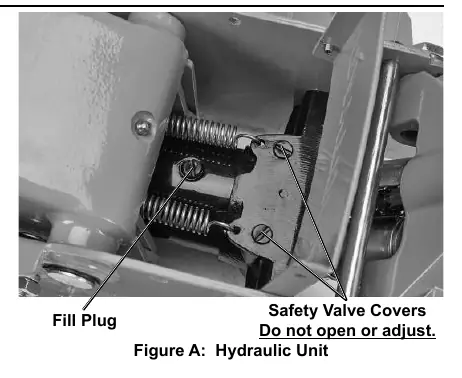
- Remove the Fill Plug on top of the Cylinder.
- Insert the handle into the socket and turn it counterclockwise to open the release valve.
- Pump the handle up and down quickly 10-15 times.
- Replace the Fill Plug and close the Cover Plate.
Adding Oil
Use only 22 viscosity, non-detergent hydraulic jack oil. With the jack fully lowered, open the Cover Plate, remove the Fill Plug, and add oil until it reaches the top of the Piston inside the Cylinder.
Operating Instructions
Lifting
- Park the vehicle on a flat surface, turn off the engine, and engage the parking brake.
- Turn the handle counterclockwise to lower the jack, then clockwise to close the valve.
- Position the Saddle under the manufacturer's recommended lifting point.
- Pump the handle to raise the jack until it nearly touches the lifting point, then position it precisely.
- Pump the handle to lift the vehicle.
- Once raised, slide jack stands under the vehicle and lower the vehicle onto them.
Lowering
- Raise the vehicle slightly to clear the jack stands and remove them.
- Slowly turn the handle counterclockwise (no more than 1/2 turn) to lower the vehicle to the ground.
Maintenance and Servicing
Inspect the jack before every use for leaking hydraulic fluid, loose hardware, or damaged parts. Do not use if damaged.
- Lubrication: Weekly, inject general-purpose lithium grease into grease fittings and lightly lubricate linkages and pivot points.
- Oil Change: Change hydraulic oil at least once every three years. Drain old oil by tipping the jack, then refill with non-detergent 22 weight hydraulic oil.
Troubleshooting
If the jack fails to operate correctly, ensure the release valve is fully closed and bleed the air from the system. If the saddle lowers under load, the valves may be blocked; flush them by manually lifting the saddle and forcing it down quickly. If the jack is low on oil, check the level and refill as described in the setup section.
Parts List and Diagram
Refer to the parts list and assembly diagram for identification of components. Repairs should only be undertaken by certified and licensed technicians.
Manufacturer information
Harbor Freight Tools
Practical help
Common problems
Jack will not lift at capacity
Check that the Release Valve is fully closed and bleed trapped air from the hydraulics.
Saddle lowers under load
Valves may be blocked. Flush valves by manually lifting the saddle and forcing it down quickly.
Pump stroke feels spongy
Jack may be low on oil or have air trapped. Check oil level and bleed air.
Fill Plug leaking
Jack may have too much hydraulic oil. Check fluid level and adjust.
Before use
- Inspect for leaking hydraulic fluid.
- Check for loose hardware or parts.
- Verify no misalignment or binding of moving parts.
- Ensure no cracked, bent, or broken parts.
- Check hydraulic oil level (1/4 inch below Fill Plug hole).
Specs in practice
- Weight Capacity
- 6,000 lbs (3 Tons).
- Maximum Height
- 18.25 inches.
- Minimum Height
- 5 inches.
- Hydraulic Oil
- Non-detergent 22 weight.
Images and diagrams
- Overview: Identifies Saddle, Lift Arm, Handle, Handle Socket, and Handle Release.
- Hydraulic Unit: Shows Fill Plug location for bleeding air and adding oil.
- Assembly Diagram: Exploded view of all parts for maintenance and repair reference.
Model compatibility
- Use only on hard, level surfaces.
- Do not use for aircraft purposes.
- Always use jack stands to support the vehicle after lifting.

Manual page author
Michael Turner
Technical manual editor
Reviews PDF manuals for structure, safety notes, and practical product details so readers can find the right information quickly.