Documents / Warranty Safety
Sealey 1000KG Air Operated Coil Spring Compressor
Professional 1000kg air-operated coil spring compressor designed for safe and efficient suspension strut maintenance, featuring a safety locking guard and adjustable yokes.
Table of contents
Manual images
Jump to the sectionProduct Overview
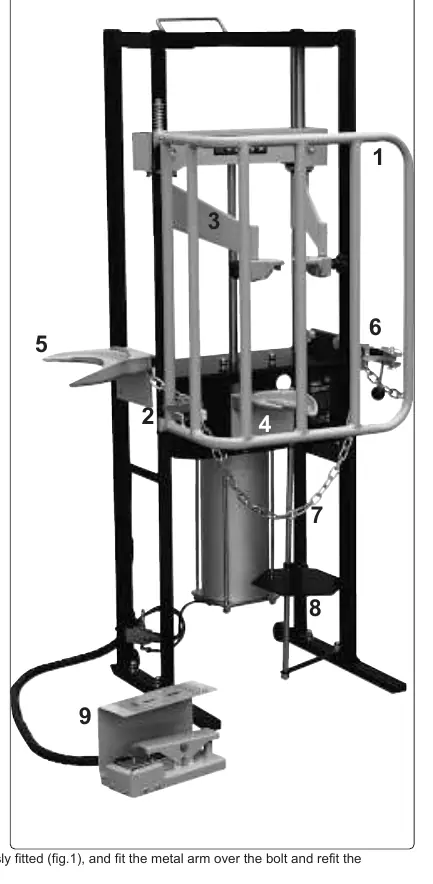
The Sealey 1000KG Air Operated Coil Spring Compressor is a robust, professional-grade tool engineered for the fast and safe compression of automotive road springs. This unit is designed to handle a wide range of spring configurations and diameters, making it an essential piece of equipment for suspension work in professional workshops. It features a heavy-duty frame, a safety locking guard, and an air-operated ram controlled by a foot pedal for precise operation.
Safety Guidelines
Safety is paramount when working with high-tension springs. Always wear approved eye and hand protection. Keep hands and fingers away from the spring and compressing jaws during operation. Never allow untrained personnel to use the equipment. Before starting, ensure the work area is clean, well-lit, and that you have stable footing. Always stand to one side of the compressor when applying pressure. Never leave a compressed spring unattended or under compression for prolonged periods, such as overnight. If the spring or strut is not correctly located in the jaws, stop immediately to prevent dangerous sideways forces.
Assembly and Preparation
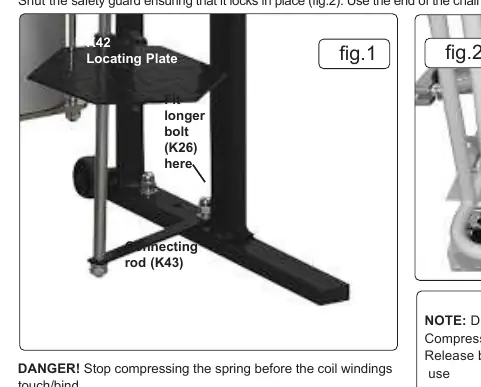
The unit requires assembly by two people. Ensure the feet are securely bolted if permanent installation is desired. The safety guard must be correctly installed and locked before use. Before connecting the air supply, ensure the foot control lever is in the off position. The air supply must be clean and not exceed 116psi (8bar). Drain the air supply water separator daily to prevent internal damage to the ram.
Operation
To compress a strut, select the appropriate yoke or clamp for the spring size and secure it with the locking pin. Position the lowest coil in the lower yoke and the upper clamps on the uppermost coil. Ensure the spring is seated securely in the recesses. Use the safety chain to secure the spring and close the safety guard. Gradually press the foot pedal to compress the spring. Once the strut is loose, remove the top nut. When re-fitting, reverse the process, ensuring the spring is correctly located before slowly releasing the pressure.
Maintenance and Storage
Regular maintenance ensures longevity and safety. Before each use, inspect the unit for damage or wear. Periodically clean the sliding columns and apply a light coating of transmission oil. If the unit is to be stored for an extended period, disconnect the air supply, discharge any remaining air, and apply a small amount of air tool oil to the inlet to prevent corrosion. Store in a safe, dry, and childproof location.
Manufacturer information
Sealey Group
Practical help
Common problems
Spring or strut not located correctly in jaws
Stop immediately; ensure the top cap assembly rotates freely before attempting to remove it.
Air supply contains water
Drain the air supply water separator daily to prevent damage to the ram.
Unit unstable during assembly
Use two people to stand the unit onto its feet, taking care when wheels contact the floor.
Before use
- Check for damaged or worn parts
- Ensure jaw locating pins are properly positioned
- Verify safety clips are attached
- Ensure air pressure does not exceed 116psi
- Check that the foot control lever is in the Off position
- Ensure the safety guard is locked in place
- Verify the spring is securely held in the yokes
Specs in practice
- Maximum Load
- The maximum weight capacity of 1000kg the unit can safely compress.
- Upper Yoke Travel
- The maximum distance (420mm) the upper yoke can move during compression.
- Spring Diameter
- The range of spring sizes (102-165mm) compatible with the provided yokes.
- Maximum Air Pressure
- The limit of 116psi (8bar) required for full capacity operation.
Images and diagrams
- Fig 1 & 2: Shows the assembly of the feet, locating plate, and safety guard.
- Fig 2A: Indicates the foot pedal direction for compression and release.
- Fig 3 & 4: Demonstrates correct positioning of the spring in the yokes and use of the safety chain.
- Fig 5 & 6: Illustrates the correct placement of the upper arms and tightening of locking knobs.
- Fig 7: Shows the final safety guard and chain configuration.
Model compatibility
- Fits a wide range of spring configurations and diameters.
- Supplied with two interchangeable plastic coated lower yokes.
- Includes a suspension strut clamp for specific strut types.

Manual page author
Emily Carter
User documentation editor
Prepares concise manual descriptions and highlights the most useful setup, operation, and maintenance information for readers.