Tools / Automotive Tools
User Manual for Sealey 10PC Fuel Pump Timing Kit VSE2242.V2
Quick guide for the Sealey 10PC Fuel Pump Timing Kit (VSE2242.V2). Includes setup instructions, operation steps for Bosch VE pumps, and safety guidelines.
Table of contents
Manual images
Click an image to enlargeQuick guide from the manual
This kit is designed for setting the correct timing position on Bosch VE type fuel pumps and compatible systems (Kiki, Nippon Denso, CAV Rotodiesel). The kit includes a dial test indicator and various adaptors to fit different port sizes. Always refer to the vehicle manufacturer's service instructions to establish the correct timing data for your specific engine.
Safety
- Ensure the vehicle is adequately supported by axle stands if jacked up.
- Wear approved eye protection.
- Wear suitable clothing to avoid snagging; do not wear jewellery and tie back long hair.
- Do not attempt to start the engine or move the vehicle while timing devices are fitted.
- Account for all tools, locking bolts, pins, and parts; do not leave them in or near the engine.
Contents
The kit includes the following components:
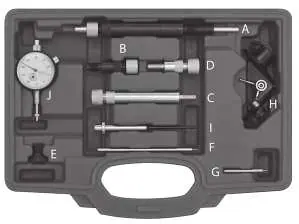
- M14 Extension
- Adaptor Assemblies (M8 35mm, 90mm, M10 35mm)
- M8-M12 Adaptor
- Adaptors (90mm, 35mm)
- DTI Bracket
- Probe
- Dial Test Indicator (41mm x 8mm x 0.1mm)
Operation
Follow these steps to set the timing:
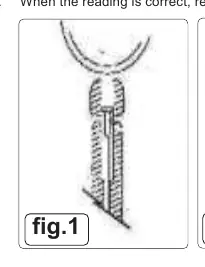
- Unscrew the standard tip from the dial test indicator and fix the correct extension in its place.
- Select the correct length M8 adaptor and attach the dial test indicator with the extension.
- Tighten the adaptor to the dial test indicator shank using the nut. If the fuel pump has an M12 threaded port, use the provided adaptor to convert the M8 thread.
- Clean the fuel injection pump around the service port.
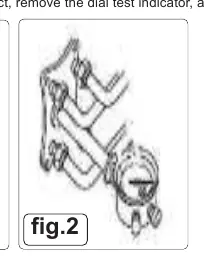
- Remove the plug and attach the adaptor and dial test indicator. You can rotate the indicator to make it easier to read.
- Loosen the nut on the adaptor to bring the indicator and extension into contact with the pump plunger. This will pre-load the indicator by approximately 1mm.
- Tighten the nut to prevent the indicator from sliding.
- Zero the dial test indicator bezel and lock it in position with the thumbscrew.
- Turn the crankshaft backwards until the pointer on the dial test indicator stops moving. Check that the small scale shows a 1mm pre-load and re-zero the bezel.
- Turn the crankshaft forward to the static timing point and compare the reading on the dial test indicator with the manufacturer's specified timing data.
- Once the reading is correct, remove the dial test indicator, adaptor, and extensions.
Environment Protection
Recycle unwanted materials instead of disposing of them as waste. All tools, accessories, and packaging should be sorted and taken to a recycling centre. If the product becomes unserviceable, drain any fluids into approved containers and dispose of the product and fluids according to local regulations.
Manufacturer information
Sealey Group
Practical help
Common problems
Indicator sliding within the adapter
Tighten the nut on the adapter to secure the indicator in position.
Difficulty reading the dial
Rotate the dial test indicator to a position that is easy to read.
Incorrect timing reading
Ensure the crankshaft is turned to the static timing point and compare the reading with the manufacturer's specified timing data.
Before use
- Ensure the vehicle is supported by axle stands.
- Wear approved eye protection.
- Clean the fuel injection pump around the service port.
- Verify the correct adaptor (M8, M10, M12, M14) for your pump.
- Check that the dial test indicator is pre-loaded by approximately 1mm.
Specs in practice
- Entry Port Sizes
- Compatible with M8, M10, M12, and M14 ports.
- Dial Test Indicator
- Precision tool for measuring plunger movement (41mm x 8mm x 0.1mm).
Images and diagrams
- Fig 1 illustrates the assembly of the dial test indicator with the adaptor.
- Fig 2 illustrates the indicator attached to the pump for reading.
Model compatibility
- Suitable for Bosch VE type fuel pumps.
- Compatible with Kiki, Nippon Denso, and CAV Rotodiesel systems.

Manual page author
David Miller
Documentation analyst
Organizes user manual content into clear summaries, with attention to model details, product context, and everyday usability.