Documents / Warranty Safety
User Manual for Sealey TC904 Bead Seating Tool
Comprehensive user guide for the Sealey TC904 Bead Seating Tool. Includes safety instructions, operating procedures for horizontal and upright positions, charging instructions, and maintenance requirements.
Table of contents
Manual images
Jump to the sectionQuick Guide from the Manual
The Sealey TC904 is a 19-litre bead seating tool designed to seat tubeless tyre beads by dumping air into the tyre void. Important: Always wear safety glasses, ear defenders, gloves, and protective clothing. Never discharge the tool unless the nozzle is positioned on the wheel rim. Ensure the safety key is removed from the trigger only when ready to operate.
Safety Instructions
The bead seater is a pressure vessel. Adhere to the following safety measures:
- Ensure the unit is in good condition before use.
- Always wear safety glasses and ear defenders.
- Keep children and unauthorized persons away from the work area.
- WARNING: Do not discharge unless the nozzle is positioned on the wheel rim.
- Do not use the bead seater without the safety valve fitted.
- Do not tamper with the safety valve, modify the unit, or strap anything to it.
- Do not subject the unit to impact, vibration, or heat.
- Do not direct compressed air towards people or animals.
Introduction
This tool provides an easy and instant way to seat tubeless tyre beads. It features a diaphragm valve and push-button trigger, with a slotted key to prevent accidental operation. It is suitable for use on cars, commercials, agricultural, and ATV tyres.
Specification
- Model No: TC904
- Maximum Pressure: 150psi (10.4bar)
- Tank Capacity: 19 litres
Operation
Charging
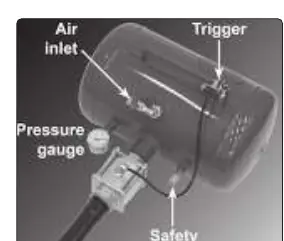
- The air inlet is fitted with a 1/4" BSP female connection.
- Connect via an appropriate fitting to an air line.
- Open the air line and the air cock on the inlet fitting.
- Fill the air reservoir to air line pressure (150psi maximum) and close the inlet connector cock.
- Close the cock on the air line and disconnect.
Using the seating tool in the horizontal position
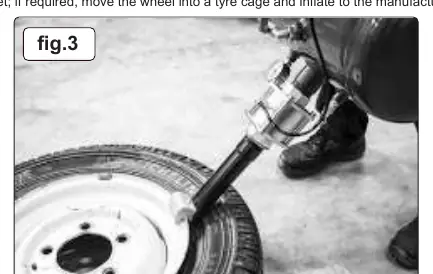
- Adjust the barrel so that the barrel flange is on the top.
- Ensure both beads of the tyre are well lubricated and the wheel is on a stand, off the ground, with the lower bead already seated.
- Attach an air line to the valve stem to assist in inflation.
- Position the bead seater so the weight of the unit is supported, resting the barrel flange on the rim of the wheel directly opposite the valve stem.
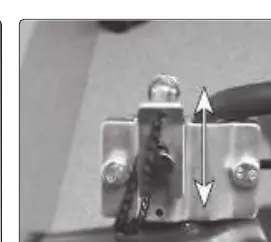
- Remove the safety key from behind the trigger button.
- Position the bead seater at an angle of between 50 and 70 degrees, pointing the barrel into the largest gap between the tyre and the wheel.
- Hold the unit securely, press the trigger to release the air, and withdraw the nozzle.
- If the bead does not seat, recharge the tank to a higher pressure and repeat.
Using the bead seater in the upright position (truck tyres only)
- Adjust the barrel so that the barrel flange is on the bottom.
- Position the wheel against a wall or solid prop with the valve stem at the bottom facing you.
- Attach an air line to the valve stem.
- Position the bead seater at an angle of between 50 and 70 degrees, pointing the barrel into the largest gap between the tyre and the wheel.
- Hold the unit securely, remove the safety key, and press the trigger to release the air.
- If the bead does not seat, recharge the tank to a higher pressure and repeat.
Maintenance
- Drain condensation from the bead seater daily.
- Inspect inside walls for corrosion every three months.
- Have a detailed inspection carried out annually.
- The bead seater shell must not fall below the certified thickness at any point.
Environmental Protection
Recycle unwanted materials instead of disposing of them as waste. All tools, accessories, and packaging should be sorted and taken to a recycling centre. When the product becomes unserviceable, drain any fluids into approved containers and dispose of according to local regulations.
Contact Support
Parts support is available for this product. Please email [email protected] or telephone 01284 757500.
Manufacturer information
Sealey Group
Practical help
Common problems
Bead does not seat
Recharge the tank to a higher pressure and repeat the procedure.
Accidental trigger operation
Ensure the slotted safety key is inserted behind the trigger when not in use.
Before use
- Ensure the unit is in good condition.
- Wear safety glasses, ear defenders, gloves, and protective clothing.
- Check that the safety valve is fitted.
- Ensure the work area is well-lit and clear of unauthorized persons.
- Remove the safety key from behind the trigger only when ready to operate.
Specs in practice
- Maximum Pressure
- 150psi (10.4bar). Do not exceed this pressure.
- Tank Capacity
- 19 litres.
Images and diagrams
- Fig 1: Shows the air inlet, pressure gauge, and safety valve locations.
- Fig 2: Shows the trigger mechanism and safety key location.
- Fig 3: Shows the barrel flange positioning for horizontal use.
Model compatibility
- Suitable for use on cars, commercials, agricultural, and ATV tyres.
- Upright position is for truck tyres only.

Manual page author
David Miller
Documentation analyst
Organizes user manual content into clear summaries, with attention to model details, product context, and everyday usability.