Garden / Portable Garages
User Manual for Harbor Freight COVER PRO 10FTx17FT Portable Garage 63055
Quick guide for the Harbor Freight COVER PRO 10FTx17FT Portable Garage (Item 63055). Includes assembly instructions, anchoring steps, cover installation, and maintenance tips.
Table of contents
Manual images
Click an image to enlargeQuick guide from the manual
This portable garage is designed for temporary use only. It is not a permanent shelter and does not meet tent flammability standards. Do not use in high wind conditions and remove the cover if harsh weather or heavy rain threatens. Ensure the assembly area is flat, level, and free of hidden utility lines before starting. At least 3 workers are required for safe assembly.
Assembly Instructions
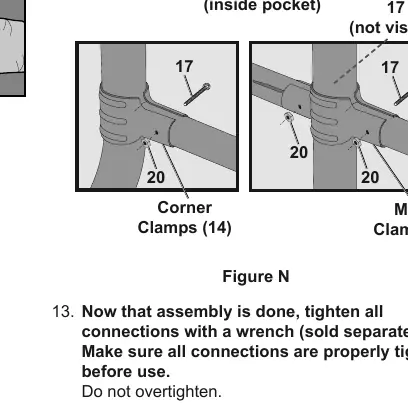
The assembly process involves constructing the frame, anchoring it, and installing the covers. Finger-tighten all connections until the entire frame is assembled, then tighten fully with a wrench.
Frame Assembly
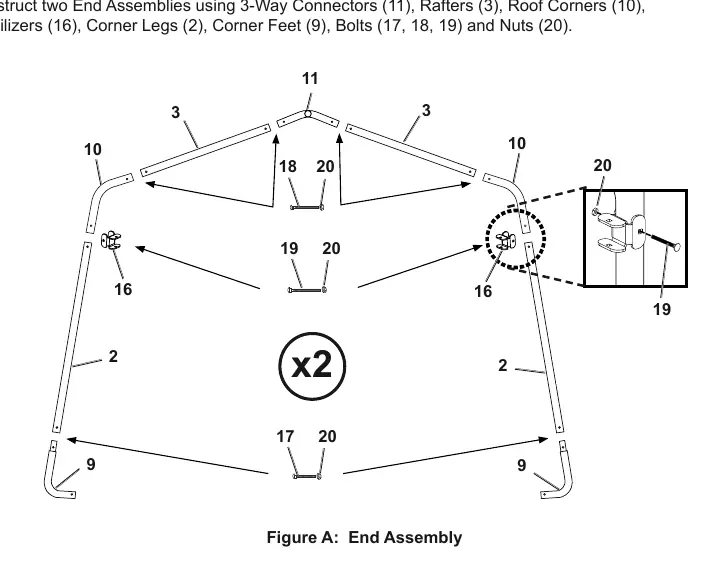
- End Assemblies: Construct two end assemblies using 3-Way Connectors, Rafters, Roof Corners, Stabilizers, Corner Legs, Corner Feet, Bolts, and Nuts.
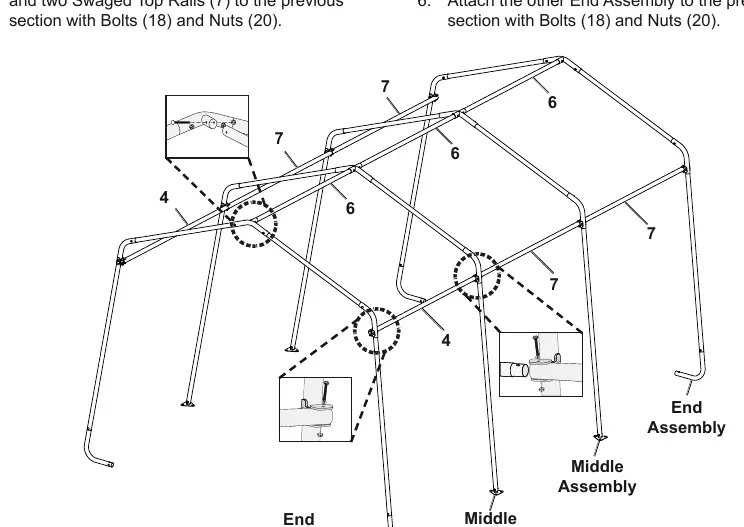
- Middle Assemblies: Construct two middle assemblies using 4-Way Connectors, Rafters, Roof Corners, Stabilizers, Middle Legs, Middle Feet, Bolts, and Nuts.
- Frame Connection: Connect the end and middle assemblies using Ridge Rails and Top Rails. Ensure all bolts are oriented so the heads are against the fabric to prevent tearing.
Anchoring the Frame
Proper anchoring is critical for safety.
- Position the frame and level it end-to-end and side-to-side.
- Measure diagonals to ensure the frame is square (diagonals must be equal).
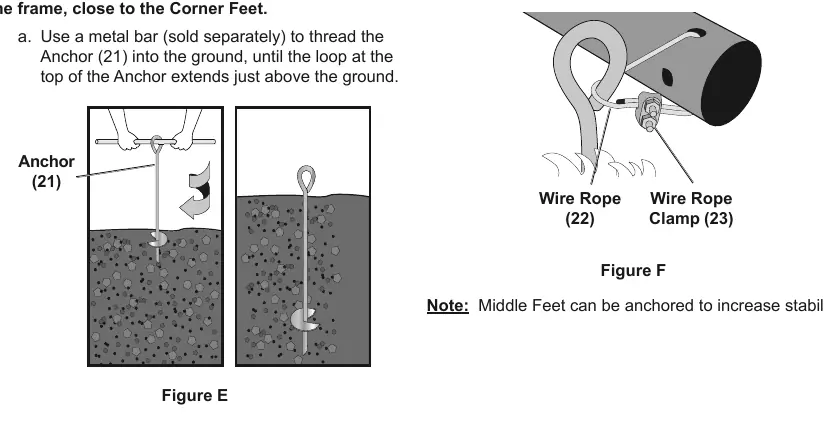
- Thread the Anchors into the ground until the loop is just above the surface.
- Secure the frame to the anchors using the provided Wire Rope and Wire Rope Clamps.
Cover Installation
- Front and Back Covers: Position the covers with zippers facing outside. Secure the straps over the frame connectors and tighten. Secure the bottom of the covers to the corner legs using the provided ratchets.
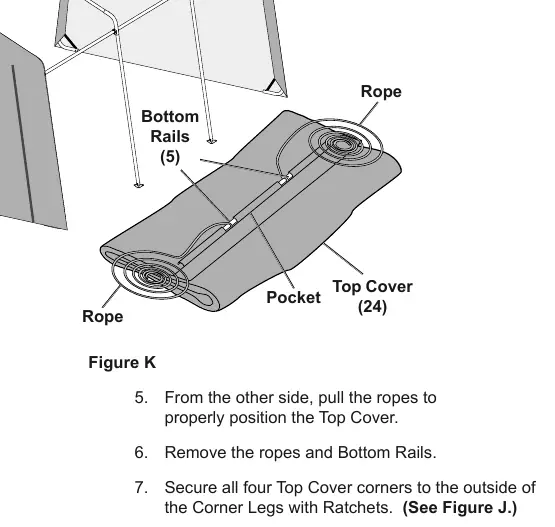
- Top Cover: Lay the cover on the ground, insert Bottom Rails into the pockets, and tie ropes to the rails. Throw the ropes over the frame to pull the cover into position. Secure the corners to the legs using ratchets.
- Finalizing: Install Bungee Cords to secure the front cover.
Maintenance
- Inspection: Monthly, inspect for loose hardware, torn or frayed covers/ropes, and cracked or bent parts. Tighten all connections as needed.
- Cleaning: Remove debris from the cover using a broom or mop. Clean periodically with mild soap and water. Do not use bleach or harsh abrasives.
Specifications
- Overall Dimensions: 10 ft W x 17 ft L
- Center Height: 8 ft
- Side Height: 6 ft 3 in
- Pole Diameter: 1.34 in
Manufacturer information
Harbor Freight Tools
Practical help
Common problems
High wind damage
Do not use in high wind. Remove cover if harsh weather or heavy rain threatens.
Structural instability
Tighten all hardware regularly. Ensure proper anchoring to the ground.
Tearing fabric
Position all bolt heads against the fabric to prevent tearing.
Before use
- Check for utility lines before anchoring.
- Ensure assembly area is flat, level, and hard.
- Verify at least 3 workers are available for assembly.
- Wear safety goggles, heavy-duty gloves, and a hard hat.
- Keep bystanders out of the area during assembly.
Specs in practice
- Overall Dimensions
- 10 ft wide by 17 ft long.
- Center Height
- 8 ft.
- Pole Diameter
- 1.34 in.
Images and diagrams
- Figure A/B: Shows frame assembly components (connectors, rafters, legs).
- Figure D: Illustrates squaring the frame by measuring diagonals.
- Figure E/F: Details the anchoring process using wire rope and clamps.
- Figure K/L: Demonstrates the method for pulling the top cover over the frame.
Model compatibility
- Temporary use only; not for long-term shelter.
- Does not meet tent flammability standards.
- Do not use grill, heater, or ignition sources inside or near cover.

Manual page author
David Miller
Documentation analyst
Organizes user manual content into clear summaries, with attention to model details, product context, and everyday usability.