Electronics / Speakers & Soundbars
User Manual for Helvia ONDA FCW/BW Series Ceiling Speakers
Comprehensive user guide for Helvia ONDA FCW and BW series ceiling speakers. Includes installation instructions, wiring diagrams, power tap settings, and technical specifications.
Quick answers from the manual
Quick answer
- The Helvia ONDA FCW/BW series are 2-way ceiling speakers. Installation involves cutting a hole based on the model's cutout size, wiring to the amplifier, and securing with the 4-screw mounting system. BW series models include a front power tap selector for 70V/100V or 8 ohm operation. p. 9, 14, 15
Key actions
- Install speaker p. 14, 15
- Connect wires p. 15, 16
First start
- Ensure amplifier is off, select correct power tap (BW series), connect wires, mount speaker. p. 14, 15, 16
Show 4 more answers Show less
Problems and fixes
Distortion
Reduce amplifier volume (clipping).
p. 16
No bass / Unnatural sound
Check polarity (+/-).
p. 16Maintenance and reset
- Clean with dry, soft cloth. Do not use chemicals. p. 8
Technical specifications
| Parameter | Value | Meaning | Pages |
|---|---|---|---|
| Impedance | 8 ohm | Standard impedance for all models. | p. 21 |
Where to find it in the PDF
- Installation p. 14, 15
- Specifications p. 21
Table of contents
Manual images
Click an image to enlargeQuick Guide from the Manual
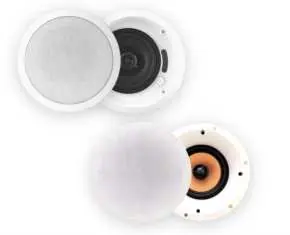
The Helvia ONDA FCW and BW series are 2-way ceiling speakers designed for professional audio reinforcement. Installation requires cutting a hole in the ceiling, connecting the speaker cable, and securing the unit using the integrated 4-screw mounting system. For BW series models, ensure the front power tap selector is set correctly for your amplifier configuration (70V/100V or 8 ohm).
Safety Instructions
- Electrical Hazards: Do not modify internal wiring. Always switch off the amplifier before connecting or disconnecting cables. Ensure cables are not pinched or frayed.
- Fire Hazards: Do not install near heat sources or in contact with flammable insulation. Do not block amplifier ventilation.
- Installation Hazards: Ensure the ceiling can support the speaker's weight. Use only certified mounting hardware. Professional installation is recommended.
Installation
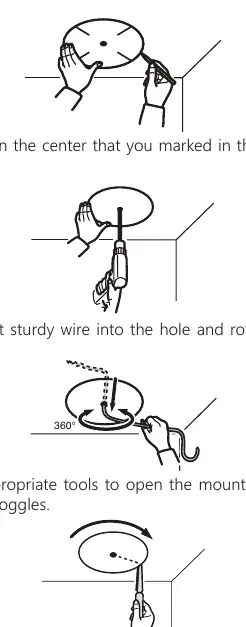
- Preparation: Mark the center and draw a hole on the ceiling using the diameter specified for your model (see Technical Parameters).
- Cutting: Drill a pilot hole, check for obstructions behind the ceiling, and cut the mounting hole.
- Wiring: Pull the speaker cable through the hole, leaving extra length.
- Mounting: Connect the cable to the speaker terminals. Insert the speaker into the hole and tighten the 4 screws to secure it. Do not touch the tweeter or woofer cones during handling.
Speaker Connection
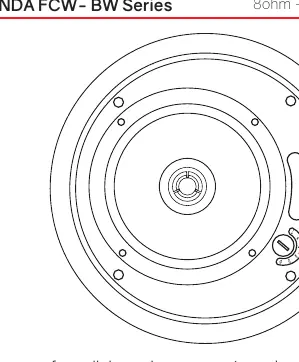
ONDA-BW Series: These models feature a built-in line transformer. Use the front power tap selector to choose the appropriate wattage for 70V/100V systems or the 8 ohm setting for low-impedance amplifiers. Notice: Never set the tap selector to the "-" (position 1) when operating on a 100V line.
ONDA-FCW Series: Connect the + and - wires from the amplifier directly to the corresponding terminals on the back of the speaker. Ensure correct polarity to avoid unnatural sound or loss of bass.
Maintenance
- Clean only with a dry, soft cloth. Do not use chemicals, alcohol, or abrasive materials.
- Periodically inspect mounting points and terminals for signs of wear or loosening.
Technical Parameters
The manual provides detailed frequency response charts and specifications for all models (ONDA-530FCW, ONDA-640FCW, ONDA-850FCW, ONDA-B520W, ONDA-B630W, ONDA-B840W), including power ratings, cutout sizes, and weights.
Practical help
Common problems
Distorted sound at high volume
The amplifier may be under-powered (clipping). Reduce the amplifier volume until distortion stops.
Unnatural sound or lack of bass
Check speaker polarity (+/-). Ensure wires are not reversed.
Speaker loose or rattling
Check that all 4 mounting screws are tightened and the ceiling surface is stable.
Before use
- Verify the ceiling material can support the speaker weight.
- Check for concealed electrical wiring or plumbing before cutting.
- Ensure the amplifier is turned off before making connections.
- For BW series, select the correct power tap on the front selector.
- Wear safety goggles when drilling or cutting the ceiling.
Show more Show less
Specs in practice
- Impedance (8 ohm)
- Standard low-impedance connection mode for professional amplifiers.
Images and diagrams
- Power Tap Selector: A rotary switch on the front of BW series speakers to select wattage or 8 ohm mode.
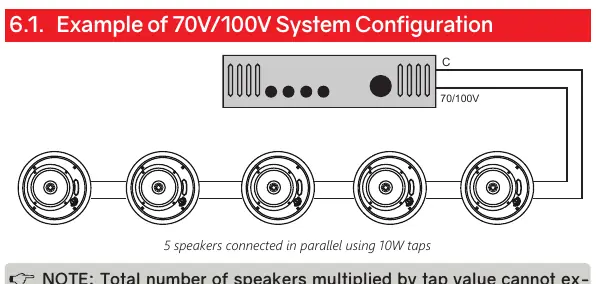
- Wiring Diagram: Illustrates parallel connection for 70V/100V systems.
Model compatibility
- Compatible with 70V/100V constant voltage amplifiers.
- Compatible with 8 ohm low-impedance amplifiers.

Manual page author
David Miller
Documentation analyst