General / Accessories
Hikoki NR 1890DCA Cordless Strip Nailer User Guide
Quick guide for the Hikoki NR 1890DCA cordless strip nailer, covering operation modes, nail loading, depth adjustment, safety procedures, and troubleshooting.
Table of contents
Manual images
Jump to the sectionQuick guide from the manual
The Hikoki NR 1890DCA is a cordless strip nailer designed for wood framing, flooring, and decking. This guide provides essential operational steps, safety protocols, and maintenance instructions. Always ensure the battery is removed before performing any maintenance, clearing jams, or adjusting the tool.
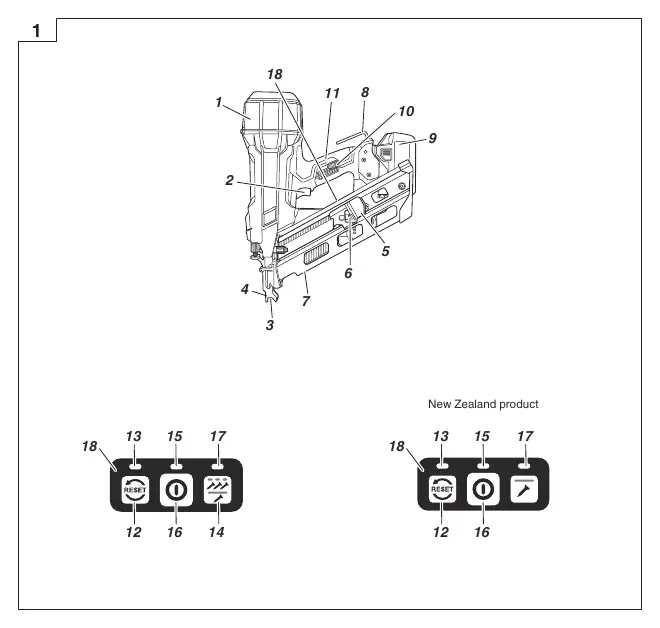
Operation panel and modes
The tool features an operation panel to manage power and nailing modes. To turn the tool on, press and hold the power switch for more than 1 second. The tool will automatically power off after 30 minutes of inactivity. You can switch between Full Sequential Actuation (initial mode) and Contact Actuation by pressing the nailing operation switch. Note that New Zealand models are restricted to Full Sequential mode only.
Loading nails
- Remove the battery from the nailer.
- Insert the nail strip into the back of the magazine.
- Slide the strip forward.
- Pull the nail feeder (B) to the rear of the magazine until it returns gently. Ensure the nail feeder (A) is not riding up on a nail.
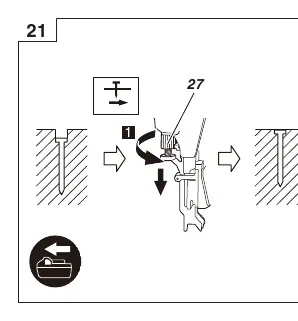
Adjusting nailing depth
To ensure consistent nail penetration, adjust the depth using the adjuster located on the tool. Turn the adjuster toward the shallow side if nails are driven too deep, or toward the deep side if they are too shallow. Perform a test on scrap material after adjustment.
Safety and maintenance
Always wear eye and ear protection. Never point the nail outlet at yourself or others. The tool includes a Misalignment Protection Function; if the indicator lights up, remove jammed nails, press the push lever, pull the trigger, and push the Misalignment Clear switch. Keep the magazine and push lever clean by blowing them out daily to prevent jams.
Troubleshooting
If the tool fails to operate, check the battery charge, ensure the push lever is pressed firmly against the workpiece, and verify that the trigger lock is in the off position. If the tool is too hot or cold, allow it to reach an appropriate temperature before resuming work.
Manufacturer information
HiKOKI
Practical help
Common problems
Power switch turns off automatically
Check for low battery, ensure the push lever/trigger are not held in the ON state, or press and hold the power switch for more than 1 second if the auto-power-off function was triggered.
Nailer does not drive nails
Ensure the tool is pressed firmly against the workpiece, the trigger is pulled firmly, and the trigger lock is in the OFF position. Check for jams or empty magazine.
Nails driven too deep or shallow
Adjust the nailing depth using the adjuster on the tool. Turn toward the shallow side if too deep, or deep side if too shallow.
Misalignment indicator blinking
Clear any jammed nails, then press the push lever, pull the trigger, and press the Misalignment Clear switch.
Before use
- Ensure all mounting screws are tightened.
- Verify the push lever and trigger move smoothly.
- Check that the battery is fully charged.
- Confirm the nailing operation mode is correctly set.
- Ensure eye protection is worn by the operator and bystanders.
Specs in practice
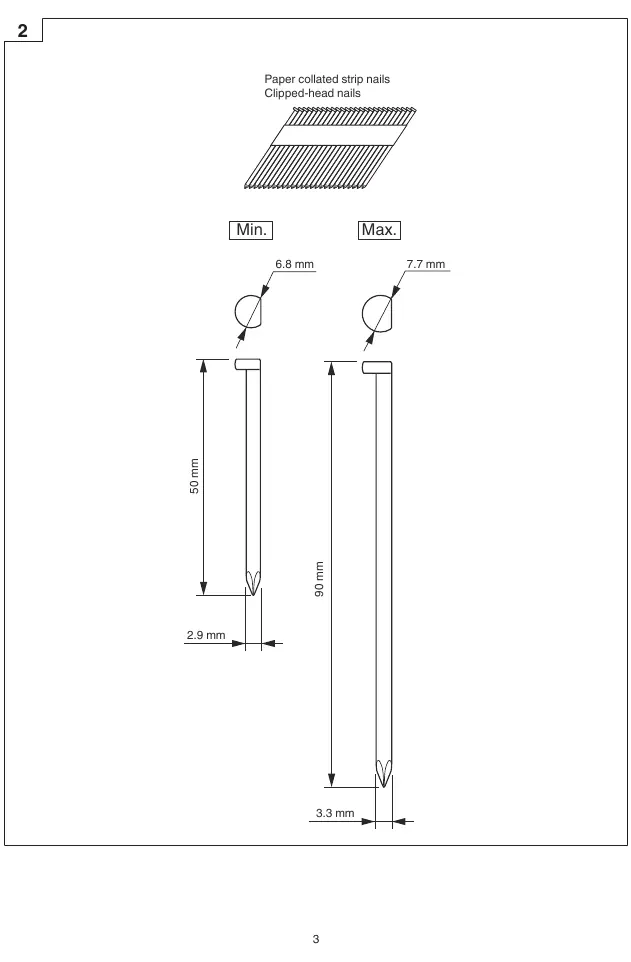
- Applicable Nail Length
- 50 mm to 90 mm paper collated strip nails (30° angle).
- Nail Loading Capacity
- 50 nails.
- Operating Temperature
- 0°C to 40°C. The tool may fail to operate outside this range.
Images and diagrams
- Fig 1: Overview of parts including trigger, push lever, magazine, and operation panel.
- Fig 2: Nail specifications (50-90mm length, 2.9-3.3mm diameter).
- Fig 10: Nailing operation mode selection (Full Sequential vs Contact).
- Fig 21-22: Nailing depth adjustment procedure.
Model compatibility
- Use only specified paper collated strip nails (30° angle).
- Not recommended for 75-90mm ring shank nails in pressure-treated lumber.
- New Zealand models are restricted to Full Sequential Actuation mode only.

Manual page author
David Miller
Documentation analyst
Organizes user manual content into clear summaries, with attention to model details, product context, and everyday usability.