General / Accessories
HiKOKI NT 1865DAA and NT 1865DSA Cordless Finish Nailer Instruction Manual
Quick guide for the HiKOKI NT 1865DAA and NT 1865DSA cordless finish nailers. Includes setup, nailing modes, depth adjustment, maintenance, and troubleshooting.
Table of contents
Manual images
Jump to the sectionQuick guide from the manual
This document provides essential operating instructions for the HiKOKI NT 1865DAA and NT 1865DSA cordless finish nailers. It covers safety, battery management, nailing modes, and maintenance. Always ensure the battery is removed before performing any adjustments or maintenance.
Device Description
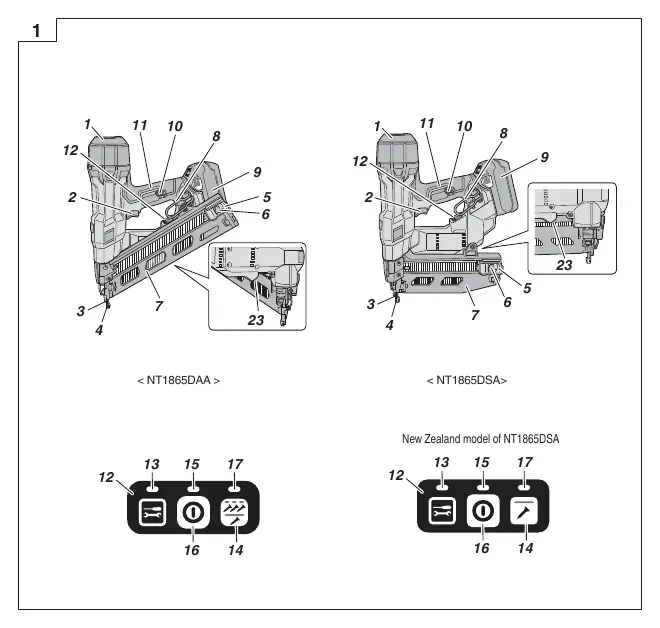
The nailers feature an operation panel with power and mode switches, a magazine for nail strips, a push lever for safety actuation, and a trigger. The NT 1865DAA uses 15-gauge nails (34° angle), while the NT 1865DSA uses 16-gauge straight nails.
First Use and Setup
- Battery: Charge using the UC18YSL3 charger. Ensure the battery is fully inserted.
- Loading Nails: Insert the nail strip into the back of the magazine, slide it forward, and engage the nail feeder.
- Powering On: Press and hold the power switch for more than 1 second. The power indicator will light green.
Operation Modes
The nailers offer two firing modes (except for New Zealand models, which are fixed to full sequential):
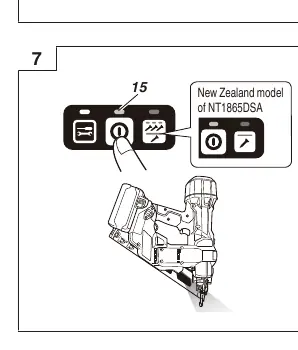
- Full Sequential Actuation: Press the push lever against the wood first, then pull the trigger.
- Contact Actuation: Allows for rapid nailing by holding the trigger and bouncing the push lever against the workpiece.
Adjustments and Maintenance
- Nailing Depth: Remove the battery, then turn the adjuster on the firing head. Turn toward the shallow side if nails are driven too deep, or toward the deep side if too shallow.
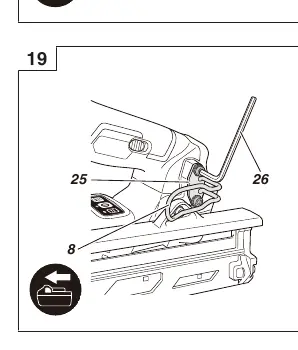
- Clearing Jams: Remove the battery and nails. Release the lock lever, open the guide plate, and remove the jammed nail with a screwdriver.
- Cleaning: Regularly blow out dust from the magazine and the push lever sliding area.
Safety Warnings
- Always wear eye and ear protection.
- Never point the nail outlet at yourself or others.
- Do not use on ladders or scaffolding.
- The tool has a temperature protection circuit; if it stops due to overheating, allow it to cool before resuming.
Manufacturer information
HiKOKI
Practical help
Common problems
Power switch turns off automatically
Check for low battery, ensure push lever/trigger are not held during startup, or check if the 30-minute auto-power-off has activated.
Nailer operates but no nail is driven
Check for a jam, ensure the magazine is clean, or verify that the driver blade is not worn.
Weak drive or slow cycle
Adjust the nailing depth setting or check if the driver blade is worn.
Skipping nails
Ensure you are using the correct recommended nails and that the nail feeder is not damaged.
Before use
- Ensure all mounting screws are tightened.
- Verify the push lever and trigger move smoothly.
- Check that the battery is fully charged.
- Ensure the nailing mode is correctly set for the task.
- Confirm the trigger lock is in the correct position.
Specs in practice
- 15 Ga (NT1865DAA)
- Uses 15-gauge finish nails at a 34° angle.
- 16 Ga (NT1865DSA)
- Uses 16-gauge straight finish nails.
Images and diagrams
- Fig. 1-2: Overview of parts and operation panel.
- Fig. 3: Battery level indicator status.
- Fig. 8: Nailing mode selection (Full Sequential vs. Contact).
- Fig. 17-18: Nailing depth adjustment procedure.
Model compatibility
- New Zealand models of NT1865DSA are restricted to full sequential mode only.
- Only use genuine HiKOKI batteries.
- Operating temperature range is 0°C to 40°C.

Manual page author
David Miller
Documentation analyst
Organizes user manual content into clear summaries, with attention to model details, product context, and everyday usability.