Tools / Power Tools
User Manual for HiKOKI G10BYEQ and G13BYEQ Disc Grinder
Comprehensive user guide for the HiKOKI G10BYEQ and G13BYEQ disc grinders. Includes assembly instructions, safety warnings, operation procedures, maintenance, and technical specifications.
Table of contents
Manual images
Click an image to enlargeQuick guide from the manual
This manual provides essential instructions for the safe and effective operation of the HiKOKI G10BYEQ and G13BYEQ disc grinders. Before use, ensure the power source matches the nameplate requirements and that you are wearing appropriate personal protective equipment, including eye protection. Always test the grinder in a safe position for at least 1 minute (daily) or 3 minutes (after changing the wheel) before starting work.
Safety warnings
- Kickback protection: The tool automatically cuts power if the wheel speed drops suddenly (e.g., wheel lock).
- Overload/Overheat protection: The motor stops if overloaded or overheated. If this occurs, release the switch and allow the tool to cool down.
- Braking function: The electric brake activates when the switch is released. Hold the tool firmly as this may cause a slight kickback.
- 0 Voltage restart protection: Prevents the tool from restarting automatically after a power interruption.
- General safety: Do not use the tool near flammable materials or welding equipment. Always disconnect the power when not in use or before changing accessories.
Assembly and installation
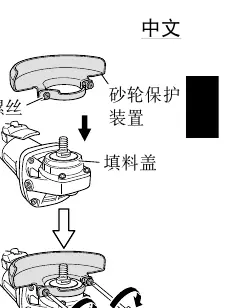
Installing the wheel guard
The wheel guard must be mounted to protect the operator from broken wheel fragments.
- G10BYEQ: Loosen the screw, install the guard onto the packing gland, adjust to the desired angle, and tighten the screw securely.
- G13BYEQ: Set the assembly onto the packing gland, tighten the M5 hex socket bolt while the lever is in the closed position. Adjust the angle by releasing the lever.
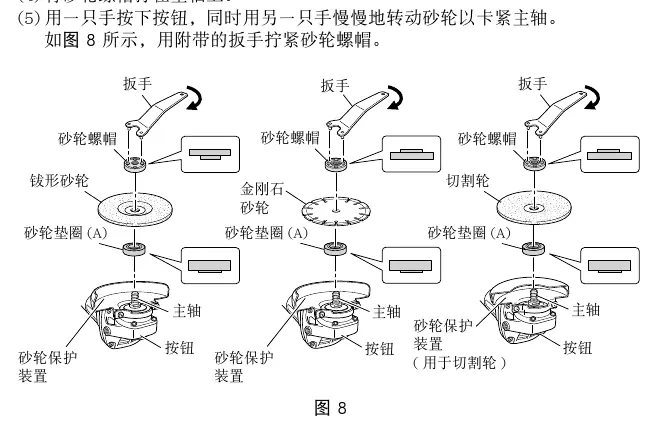
Assembling the depressed center wheel
- Turn the grinder upside down so the spindle faces upward.
- Align the wheel washer with the spindle's notched part.
- Fit the wheel onto the washer.
- Screw the wheel nut onto the spindle.
- Press the push button to lock the spindle and tighten the nut using the supplied wrench.
Operation
To switch on, slide the off-lock lever and press the switch lever. The grinder features a soft-start function. When grinding, use only the edge of the wheel at a 15° to 30° angle. Do not apply excessive pressure; the weight of the machine is usually sufficient for effective grinding.
Maintenance and inspection
Regularly inspect the wheel for cracks and ensure all mounting screws are tight. After approximately 50 hours of use, clean the filter set. Use an air blow gun to remove dust from the air holes and filter mesh. If the filter is damaged, replace it immediately. For power cord replacement, contact a HiKOKI Authorized Service Center.

Manufacturer information
HiKOKI
Practical help
Common problems
Grinder stops during operation
Check if the overload, overheat, or kickback protection has been triggered. Release the switch, allow the tool to cool if necessary, and restart.
Excessive vibration
Ensure the wheel is correctly mounted, the wheel nut is tight, and the wheel is not damaged or cracked.
Filter clogged with dust
Remove the filter set and use an air blow gun to clean the mesh. Replace if damaged.
Before use
- Verify power source matches the tool's nameplate.
- Ensure the wheel guard is securely mounted.
- Check that the wheel is the correct type and free of cracks.
- Test run the tool for 1-3 minutes in a safe position.
- Ensure the push button is disengaged before switching on.
Specs in practice
- G10BYEQ Wheel size
- 100 x 6 x 16 mm
- G13BYEQ Wheel size
- 125 x 6 x 22.23 mm
Images and diagrams
- Fig 2/3: Shows the correct installation of the wheel guard for G10BYEQ and G13BYEQ models.
- Fig 8/9: Illustrates the assembly sequence for the depressed center wheel, diamond wheel, and cutting wheel.
- Fig 12/13: Demonstrates the removal and reattachment procedure for the filter set.
Model compatibility
- Do not use cutting-off wheels for side grinding.
- Do not use separate reducing bushings or adapters for large hole wheels.
- Use only recommended wheel types and guards.

Manual page author
David Miller
Documentation analyst
Organizes user manual content into clear summaries, with attention to model details, product context, and everyday usability.