Tools / Drills
User Manual for HiKOKI D 13VL Drill
Quick guide and user manual for the HiKOKI D 13VL drill. Includes safety instructions, operation, maintenance, and technical specifications.
Table of contents
Manual images
Click an image to enlargeQuick guide from the manual
The HiKOKI D 13VL is a professional-grade drill designed for boring holes in metal, wood, and plastic. Before use, ensure the power source matches the requirements on the product nameplate and that the switch is in the OFF position. Always use the side handle and hold the drill firmly with both hands during operation.
Safety warnings
General Power Tool Safety Warnings: Read all safety warnings and instructions. Failure to follow them may result in electric shock, fire, or serious injury. Keep the work area clean and well-lit, avoid explosive atmospheres, and keep children and bystanders away. Ensure the power tool plug matches the outlet and avoid body contact with earthed surfaces.
Drill Safety Warnings: Use auxiliary handles if supplied. Hold the power tool by insulated gripping surfaces when performing operations where the cutting accessory may contact hidden wiring or its own cord.
Standard accessories
The package includes the main unit, a chuck wrench (for keyed chuck models), a side handle, and a depth gauge.
Applications
Boring holes in metal, wood, and plastic.
Specifications
The drill features a power input of 860 W. It has two speed ranges: 0–1100 min-1 and 0–3000 min-1. Drilling capacity in steel is 13 mm (range 1) and 8 mm (range 2), and in wood is 40 mm (range 1) and 25 mm (range 2). The weight is 2.9 kg.
Mounting and operation
Refer to the following actions for setup and use:

- Insulated gripping surface: Figure 1
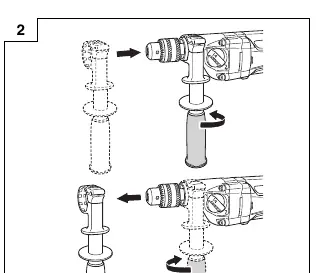
- Fixing and removing side handle: Figure 2
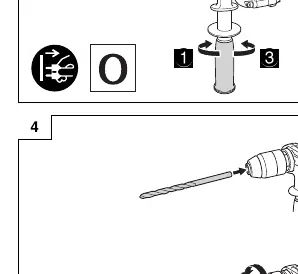
- Using depth gauge: Figure 3
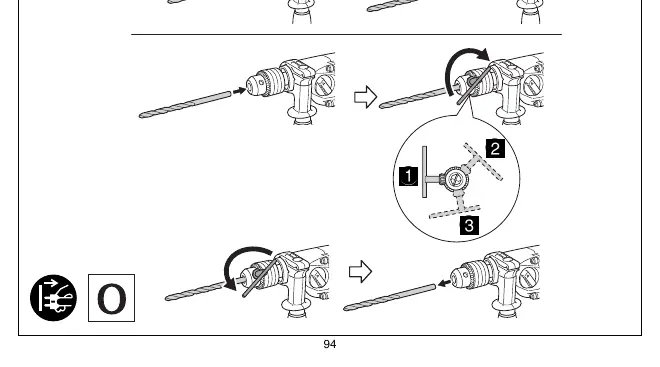
- Mounting and dismounting of the bit: Figure 4
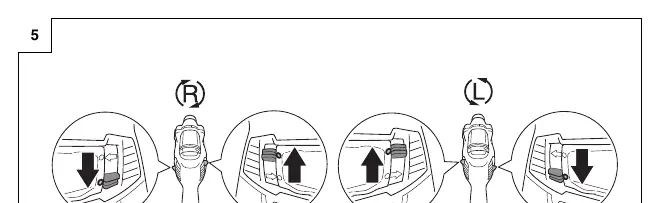
- Selecting rotation direction: Figure 5
- Switch operation: Figure 6
- Locking-on the switch: Figure 7
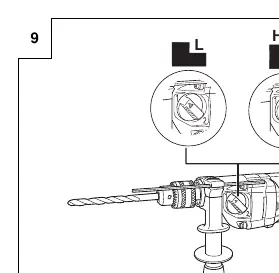
- Change rotation speed: Figure 9
Maintenance and inspection
Regularly inspect drill bits for wear and replace or resharpen them as needed. Check all mounting screws periodically to ensure they are tight. The motor winding is the heart of the tool; ensure it is not damaged or wet. Carbon brush inspection and replacement, as well as supply cord replacement, must be performed by a HiKOKI Authorized Service Center.
Guarantee
HiKOKI Power Tools are guaranteed in accordance with statutory/country-specific regulations. This guarantee does not cover defects or damage due to misuse, abuse, or normal wear and tear.
Manufacturer information
HiKOKI
Practical help
Common problems
Drill stalls during operation
Release the trigger immediately, remove the bit from the work, and start again. Do not click the trigger on and off to restart a stalled drill, as this can damage it.
Overheating of drill bit
The bit may become overheated during operation but remains operable. Do not cool the drill bit in water or oil.
Dust accumulation in mechanism
Avoid placing the drill on surfaces with significant chips and dust while it is still rotating after use, as dust may be absorbed into the mechanism.
Before use
- Ensure the power source conforms to the requirements on the product nameplate.
- Ensure the power switch is in the OFF position.
- Check for hidden electric cables or conduits before drilling into walls, ceilings, or floors.
- Use the auxiliary handle if supplied.
- Wear eye protection and appropriate personal protective equipment.
Specs in practice
- No-load speed (Range 1)
- 0 – 1100 min-1
- No-load speed (Range 2)
- 0 – 3000 min-1
- Capacity (Steel)
- 13 mm (Range 1) / 8 mm (Range 2)
- Capacity (Wood)
- 40 mm (Range 1) / 25 mm (Range 2)
Images and diagrams
- Figure 2: Fixing and removing the side handle.
- Figure 3: Using the depth gauge.
- Figure 4: Mounting and dismounting the drill bit.
- Figure 5: Selecting the rotation direction.
- Figure 6: Switch operation.
Model compatibility
- Use an ordinary metalworking drill bit for metal or plastic.
- Use an ordinary woodworking drill bit for wood.
- For holes 6.5 mm or smaller in wood, use a metalworking drill bit.

Manual page author
David Miller
Documentation analyst
Organizes user manual content into clear summaries, with attention to model details, product context, and everyday usability.