Tools / Power Tools
User Manual for HiKOKI D 10VST (L) Drill
Quick guide for the HiKOKI D 10VST (L) drill. Includes safety instructions, drilling procedures, bit mounting, maintenance, and technical specifications.
Table of contents
Manual images
Click an image to enlargeQuick guide from the manual
This manual provides essential instructions for the safe operation and maintenance of the HiKOKI D 10VST (L) drill. Always read the safety warnings before use. Ensure the power source matches the product nameplate and that the switch is in the OFF position before plugging in the tool.
Safety Warnings
General Power Tool Safety: Keep the work area clean and well-lit. Do not operate in explosive atmospheres. Keep children and bystanders away. Use personal protective equipment, including eye protection. Prevent unintentional starting by ensuring the switch is in the OFF position before connecting to power.
Drill Safety: Hold the tool by insulated gripping surfaces when performing operations where the cutting accessory may contact hidden wiring. Always start drilling at low speed and apply pressure only in a straight line with the bit. Do not wear gloves made of material liable to roll up (e.g., cotton, wool).
Specifications
The drill features a 450 W power input and a no-load speed of 0–3200 min–1. It has a 10 mm drill chuck capacity. Drilling capacity is 10 mm for steel and 25 mm for wood. The tool weighs 1.3 kg.
Mounting and Dismounting Bits
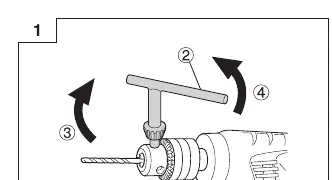
For Keyed Chuck: Open the chuck jaws, insert the bit, and use the chuck wrench in each of the three holes to tighten clockwise. To remove, use the wrench counter-clockwise.
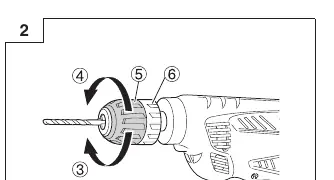
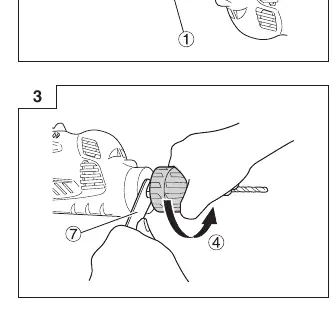
For Keyless Chuck: Hold the ring and turn the sleeve counter-clockwise to open. Insert the bit, then hold the ring and turn the sleeve clockwise to tighten. If difficult to loosen, fix the spindle with an open-end wrench and turn the sleeve counter-clockwise.
How to Use
Switch Operation: Pull the trigger to rotate the tool; release to stop. Pulling the trigger and pushing the stopper keeps the tool in the ON position for continuous running. Pull the trigger again to release the stopper.
Drilling: Start slowly and gradually increase speed. Apply pressure in a straight line. If the drill stalls, release the trigger immediately and remove the bit from the work before restarting.
Maintenance and Inspection
Regularly inspect drill bits for abrasion and replace or resharpen them. Check all mounting screws for tightness. Keep the motor winding clean and free of oil or water. Carbon brush inspection and replacement, as well as supply cord replacement, must be performed ONLY by a HiKOKI Authorized Service Center.
Manufacturer information
HiKOKI
Practical help
Common problems
Drill stalls during operation
Release the trigger immediately, remove the bit from the workpiece, and start again. Do not repeatedly click the trigger to restart a stalled drill.
Bit bends or breaks
Do not operate at speeds higher than the bit's rating. Start drilling at low speed and apply pressure only in a straight line.
Loose mounting screws
Regularly inspect all mounting screws and retighten immediately if loose.
Before use
- Ensure the power source conforms to the product nameplate.
- Verify the power switch is in the OFF position.
- Select the appropriate drill bit for the material (metal, wood, plastic).
- Ensure the drill bit is securely mounted in the chuck.
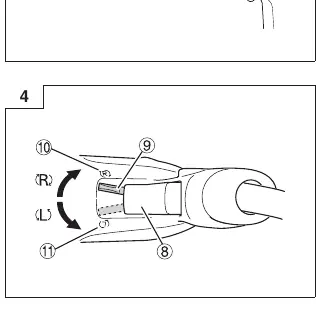
- Check the rotational direction (R for clockwise, L for counter-clockwise).
Specs in practice
- No load speed
- 0–3200 min–1
- Drill chuck capacity
- 10 mm
- Capacity (Steel)
- 10 mm
- Capacity (Wood)
- 25 mm
Images and diagrams
- Fig 1: Mounting/dismounting bit for keyed chuck.
- Fig 2: Mounting/dismounting bit for keyless chuck.
- Fig 3: Loosening keyless chuck using open-end wrench.
- Fig 4: Rotational change lever (R/L).
- Fig 5: Switch trigger and stopper operation.
Model compatibility
- Use ordinary metalworking drill bits for metal or plastic.
- Use ordinary woodworking drill bits for wood.
- For holes 6.5 mm or smaller in wood, use a metalworking drill bit.

Manual page author
Michael Turner
Technical manual editor
Reviews PDF manuals for structure, safety notes, and practical product details so readers can find the right information quickly.