Tools / Drills
User Manual for HiKOKI DM 20V Masonry Drill
Quick guide for the HiKOKI DM 20V masonry drill. Includes setup, drilling modes, bit installation, maintenance, and safety instructions.
PDF source: Français · summary: English
Quick answers from the manual
Quick answer
- The HiKOKI DM 20V is a corded masonry drill designed for drilling into concrete, stone, metal, wood, and plastic. It features two speed settings and a mode selector for rotation-only or impact-drilling. p. 7, 8
Key actions
- Mounting the bit p. 8
- Switching between Impact and Rotation p. 8
- Changing speed p. 8
First start
- Ensure the power switch is in the OFF position before connecting to the power source. p. 8
Show 4 more answers Show less
Problems and fixes
Drill stalls
Release trigger immediately, remove bit, and start again.
p. 9Maintenance and reset
- Inspect drill bits, mounting screws, motor, and carbon brushes regularly. Replace damaged supply cord at an authorized service center. p. 9
Technical specifications
| Parameter | Value | Meaning | Pages |
|---|---|---|---|
| Power input | 790 W | Rated power consumption | p. 7 |
| Weight | 3.0 kg | Weight without cord | p. 7 |
Where to find it in the PDF
- Safety Warnings p. 6, 7
- Specifications p. 7
- Operation p. 8, 9
Table of contents
Manual images
Click an image to enlargeQuick guide from the manual
The HiKOKI DM 20V is a corded masonry drill designed for drilling into concrete, stone, metal, wood, and plastic. Before use, ensure the power source matches the product nameplate and the switch is in the OFF position. Always use the side handle and hold the tool firmly with both hands during operation.
Safety instructions
- General: Read all safety warnings and instructions to avoid electric shock, fire, or serious injury.
- Work area: Keep the area clean and well-lit. Do not operate in explosive atmospheres.
- Electrical: Ensure the plug matches the outlet. Do not modify the plug. Use an RCD-protected supply in damp locations.
- Personal: Wear eye protection and ear protection when impact drilling. Do not wear loose clothing or jewelry.
Setup and installation
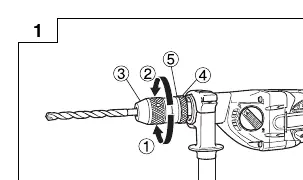
Mounting and dismounting the bit
The drill uses a keyless chuck (Type A or Type B depending on the region).
- Type A: Turn the lock collar to 'AUF' to open the chuck. Insert the bit, then turn the collar to 'ZU'. Grip the ring and turn the sleeve clockwise to tighten.
- Type B: Turn the sleeve counterclockwise to open the chuck. Insert the bit, then turn the sleeve clockwise to tighten.
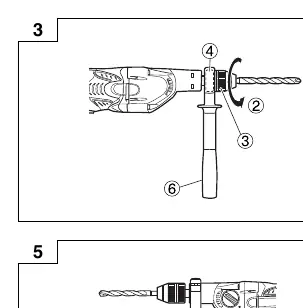
Side handle and depth gauge
Attach the side handle to the mounting part and rotate the grip clockwise to secure it. To use the depth gauge, insert it into the U-shaped groove on the side handle and adjust to the desired depth.
Operation
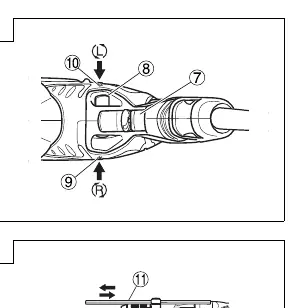
Mode selection
Use the change lever to switch between modes:
- IMPACT: For hard materials like concrete, stone, and tiles.
- ROTATION: For metal, wood, and plastic.
Speed changeover
Rotate the gear shift dial to select speed. '1' denotes low speed, and '2' denotes high speed. Ensure the drill has come to a complete stop before changing speeds.
Drilling
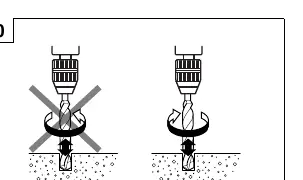
Start slowly and increase speed gradually. Apply pressure in a straight line with the bit. If the drill stalls, release the trigger immediately and remove the bit from the work.
Maintenance and inspection
- Regularly inspect drill bits for abrasion and replace if necessary.
- Check all mounting screws for tightness.
- Keep the motor winding clean and free from oil or water.
- Carbon brush inspection and replacement must be performed by an authorized HiKOKI service center.
Manufacturer information
HiKOKI
Practical help
Common problems
Drill bit stalls
Release the trigger immediately, remove the bit from the work, and start again. Do not click the trigger on and off to restart.
Gear shift dial is hard to turn
Turn the chuck slightly in either direction and then turn the gear shift dial again.
Before use
- Ensure power source matches product nameplate
- Check that power switch is in OFF position
- Select appropriate drill bit for material
- Ensure side handle is securely attached
- Check rotational direction
Show more Show less
Specs in practice
- No load speed (1)
- Low speed range (0-1000 min-1)
- No load speed (2)
- High speed range (0-3000 min-1)
Images and diagrams
- Fig 1/2: Mounting/dismounting drill bits
- Fig 4: Rotational direction switch
- Fig 5/6: Side handle and depth gauge installation
- Fig 7: Impact/Rotation mode selector
- Fig 8: Speed changeover dial
Model compatibility
- Use impact drill bits for concrete/stone
- Use metalworking bits for metal/plastic
- Use woodworking bits for wood

Manual page author
Emily Carter
User documentation editor