Tools / Drills
User Manual for HiKOKI DS 18DF Cordless Driver Drill
Comprehensive user guide for the HiKOKI DS 18DF Cordless Driver Drill. Includes instructions for battery charging, bit installation, torque adjustment, speed selection, and maintenance.
Quick answers from the manual
Quick answer
- The HiKOKI DS 18DF is a cordless driver drill featuring a keyless chuck, adjustable clutch (1-22), and two-speed settings. It is designed for driving screws and drilling into wood or metal. p. 1, 30
Key actions
- Adjusting torque p. 36
- Changing speed p. 35
First start
- Charge the battery p. 32
- Install the bit p. 34
Problems and fixes
Motor stops
Battery is low or tool is overloaded. Charge battery or release switch and eliminate overload.
p. 26Maintenance and reset
- Cleaning terminals p. 40
Technical specifications
| Parameter | Value | Meaning | Pages |
|---|---|---|---|
| Voltage | 18 V | Operating voltage | p. 30 |
| No-load speed | 0-450 / 0-1250 /min | Low and High speed settings | p. 30 |
Where to find it in the PDF
- Safety Warnings p. 22, 23, 24, 25
- Specifications p. 30
- Operation p. 34, 35, 36, 37
Table of contents
Manual images
Click an image to enlargeQuick Start Guide
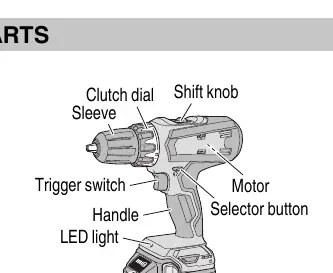
To begin using your HiKOKI DS 18DF, ensure the battery is fully charged. Insert the battery into the tool until it clicks. Install your desired drill or driver bit into the keyless chuck by rotating the sleeve. Select your rotation direction using the selector button and adjust the clutch dial to the appropriate torque setting for your task.
Safety Warnings
- Work Area: Keep the area clean, well-lit, and free of debris. Do not operate in explosive atmospheres.
- Electrical Safety: Do not expose the tool to rain or wet conditions.
- Personal Safety: Always wear eye protection. Keep hair, clothing, and gloves away from moving parts.
- Battery Safety: Do not short-circuit the battery. Do not dispose of batteries in fire. Charge only with the specified charger.
Battery Charging and Handling
The battery should be charged at temperatures between 0°C and 40°C. The charger indicator light provides status updates:
- Blinking (1s interval): Before charging.
- Continuous Light: Charging in progress.
- Blinking (1s interval): Charging complete.
- Blinking (0.5s interval): Overheat standby (battery too hot).
- Flickering (0.1s interval): Malfunction in battery or charger.
Note: If the battery is hot after use, let it cool before charging. If the battery usage time becomes very short, it may have reached the end of its life.
Operation
Bit Installation and Removal
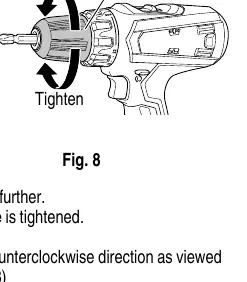
To install a bit, loosen the sleeve by turning it counter-clockwise (viewed from the front) to open the chuck. Insert the bit, then tighten the sleeve by turning it clockwise.
Rotation and Speed
Use the selector button to choose the rotation direction (R for clockwise, L for counter-clockwise). Use the shift knob to select speed: LOW (0–450/min) for high torque tasks or HIGH (0–1250/min) for fast drilling.
Torque Adjustment
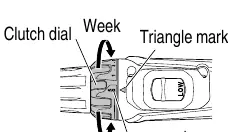
The clutch dial allows you to adjust tightening torque from 1 to 22. Use lower numbers for smaller screws and higher numbers for larger screws or drilling. Align the chosen number with the triangle mark on the tool body.
Maintenance and Inspection
- Tool Inspection: Sharpen or replace dull bits to prevent motor malfunction.
- Mounting Screws: Regularly check that all screws are tight.
- Cleaning: Wipe the tool with a soft, dry cloth or soapy water. Do not use solvents like gasoline or paint thinner.
- Storage: Store in a dry place below 40°C, out of reach of children.
Manufacturer information
HiKOKI
Practical help
Common problems
Motor stops during operation
The battery may be low (charge it) or the tool is overloaded (release the switch, eliminate the cause of overload, and let the battery cool).
Sleeve cannot be loosened
Secure the bit with a vise, set the clutch mode between 1 and 11, and turn the sleeve to the loose side (left) while operating the clutch.
Battery indicator shows malfunction
Check for foreign objects in the charger connector. If none, the battery or charger may be faulty; contact an authorized service center.
Before use
- Ensure the work area is clear of debris.
- Verify the battery is fully charged.
- Check that the rotation direction is set correctly.
- Ensure the bit is securely tightened in the chuck.
- Set the clutch dial to the appropriate torque for the task.
Specs in practice
- No-load speed
- Low: 0-450/min; High: 0-1250/min. Use Low for high torque, High for speed.
- Clutch dial (1-22)
- Adjusts tightening torque. 1 is the weakest, 22 is the strongest.
- Drilling capacity
- Wood: 38mm; Metal (Steel/Aluminum): 13mm.
Images and diagrams
- Fig 3: Overview of tool parts including clutch dial, shift knob, and trigger.
- Fig 8: How to loosen and tighten the keyless chuck sleeve.
- Fig 12: Aligning the clutch dial with the triangle mark.
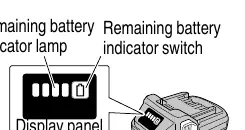
- Fig 15: Using the remaining battery indicator.
Model compatibility
- Use only genuine HiKOKI batteries.
- Charger UC18YKSL is compatible with 14.4V-18V batteries.

Manual page author
Emily Carter
User documentation editor
Prepares concise manual descriptions and highlights the most useful setup, operation, and maintenance information for readers.