Tools / Saws
User Manual for Hilti DST 20-CA Electric Wall Saw
Comprehensive user guide for the Hilti DST 20-CA electric wall saw. Includes setup, installation, blade mounting, safety procedures, and maintenance instructions.
PDF source: RO · summary: English
Quick answers from the manual
Quick answer
- The Hilti DST 20-CA is a water-cooled electric wall saw for reinforced concrete and masonry. It requires a 380-400V power supply and a water pressure of 2-6 bar for operation. p. 17, 20
Key actions
- Mount the rail system securely on the wall. p. 26, 27
- Mount the saw head onto the rail and lock it. p. 32
- Mount the saw blade using the correct flange and bolt. p. 37, 39
First start
- Ensure the rail is stable, water is connected, and the emergency stop is unlocked. p. 40, 41
Show 4 more answers Show less
Problems and fixes
Blade jamming
Free the blade by moving it forward/backward or remove the blade and chisel the piece free.
p. 48Maintenance and reset
- Service is required every 200 operating hours. p. 45
Technical specifications
| Parameter | Value | Meaning | Pages |
|---|---|---|---|
| Blade diameter | 600 - 1600 mm | Admissible blade diameter range | p. 20 |
| Voltage | 380 - 400 V | Nominal voltage | p. 20 |
Where to find it in the PDF
- Safety Instructions p. 5, 15
- Installation p. 22, 31
- Blade Mounting p. 30, 39
- Technical Data p. 15, 20
Table of contents
Manual images
Click an image to enlargeQuick guide from the manual
The Hilti DST 20-CA is a professional, water-cooled electric wall saw designed for cutting reinforced concrete and masonry. Before starting, ensure the rail system is securely mounted on a solid, stable surface. Always verify that the water supply is connected and providing sufficient pressure (2-6 bar) for cooling and dust suppression. Ensure all safety zones are clear of personnel and that you are wearing appropriate personal protective equipment (PPE).
Safety instructions
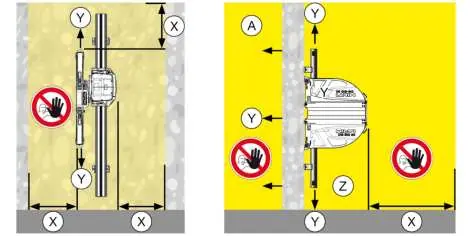
- Electrical Safety: Ensure the power supply (380-400V) is properly grounded and protected by a residual current device (RCD).
- Operational Safety: Never stand in the cutting plane of the saw blade. Always use the appropriate blade guard for the specific cutting application.
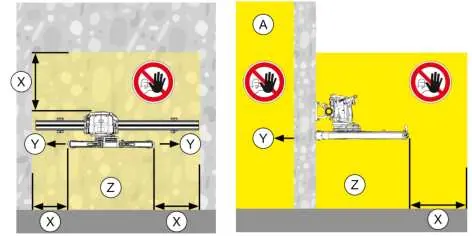
- Exclusion Zones: Maintain a safety distance of at least 1.5m from all moving parts. Never stand below the work area.
- Dust and Slurry: Use a dust extraction system where possible. Manage slurry runoff to prevent environmental contamination.
Installation
Rail mounting
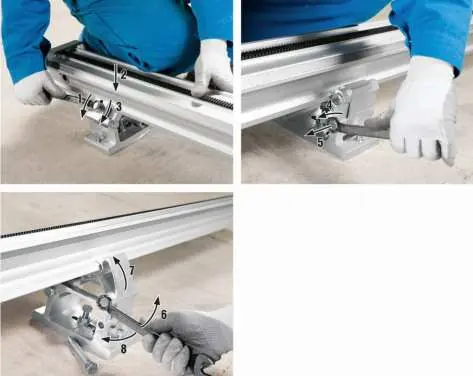
- Mark the anchor positions according to the planning guidelines.
- Drill holes and install appropriate anchors (e.g., HKD-D M12).
- Mount the rail feet and align the rail system.
- Ensure the rail is perpendicular to the cut and tighten all fixings.
Saw head mounting
- Unlock the locking lever on the saw head.
- Place the saw head onto the rail, ensuring the guide rollers are correctly positioned.
- Lock the lever securely into the housing recess.
Blade mounting
Always ensure the saw is disconnected from power before mounting or changing blades.
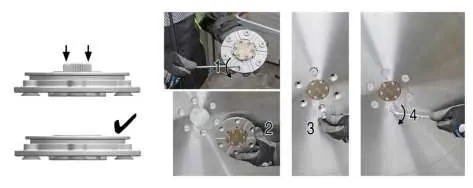
- Normal cutting: Mount the inner flange, then the blade, and secure with the outer flange and M12x25 bolt.
- Flush cutting: Use the specific flush cutting inner flange and secure with the provided countersunk screws.
- Important: Always grease the bolt thread and ensure the blade rotation arrow matches the guard arrow.
Operation
Perform a test cut at reduced power (30-50%) to ensure a straight, non-wavy cut. Subsequent cuts can be performed at full power. Always pivot the blade out of the cut before moving the saw head to prevent damage.
Maintenance
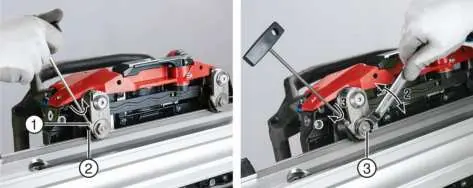
- Daily: Check rail feet, rail surfaces, and blade guard for debris. Inspect cables and connectors for damage.
- Weekly: Check roller guide play, clean and grease threads, and inspect all safety components.
- Inspection: Have the unit serviced by Hilti every 200 operating hours.
Manufacturer information
Hilti Corporation
Practical help
Common problems
Blade jamming in the cut
Check if the cut piece is pressing on the blade. Try to lift the blade out using alternating forward/reverse movements. If stuck, remove the blade and free the piece with a chisel.
Reduced power
Check if the blade specification is correct, reduce cutting depth, or increase feed speed. Ensure the blade rotation speed is set correctly.
Cut is not straight
Check flange tightness, adjust guide roller tolerance, or ensure the rail system is securely fixed and not twisting.
Before use
- Verify power supply (380-400V) and RCD protection.
- Ensure rail system is aligned and securely mounted.
- Check that the saw head is locked correctly on the rail.
- Verify blade is mounted in the correct rotation direction.
- Ensure water supply is connected and pressure is between 2-6 bar.
- Check that the emergency stop button is functional and unlocked.
Show more Show less
Specs in practice
- Blade diameter
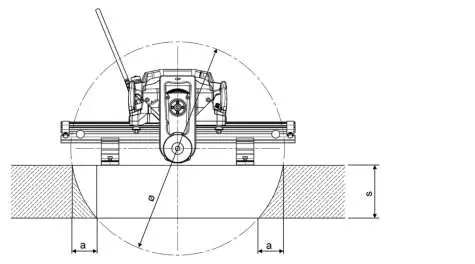
- 600 mm to 1600 mm (Max start diameter 800 mm).
- Water pressure
- 2 bar to 6 bar required for cooling.
- Power supply
- 380 V to 400 V, 3-phase + PE.
Images and diagrams
- Rail mounting: Shows the correct positioning of rail feet and anchor points.
- Safety zones: Illustrates the 1.5m exclusion zone around the saw.
- Blade mounting: Details the flange and bolt assembly for different cutting modes.
Model compatibility
- Use only Hilti original M12x25 10.9 bolts for blade mounting.
- Rail system must be compatible with the specific saw head model.

Manual page author
David Miller
Documentation analyst