Tools / Saws
Installation Guide for Hilti DST 10-CA and DST 20-CA Diamond Wire Saws
Quick installation guide for Hilti DST 10-CA and DST 20-CA diamond wire saws. Includes mounting dimensions, anchor specifications, and step-by-step rail setup procedures.
Table of contents
Manual images
Click an image to enlargeQuick guide from the manual
This document provides the visual installation procedure for the Hilti DST 10-CA and DST 20-CA diamond wire saws. It outlines the required anchor specifications, hole spacing, and the sequence for mounting the rail system to ensure safe and accurate operation.
Mounting and Anchoring
Proper anchoring is critical for the stability of the wire saw system. Use the following specifications for installation:
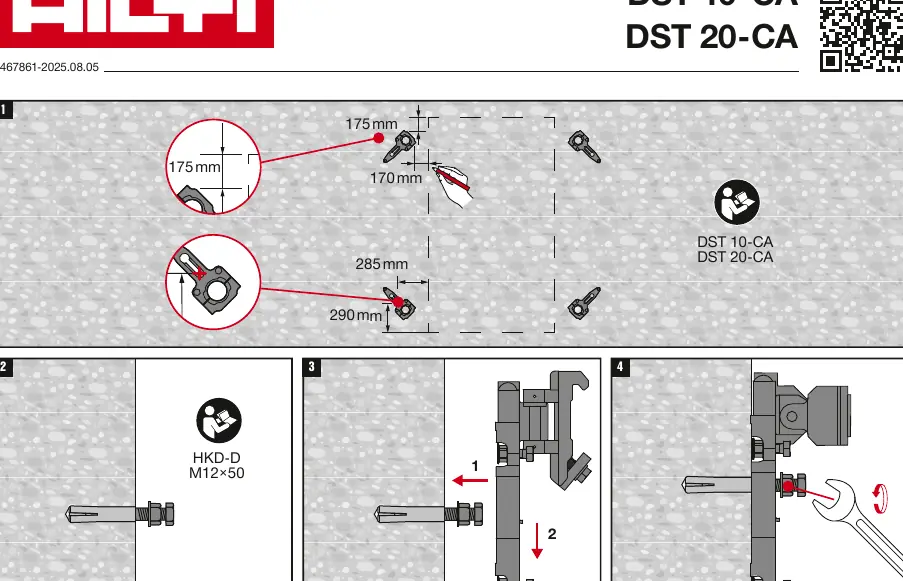
- Anchor Type: HKD-D M12x50.
- Hole Spacing (Top): 175mm horizontal by 170mm vertical.
- Hole Spacing (Bottom): 285mm horizontal by 290mm vertical.
Ensure the anchors are installed securely into the concrete surface before attempting to mount the rail bracket.
Rail Installation
Follow these steps to mount the rail system:
- Install the HKD-D M12x50 anchors according to the specified dimensions.
- Position the rail bracket over the installed anchors.
- Secure the bracket to the anchors using the provided hardware.
- Tighten the fasteners firmly to ensure the rail is rigid and stable.
Cutting Setup
Once the rail is mounted, proceed with the rail alignment and wire saw setup:
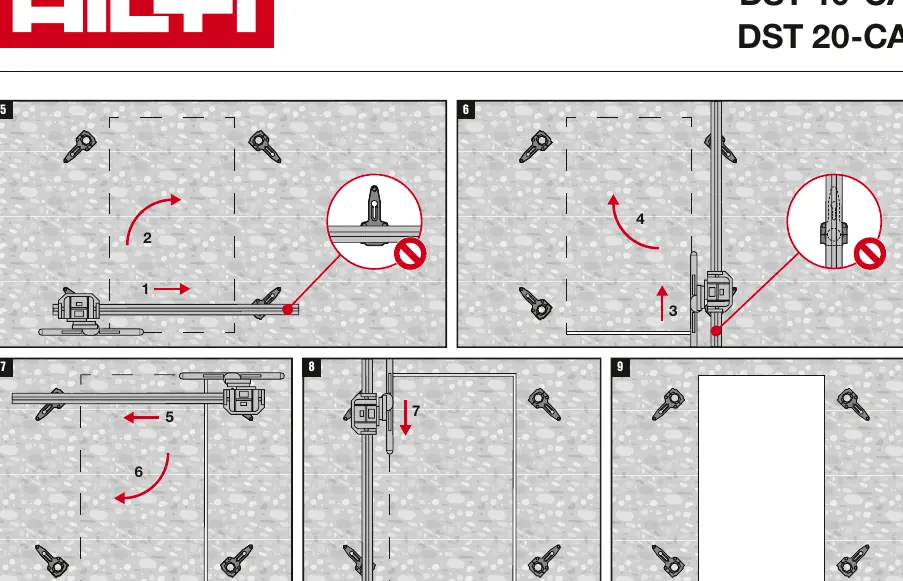
- Align the rail system according to the cutting path requirements.
- Follow the numbered sequence (5 through 9) as illustrated in the manual to position the saw components correctly.
- Verify that all locking mechanisms are engaged before starting the cutting operation.
Manufacturer information
Hilti Corporation
Practical help
Common problems
Rail instability during operation
Ensure all HKD-D M12x50 anchors are fully tightened and the rail bracket is flush against the mounting surface.
Incorrect rail alignment
Verify that the hole spacing matches the 175mm/170mm and 285mm/290mm dimensions exactly before drilling.
Before use
- Verify the use of HKD-D M12x50 anchors.
- Measure and mark hole positions: 175mm x 170mm (top) and 285mm x 290mm (bottom).
- Ensure the mounting surface is structurally sound.
- Check that all rail components are free of debris.
Specs in practice
- HKD-D M12x50
- The specific type and size of drop-in anchor required for mounting the rail system.
Images and diagrams
- Steps 1-4: Illustrate the drilling pattern, anchor installation, and bracket mounting process.
- Steps 5-9: Illustrate the rail alignment and the sequence for setting up the wire saw path.
Model compatibility
- This installation guide applies to both DST 10-CA and DST 20-CA models.

Manual page author
Michael Turner
Technical manual editor
Reviews PDF manuals for structure, safety notes, and practical product details so readers can find the right information quickly.