Lighting / Fixtures
Installation Guide for Hinkley 23010BK Catalina LED Fixture
Comprehensive installation, wiring, and maintenance guide for the Hinkley 23010BK Catalina LED fixture. Includes step-by-step assembly, glass installation, grounding instructions, and weatherproofing procedures.
Quick answers from the manual
Quick answer
- This manual provides instructions for the assembly, wiring, glass installation, and weatherproofing of the Hinkley 23010BK fixture. p. 1, 2, 3, 4
Key actions
- Turn off power supply at the circuit breaker. p. 1, 3
- Seal gaps with waterproof caulk. p. 4
Problems and fixes
Fixture not working
Check wiring connections and ensure power is on.
p. 1, 3Show 2 more answers Show less
Technical specifications
| Parameter | Value | Meaning | Pages |
|---|---|---|---|
| Bulb Type | Medium base | Standard medium base bulb required. | p. 2 |
Where to find it in the PDF
- Assembly Instructions p. 1
- Glass Installation p. 2
- Wiring and Grounding p. 3
- Caulking Instructions p. 4
Table of contents
Manual images
Click an image to enlargeQuick Guide
This document provides essential instructions for the assembly, wiring, and installation of the Hinkley 23010BK fixture. Before beginning, ensure the power supply is turned off at the circuit breaker. The installation requires basic tools and, for outdoor applications, waterproof caulk or silicone sealant.
Assembly and Mounting
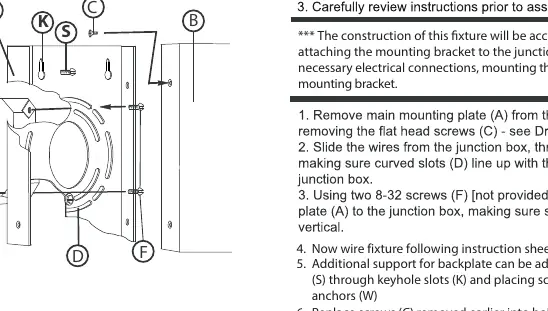
The fixture is installed by first attaching the mounting bracket to the junction box. Ensure the mounting plate is vertical. Once the bracket is secure, the fixture body is mounted to the bracket. Additional support for the backplate can be provided by using screws through the keyhole slots into wall anchors.
Wiring and Grounding
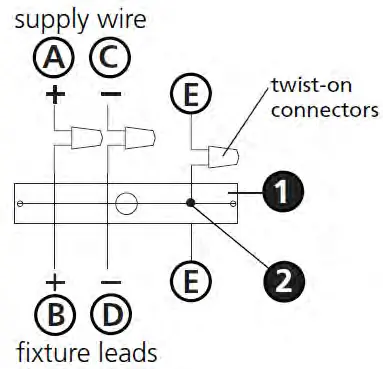
Wiring: Connect the positive supply wire (typically black or smooth/unmarked) to the positive fixture lead using a twist-on connector. Connect the negative supply wire (typically white or ribbed/marked) to the negative fixture lead. For outdoor fixtures, seal the open end of the connectors with silicone sealant to ensure a watertight connection.
Grounding: Follow the specific grounding instructions based on your mounting type:
- Flush Mount: Fasten the fixture ground wire to the mounting strap with the ground screw.
- Chain Hung: Loop the ground wire under the head of the ground screw on the mounting strap and connect the loose end to the building system ground wire.
- Post-Mount: Connect the fixture ground wire to the power supply ground inside the post using a twist-on connector.
Glass Installation
To install the glass panels:
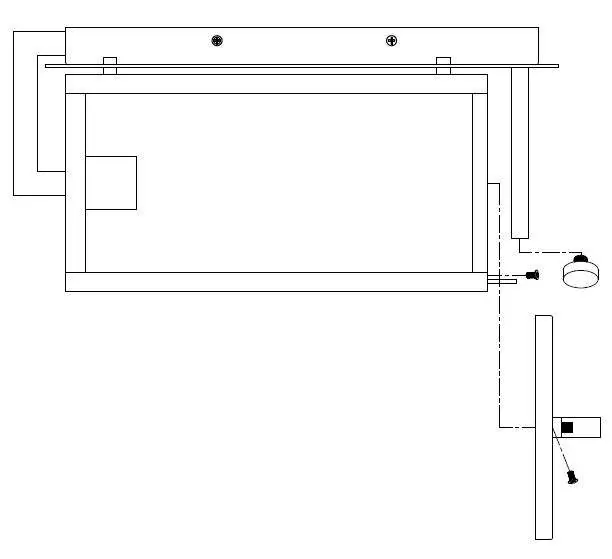
- Remove the knob and screws from the top of the fixture to access the glass cage.
- Install an appropriate medium base bulb.
- Slide the bottom of the glass panel into the channel at the bottom of the outer body.
- Tip the glass up into position.
- Use the provided screws and glass clips to secure the top of the glass.
- Repeat for all panels.
- Replace the fixture top and secure it with the previously removed knob and screws.
Weatherproofing and Caulking
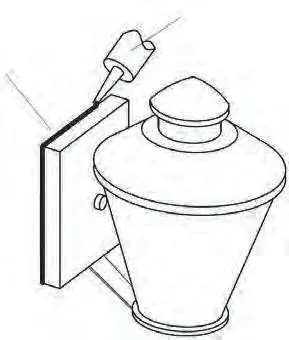
After securing the fixture to the wall, it is recommended to seal the gap between the wall and the fixture backplate on the top and both sides using a high-quality waterproof caulk or silicone sealant. It is also recommended to apply a small bead of sealant under the ball knobs used to mount the fixture to prevent water ingress.
Manufacturer information
Hinkley Lighting
Practical help
Common problems
Fixture does not light
Verify that the power supply is turned on and check that all wiring connections are secure and correctly matched (positive to positive, negative to negative).
Water ingress (outdoor use)
Ensure that all gaps between the fixture backplate and the wall are sealed with waterproof caulk and that wire connectors are sealed with silicone sealant.
Before use
- Turn off the power supply at the circuit breaker before starting installation.
- Ensure you have a medium base bulb.
- Verify you have waterproof caulk or silicone sealant for outdoor installation.
- Check that the junction box is properly installed.
- Ensure you have the necessary tools (screwdriver, caulk gun).
Show more Show less
Images and diagrams
- Drawing 1 (Page 1): Shows the fixture mounting process to the junction box.
- Drawing 2/3 (Page 2): Illustrates the glass panel installation and securing process.
- Wiring Diagrams (Page 3): Details the specific wiring and grounding configurations for flush, chain, and post-mount installations.
- Caulking Diagrams (Page 4): Shows where to apply sealant to ensure a watertight installation.
Model compatibility
- Suitable for both indoor and outdoor use.
- Requires specific grounding methods based on mounting type (Flush, Chain, or Post).

Manual page author
Emily Carter
User documentation editor