Lighting / Fixtures
Installation Guide for Hinkley 38895 Light Fixture
Step-by-step installation and wiring guide for the Hinkley 38895 light fixture. Includes instructions for flush or pendent mounting, shade assembly, and electrical connections.
Quick answers from the manual
Quick answer
- The Hinkley 38895 is a convertible light fixture. For flush mounting, use the 4-inch stem. For pendent mounting, combine the provided stems to reach the desired height. Always turn off power before wiring. p. 1, 3
Key actions
- Mounting the fixture p. 1
- Installing shades p. 2
- Wiring connections p. 3
Problems and fixes
Water ingress in outdoor installation
Cover open end of connectors with silicone sealant to form a watertight seal.
p. 3Show 2 more answers Show less
Technical specifications
| Parameter | Value | Meaning | Pages |
|---|---|---|---|
| Bulb Base | E12 | Candelabra base | p. 2 |
Where to find it in the PDF
- Mounting Instructions p. 1
- Shade Assembly p. 2
- Wiring and Grounding p. 3
Table of contents
Manual images
Click an image to enlargeQuick Guide
This document provides installation instructions for the Hinkley 38895 light fixture. The fixture is convertible, allowing for either flush or pendent mounting. Please read all instructions carefully and turn off the power supply at the circuit breaker before beginning any installation work.
Mounting Instructions
The fixture can be installed as a flush mount or a pendent mount.
- Flush Mount: Use the small 4-inch stem to mount the fixture flush to the ceiling.
- Pendent Mount: Use the provided assortment of stems to achieve the desired hanging height. Thread the stems together, starting with the longest stem, and attach them to the fixture.
- Canopy Installation: Slide the canopy (C) over the stems. Secure the mounting strap (A) to the junction box (J) using screws (B). Hook the inspection cable (I) to the mounting strap. Use barrel knobs (W) to secure the canopy to the ceiling.
Shade Installation
Follow these steps to install the shades:
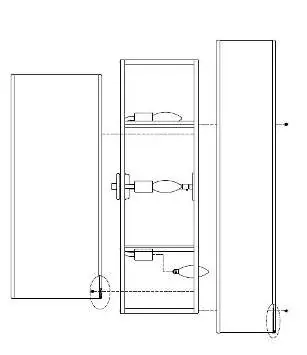
- Ensure you have an appropriate E12 base bulb.
- Secure the inner shade (5) to the main body of the fixture (3) using screws (4).
- Secure the outer shade (2) to the main body of the fixture (3) using screws (1).
- Note: Both the smaller and larger shades feature tabs (6) on the inner ring to assist in aligning and inserting the screws.
Wiring and Grounding
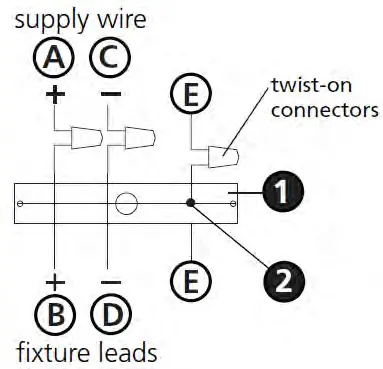
All electrical connections must be made according to the I.S. 18 wiring instructions:
- Positive Wire: Connect the positive supply wire (typically black or smooth) to the positive fixture lead (B) using a twist-on connector.
- Negative Wire: Connect the negative supply wire (typically white or ribbed) to the negative fixture lead (D) using a twist-on connector.
- Grounding: Fasten the fixture ground wire (E) to the mounting strap (M) using the ground screw (S) for flush mounts, or connect it to the building system ground for chain-hung fixtures.
- Outdoor Use: If installing outdoors, cover the open ends of connectors with silicone sealant to create a watertight seal.
Manufacturer information
Hinkley Lighting
Practical help
Common problems
Water entering the outlet box (outdoor installation)
Use silicone sealant to cover the open ends of wire connectors and caulk the gaps between the mounting plate and the wall.
Fixture not level or secure
Ensure the mounting strap is securely fastened to the junction box and that the canopy is properly tightened using the barrel knobs.
Before use
- Turn off the power supply at the circuit breaker.
- Identify if you are performing a flush mount or pendent mount installation.
- Verify you have the correct E12 base bulbs.
- Ensure you have a clear, safe workspace.
- Check that all parts (stems, shades, screws) are present.
Show more Show less
Images and diagrams
- Drawing 1 & 2: Illustrates the stem assembly for pendent mounting and the canopy attachment details.
- Drawing 3 & 4: Details the shade assembly process, including the location of tabs for screw insertion.
- Wiring Diagrams: Shows the correct connection of positive, negative, and ground wires using twist-on connectors.
Model compatibility
- This fixture is convertible between flush and pendent mounting styles.
- Suitable for indoor and outdoor use (if sealed correctly).

Manual page author
Emily Carter
User documentation editor