Lighting / Fixtures
Installation Manual for Hinkley 1952HE Outdoor Hanging Lantern
Comprehensive installation guide for the Hinkley 1952HE outdoor hanging lantern. Includes step-by-step instructions for wiring, grounding, chain mounting, and glass installation.
Quick answers from the manual
Quick answer
- This manual provides installation, wiring, and grounding instructions for the Hinkley 1952HE outdoor hanging lantern, including specific steps for mounting the fixture and installing the glass. p. 1, 2, 3
Key actions
- Install foam weather stripping in the roof of the fixture before installing the glass. p. 1
- Use silicone sealant on wire connectors for outdoor installations. p. 2
Problems and fixes
Water ingress at wall mount
Use caulk to seal gaps between the fixture mounting plate and the wall.
p. 2Where to find it in the PDF
- Mounting and Glass Installation p. 1
- Wiring and Grounding Instructions p. 2
- Hanging Instructions p. 3
Table of contents
Manual images
Click an image to enlargeQuick guide from the manual
This document provides the necessary steps to install the Hinkley 1952HE outdoor hanging lantern. Before beginning, ensure the power supply is turned off at the circuit breaker. The installation process involves preparing the mounting strap, making electrical connections, hanging the fixture, and installing the glass with weather stripping.
Mounting and Hanging Instructions
The fixture is designed to be hung from the ceiling. Follow these steps for a secure installation:
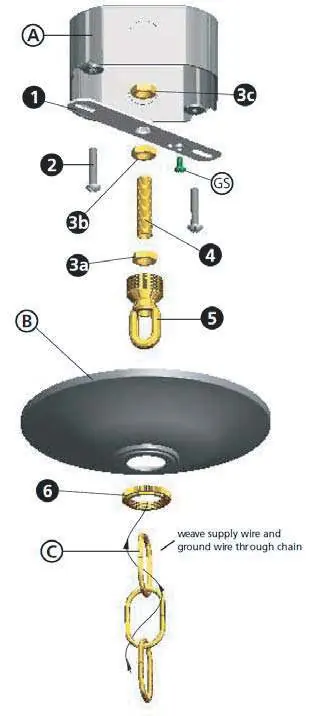
- Prepare the mounting strap: Fasten the mounting strap to the outlet box using the provided screws.
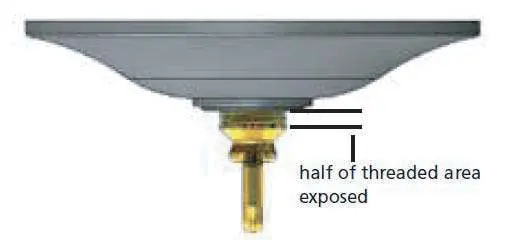
- Assemble the hanging hardware: Thread the hex nuts and loop onto the threaded tubing. Adjust the loop height so that half of the threaded area is exposed.
- Secure the assembly: Lock the loop and threaded tube in position using the hex nuts against the mounting strap.
- Hang the fixture: Determine the required chain length, attach the chain to the fixture loop, and slip the canopy and loop collar onto the chain.
- Finalize hanging: Weave the fixture lead wire and ground wire through the chain and loop. Secure the canopy against the ceiling by tightening the collar.
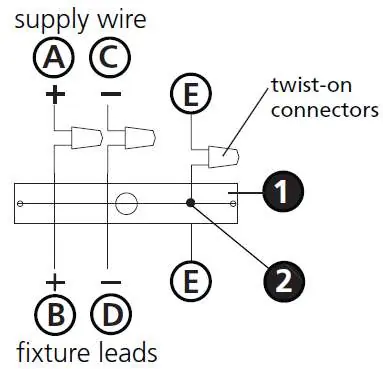
Wiring and Grounding
Proper electrical connection is critical for safety. Refer to the I.S. 18 wiring instructions included in the manual:
- Positive Wire: Connect the positive supply wire (typically black or the smooth side of the cord) to the positive fixture lead using a twist-on connector.
- Negative Wire: Connect the negative supply wire (typically white or the ribbed side of the cord) to the negative fixture lead.
- Grounding: Connect the fixture ground wire (copper or green plastic coated) to the mounting strap using the green ground screw.
- Outdoor Protection: For outdoor fixtures, cover the open end of connectors with silicone sealant to create a watertight seal.
Glass Installation
The glass must be installed after the fixture is hung:
- Weather Stripping: Before installing the glass, apply foam weather stripping to the roof of the fixture. Cut three strips approximately 1-1/2 inches long from the provided material.
- Alignment: Align the three grooves in the glass with the three tabs located inside the roof of the fixture.
- Locking: Slip the glass up into the roof and turn it clockwise to lock it securely in place.
Manufacturer information
Hinkley Lighting
Practical help
Common problems
Water entering the outlet box
Use caulk to seal gaps between the fixture mounting plate (backplate) and the wall. If the wall surface is lap siding, use a fixture mounting platform.
Difficulty holding the fixture while attaching the chain
Get assistance for this step, as the fixture may be heavy.
Before use
- Turn off the electrical current at the fuse or circuit breaker.
- Ensure you have a clear area to work in.
- Unpack the fixture and glass from the carton.
- Review all instructions carefully before starting.
- Verify you have the foam weather stripping from the parts bag.
Specs in practice
- Foam weather stripping
- Must be installed in the roof of the fixture to protect against elements.
- Silicone sealant
- Required for outdoor fixtures to cover open ends of connectors and form a watertight seal.
Images and diagrams
- Drawing 1 (Page 3): Illustrates the assembly of the mounting strap, threaded tubing, and canopy components.
- Drawing 2 (Page 2): Shows the wiring connections for chain-hung fixtures, including positive, negative, and ground wires.
- Drawing 2 (Page 3): Shows the canopy adjustment, indicating how much of the threaded area should be exposed.
Model compatibility
- Outdoor use: Requires silicone sealant on all wire connectors and caulk around the mounting plate.

Manual page author
Michael Turner
Technical manual editor
Reviews PDF manuals for structure, safety notes, and practical product details so readers can find the right information quickly.