Electronics / Televisions
User Manual for Hisense 120L9H Laser TV
Quick setup guide and user manual for the Hisense 120L9H Laser TV. Includes installation steps, geometric correction, remote control pairing, and troubleshooting.
Table of contents
Manual images
Click an image to enlargeQuick guide from the manual
This guide provides essential steps to set up your Hisense 120L9H Laser TV. Key actions include mounting the screen, positioning the console, connecting cables, and performing geometric correction to align the image. Always ensure proper ventilation and follow safety precautions regarding the laser light.
Safety Instructions
- Laser Safety: Do not look directly into the lens while the device is on. The laser light may damage your eyes.
- Ventilation: Maintain at least 20 cm of free space on the sides and 15 cm on the back for proper air circulation. Do not block vents.
- Environment: Use in a home or office environment. Avoid rooms with high humidity or dust. If moving from cold to hot, wait one hour before switching on to avoid condensation.
- Power: Connect only to the voltage specified on the type plate. Ensure the power plug is easily accessible.
Installation and Setup
Mounting and Positioning
The device should be placed on a stable surface. We recommend two people handle the device when moving it. Connect all cables (audio, video, Ethernet) to the ports on the back before positioning the unit.
Geometric Correction
To ensure the projected image fits the screen perfectly:
- Auto Geometric Correction: Use the mobile app to scan the QR code, take a photo of the screen, and upload it for automatic alignment.
- Manual Correction: Use the remote control to select and adjust points to fit the image into the screen borders.
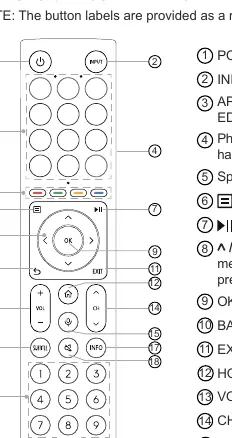
Remote Control
The remote control allows navigation, input selection, and system settings. If the remote is not working, ensure it is paired (for Bluetooth models) and that batteries are correctly installed. To pair, keep the remote within 3 meters of the TV and press any button (except power/mic).
Maintenance and Cleaning
- Cleaning: Unplug the power cord before cleaning. Use a soft, moist, clean cloth. Do not use chemicals, solvents, or insect repellents.
- Lens Care: Do not touch the lens with hands. Use a dust blower to remove dust. Grease or fingerprints should be cleaned by a professional using optical cleaning cloth.
Troubleshooting
If you experience issues, try turning the device off and on again. Common solutions include checking cable connections, verifying input sources, and ensuring the remote has fresh batteries. If the power indicator flashes red, check if the foreign object detection window is covered or dirty.
Manufacturer information
Hisense
Practical help
Common problems
No sound or picture
Check if the power cord is plugged in, press the Power button to exit standby, and verify the input source.
Remote control not working
Check battery installation, ensure the remote is within range, and re-pair if necessary.
Distorted or wavy picture
Move nearby electrical appliances away from the Laser TV and check antenna connections.
Delay when turning on
This is normal; the Laser TV is initializing and searching for previous settings.
Before use
- Ensure 20 cm of free space on the sides and 15 cm on the back for ventilation.
- Connect all cables to the ports before positioning the unit.
- Install two AA or AAA batteries in the remote control.
- Ensure the screen is parallel to the console.
- Verify the power outlet matches the voltage on the type plate.
Specs in practice
- Power Consumption
- 300 W during operation; ≤ 0.5 W in standby.
- Operating Temperature
- 5°C - 40°C (41°F - 104°F).
Images and diagrams
- Laser TV Diagram: Identifies ports, air vents, eye protection sensor, and power button.
- Geometric Correction: Illustrates how to align the projected image to the screen using the leveling feet and software.
- Remote Control: Maps buttons for power, input, volume, and menu navigation.
Model compatibility
- Requires CI+ module and card from your service provider for specific channels.
- Supports WPA, WEP, and WPA2 security systems for wireless networks.
- USB ports support 5V; USB 1.1/2.0 max 500mA, USB 3.0 max 1A.

Manual page author
David Miller
Documentation analyst
Organizes user manual content into clear summaries, with attention to model details, product context, and everyday usability.