Toys / RC Components
User Manual for Hobbywing EZRUN 1626SD Sensored Brushless Motor
Quick guide for the Hobbywing EZRUN 1626SD Sensored Brushless Motor. Includes installation steps, wiring diagrams, gearing advice, and maintenance instructions for 1/28 scale RC cars.
Table of contents
Manual images
Click an image to enlargeQuick Guide
The Hobbywing EZRUN 1626SD is a sensored brushless motor designed for 1/28 scale mini cars. For optimal performance, it is recommended to pair this motor with the Hobbywing EZRUN MINI28 ESC. Always ensure the motor temperature remains below 100°C (212°F) during operation to prevent magnet demagnetization and damage.
Installation and Connection
Mounting: The motor features 8 mounting holes with M2 specifications. The mounting holes are 2.5mm deep. Before installing, verify that your screws are the appropriate length to avoid damaging the motor internals.
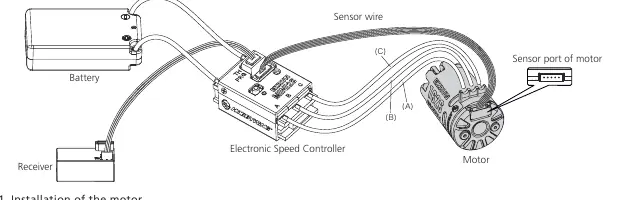
Wiring: When connecting the motor to the ESC, you must match the three-phase positions (A, B, and C) correctly:
- Wire A of the ESC must connect to Wire A of the motor.
- Wire B of the ESC must connect to Wire B of the motor.
- Wire C of the ESC must connect to Wire C of the motor.
Ensure the sensor cable is securely connected to both the motor and the ESC. Before powering on, double-check all connections.
Gearing
Selecting the correct gear ratio is critical to prevent overheating. Start with a small pinion (high FDR) and monitor the motor temperature regularly. If temperatures remain low, you may switch to a larger pinion (lower FDR). Always check the motor and ESC temperature based on your specific vehicle, local weather, and track conditions.
Assembly and Disassembly
Regular maintenance extends the service life of the motor. Periodically check the bearings and clean out any dirt. Follow these steps for assembly (reverse for disassembly):

- Mount the motor rotor.
- Mount the rear end bell set.
- Mount the screws for fastening the rear end bell (M1.6 x 4mm).
- Verify the assembled motor.
Warnings
- Never apply full throttle if the pinion is not installed, as extremely high RPMs without load can damage the motor.
- Ensure all wires and connectors are properly soldered to avoid short circuits.
- Stop usage immediately if the motor exceeds 100°C (212°F).
- Do not modify the product, as this voids responsibility and may cause damage.
Manufacturer information
Hobbywing
Practical help
Common problems
Motor overheating
Check gear ratio; start with a smaller pinion/higher FDR. Ensure operating temperature stays below 100°C (212°F).
Motor not running or ESC damage
Verify that A-B-C wires are connected to their corresponding phases (A-A, B-B, C-C).
Motor damage during installation
Ensure mounting screws are not longer than the 2.5mm depth of the mounting holes.
Before use
- Verify screw length (max 2.5mm depth) to avoid internal damage.
- Ensure all wires and connectors are properly soldered.
- Check that the gear ratio is suitable for the track and weather conditions.
- Confirm the sensor cable is connected to both motor and ESC.
- Check motor and ESC temperature regularly during operation.
Specs in practice
- No-load Current
- Current draw of the motor without any load attached.
Images and diagrams
- Wiring Diagram: Shows the connection path between the Battery, ESC, Receiver, and Motor, highlighting the A-B-C phase matching.
- Assembly Diagram: Illustrates the 4-step process for mounting the rotor and rear end bell.
Model compatibility
- Designed specifically for 1/28 scale mini cars.
- Optimized for use with Hobbywing EZRUN MINI28 ESC.

Manual page author
Emily Carter
User documentation editor
Prepares concise manual descriptions and highlights the most useful setup, operation, and maintenance information for readers.