Electronics / Intercom Systems
Hollyland Solidcom C1 Wireless Intercom System User Guide
Quick guide for the Hollyland Solidcom C1 wireless intercom system. Learn how to install batteries, pair headsets, operate the microphone, and understand status indicators.
Table of contents
Manual images
Click an image to enlargeQuick guide from the manual
This document provides essential instructions for setting up and operating the Hollyland Solidcom C1 wireless intercom system. It covers battery installation, headset pairing, microphone operation, and status indicators.
Product Interfaces
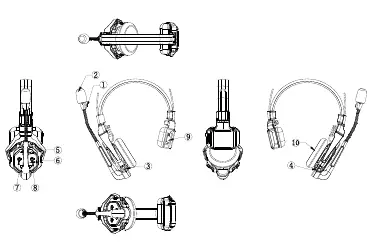

Headset Interface
- Power/Connection Indicator: Shows connection status.
- Microphone Boom: Move up or down to mute/unmute the microphone.
- Power Toggle: Turns the headset on or off.
- Volume Buttons: Adjust audio levels.
- A Button: Long press for 5 seconds to initiate pairing.
- B Button: Functions only when used with the HUB station.
Charging Case Interface
- Charging Indicator: Orange indicates charging in progress; Green indicates fully charged.
- Charging Contacts: Ensure proper alignment when inserting batteries.
Getting Started
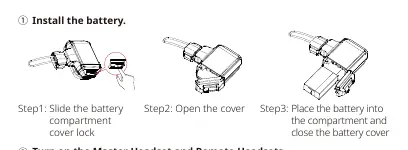
Battery Installation
- Slide the battery compartment cover lock.
- Open the cover.
- Place the battery into the compartment and close the cover securely.
Turning On and Pairing
Ensure all headsets are turned on. The Master Headset is identified by a red nameplate, while Remote Headsets have blue nameplates. The indicator lights will stop flashing and turn static green when the Master Headset is successfully paired with the Remote Headsets.
Microphone Operation
The microphone is muted or active based on the position of the boom arm:
- Mute Range: Moving the microphone boom upward clockwise or downward anti-clockwise into the designated mute zones.
- Talk Range: The microphone is active when the boom is positioned in the center 'Talk' range.
Pairing Instructions
Remote Headsets and the Master Headset included in the same package are pre-paired. Manual pairing is only required when adding new headsets to the system:
- Turn on all headsets.
- Long press the A Button on both the Master Headset and the Remote Headset for 5 seconds.
- The indicator lights on the microphone booms will flash green.
- Wait for the pairing process to complete; lights will turn static green upon success.
- One Master Headset can be paired with a maximum of 7 Remote Headsets.
Microphone Status Indicator
- Flashing Green: Disconnected (for Remote Headsets).
- Static Green: Connection successful.
- Flashing Red: Low battery level.
Technical Specifications
- Transmission Range: 350m (1000ft) Line-of-Sight.
- Frequency Band: 1.9GHz DECT.
- Battery Capacity: 700mAh (2.66Wh) Li-Ion.
- Charging Time: Approximately 2.5 hours.
- Working Temperature: 0 to +45°C.
Safety Precautions
Do not place headsets near heating devices (microwaves, ovens, gas stoves) to prevent battery overheating or explosion. Use only original charging cases, cables, and batteries to avoid electric shock or fire hazards.
Practical help
Common problems
Headset not connecting
Ensure all headsets are powered on. Perform manual pairing by long-pressing the A button for 5 seconds on both Master and Remote headsets.
Low battery warning
The indicator light flashes red. Charge the battery using the provided charging case.
Microphone not picking up audio
Check the position of the microphone boom. Ensure it is not in the 'Mute' range (up or down positions).
Before use
- Charge batteries using the charging case
- Install batteries into the headset compartment
- Identify Master Headset (red nameplate) and Remote Headsets (blue nameplate)
- Ensure all headsets are powered on
Specs in practice
- Transmission Range
- Up to 350m (1000ft) line-of-sight.
- Frequency Band
- 1.9GHz DECT technology.
- Battery Capacity
- 700mAh (2.66Wh) Li-Ion battery.
- Charging Time
- Approximately 2.5 hours.
Images and diagrams
- Headset interface shows power toggle, volume buttons, and mute function via boom position.
- Charging case interface shows charging contacts and status indicator.
Model compatibility
- One Master Headset can be paired with up to 7 Remote Headsets.

Manual page author
David Miller
Documentation analyst
Organizes user manual content into clear summaries, with attention to model details, product context, and everyday usability.