Home / Seasonal Decorations
User Manual for Home Accents Holiday 22GM13688 9ft Glimmer Ornament Arch
Quick guide for the Home Accents Holiday 9ft Glimmer Ornament Arch (22GM13688). Includes assembly steps, safety warnings, fuse/lamp replacement, and troubleshooting.
Quick answers from the manual
Quick answer
- The 9ft Glimmer Ornament Arch is an electrical decoration. Assembly takes 10-15 minutes. Always unplug when unattended or storing. p. 2, 3, 4
Key actions
- Assemble the archway by connecting pieces A-E, attaching the topper, securing to base frames, and staking to the ground. p. 2, 3
- Replace fuse with 3 Amp Max, 125 Volt fuse. p. 4, 5
First start
- Lay pieces flat, connect arches A-E, attach topper, secure to base frames, stake to ground, and plug in. p. 2, 3
Show 4 more answers Show less
Problems and fixes
Item not operating
Check power source and ensure it is plugged in.
p. 5Maintenance and reset
- Replace fuse by sliding open the fuse access cover on the plug. Replace lamps by pulling the lamp and base straight out. p. 4, 5
Technical specifications
| Parameter | Value | Meaning | Pages |
|---|---|---|---|
| Fuse | 3 Amp Max, 125 Volt | Overload protection | p. 4, 5 |
| Flashing Lamps | 4.5 Volt, 0.14 Watt | Replacement bulb specification | p. 4 |
| Steady Lamps | 3.0 Volt, 0.06 Watt | Replacement bulb specification | p. 4 |
Where to find it in the PDF
- Safety Instructions p. 1
- Assembly Instructions p. 2, 3
- User Servicing p. 4, 5
Table of contents
Manual images
Click an image to enlargeQuick Guide from the Manual
The Home Accents Holiday 9ft Glimmer Ornament Arch is a seasonal electrical decoration. Assembly takes approximately 10-15 minutes and is best performed by two people. Always unplug the product when leaving the house, retiring for the night, or when unattended.
Assembly Instructions
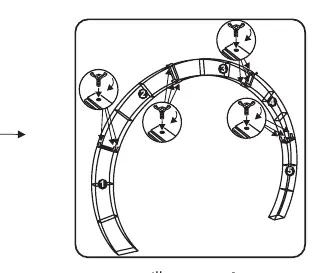
- Connect Archway Pieces: Lay pieces (A, B, C, D, E) flat on the ground. Attach arch 1 (A) to arch 2 (B) using screws (J). Continue attaching arches in sequence (A-B to C, then to D, then to E).
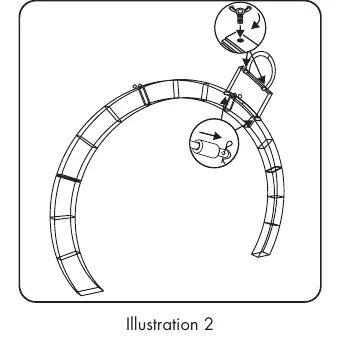
- Attach Decorative Topper: Use screws (J) to attach the ornament topper (G) to arches 3 and 4 (C, D). Attach the ornament hook (H) to the topper.
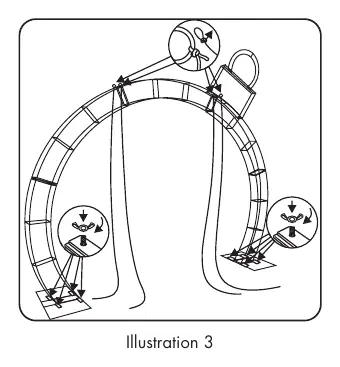
- Attach Cords: Tie the included cords (I) to the 4 iron rings located at the top of the assembled archway.
- Attach Base Support Frames: Place base support frames (F) in the desired location. Move the bottoms of arch 1 (A) and arch 5 (E) to the frames. Raise the archway onto the frames and secure using nuts (K).
- Secure to Ground: Insert yard stakes (L) into the base support frames and secure into the ground. Tie the loose ends of the cords (I) to the yard stakes and tighten.
- Plug In: Connect to an AC outlet.
User Servicing
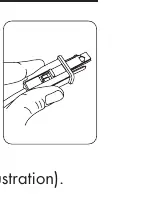
Fuse Replacement
If the product fails to light, check the fuse. Replace only with a 3 Amp Max, 125 Volt fuse. Slide open the fuse access cover on the attachment plug to replace.
Lamp Replacement
Replace burned-out lamps with the provided spares. Use 4.5 Volt, 0.14 Watt flashing lamps or 3.0 Volt, 0.06 Watt steady lamps. Pull the lamp and plastic base straight out of the lampholder to remove.
Safety and Storage
- Safety: Do not mount near gas/electric heaters or fireplaces. Do not secure wiring with staples or nails. Do not hang objects from the cord or light string.
- Storage: Store in a cool, dry location protected from sunlight. Keep the original box for storage.
Manufacturer information
Home Accents Holiday
Practical help
Common problems
Item not operating
Check if the power source is disabled or the cord is unplugged.
Fuse blown
Unplug the product and replace the fuse with a 3 Amp Max, 125 Volt fuse.
Lamp not working
Replace with the provided spare LED lamp (4.5V/0.14W flashing or 3.0V/0.06W steady).
Before use
- Inspect the product for damaged wire insulation, cracks in lampholders, or loose connections.
- Ensure assembly is performed by adults.
- Assemble near the final display location.
- Use two people for assembly if possible.
- Ensure the product is not placed near heat sources like fireplaces or heaters.
Show more Show less
Specs in practice
- Flashing Lamps
- 4.5 Volt, 0.14 Watt.
- Steady Lamps
- 3.0 Volt, 0.06 Watt.
- Assembly Time
- Approximately 10-15 minutes.
Images and diagrams
- Illustration 1: Shows the sequence of connecting arch pieces A through E.
- Illustration 2: Shows attachment of the ornament topper and hook.
- Illustration 3: Shows attachment of base support frames and cords to the arch.
- Illustration 4: Shows securing the arch to the ground using yard stakes.
Model compatibility
- Not intended for permanent installation.
- Suitable for indoor and outdoor use (connect to GFCI outlet for outdoor use).
- Do not replace steady illuminating lamps with flashing lamps to avoid overheating.

Manual page author
Emily Carter
User documentation editor