Furniture / Storage Cabinets
User Guide for Home Decorators Collection KB 06304-DEL LED Outdoor Wall Lantern
Comprehensive installation and operation guide for the Home Decorators Collection KB 06304-DEL LED Outdoor Wall Lantern. Learn how to mount the fixture, connect wiring, test the photocell, and troubleshoot common issues.
Table of contents
Manual images
Click an image to enlargeQuick guide from the manual
This guide provides essential instructions for the installation and operation of the Home Decorators Collection LED Outdoor Wall Lantern. Before beginning, ensure the power is disconnected at the circuit breaker or fuse box. The fixture includes a built-in photocell for automatic dusk-to-dawn operation.
Safety Information
Important: Consult a qualified electrician if you have any electrical questions. Before starting, disconnect power to prevent electrical shock. Inspect wire insulation for any cuts, abrasions, or exposed copper that may have occurred during shipping; do not attempt installation if defects are found.
This equipment complies with Part 15 of the FCC Rules. It is designed to provide reasonable protection against harmful interference in a residential installation. If interference occurs, try reorienting the antenna, increasing separation between equipment, or connecting to a different circuit.
Installation
Ensure you have the necessary tools: ladder, safety glasses, electrical tape, Phillips screwdriver, flat blade screwdriver, pliers, and wire strippers.
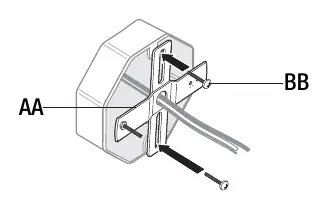
- Attaching the mounting unit: Attach the mounting unit (AA) to the junction box using the mounting screws (BB). Ensure the pre-installed support screws on the mounting bracket protrude away from the junction box.
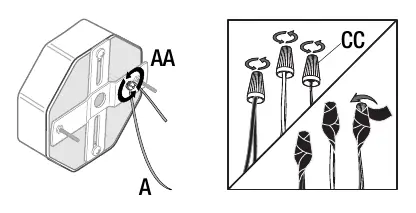
- Making electrical connections: Connect the copper wire from the light fixture to the mounting unit using the pre-installed ground screw. Connect the black wire to the black (power) wire, and the white wire to the white (neutral) wire using wire nuts (CC). Secure the wire nuts with electrical tape. If wires are the same color, attach the side with markings or letters to the black (positive) wire and the other to the white (neutral) wire.
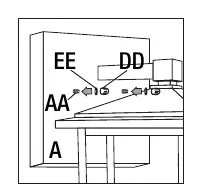
- Securing the fixture: Place the light fixture (A) over the pre-installed screws on the mounting bracket and secure it using the washers (EE) and cap nuts (DD). Maintain a tight waterproof seal between the canopy and the mounting surface.
Operation
Turn the light switch on to activate the fixture. The light features a photocell for automatic operation. If it is daylight, the fixture will not illuminate. To test the fixture during the day, cover the photocell with electrical tape. If the light turns on, the fixture is working correctly; remove the tape afterward. Position the fixture so that light from other sources does not shine directly onto the photocell eye, as this will interfere with its operation.
Care and Cleaning
Clean the lamp with a soft, dry cloth. Do not use any cleaners with chemicals, solvents, or harsh abrasives.
Troubleshooting
If the bulb will not light, ensure the power supply is on, check the wiring connections, and ensure the circuit breaker is in the On position. If the fuse blows or the circuit breaker trips when the light is turned on, there may be crossed wires or the power wire is grounding out; contact a qualified electrician or customer service.
Manufacturer information
Home Decorators Collection
Practical help
Common problems
The bulb will not light
Ensure the power supply is on, check all wiring connections, and verify the circuit breaker is in the On position.
Fuse blows or circuit breaker trips when light is turned on
There may be crossed wires or the power wire is grounding out. Contact a qualified electrician or customer service.
Before use
- Safety glasses
- Electrical tape
- Phillips screwdriver
- Flat blade screwdriver
- Wire strippers
Images and diagrams
- Wiring diagram: Connect black wire to black (power), white wire to white (neutral), and copper wire to the ground screw on the mounting unit.
- Mounting diagram: Shows the mounting unit (AA) attached to the junction box with screws (BB), and the fixture (A) secured with washers (EE) and cap nuts (DD).
Model compatibility
- Requires an existing junction box for installation.
- Designed for outdoor use.
- Features a built-in photocell for automatic dusk-to-dawn operation.

Manual page author
Emily Carter
User documentation editor
Prepares concise manual descriptions and highlights the most useful setup, operation, and maintenance information for readers.