Lighting / Outdoor Landscape
Golden Lighting 1099-OWS Outdoor Wall Light Assembly Instructions
A comprehensive assembly and installation guide for the Golden Lighting 1099-OWS outdoor wall light. This manual covers wiring, mounting, leveling, and weatherproofing procedures.
Table of contents
Manual images
Click an image to enlargeQuick guide from the manual
This document provides assembly and installation instructions for the Golden Lighting 1099-OWS outdoor wall light. Important: All installation work should be performed by an accredited professional. Always shut off the power supply at the circuit breaker before beginning. Ensure you use only the specified bulbs and do not exceed the maximum wattage. For outdoor installations, applying silicone sealant is required to protect the fixture, while leaving the bottom unsealed for drainage.
Installation Preparation
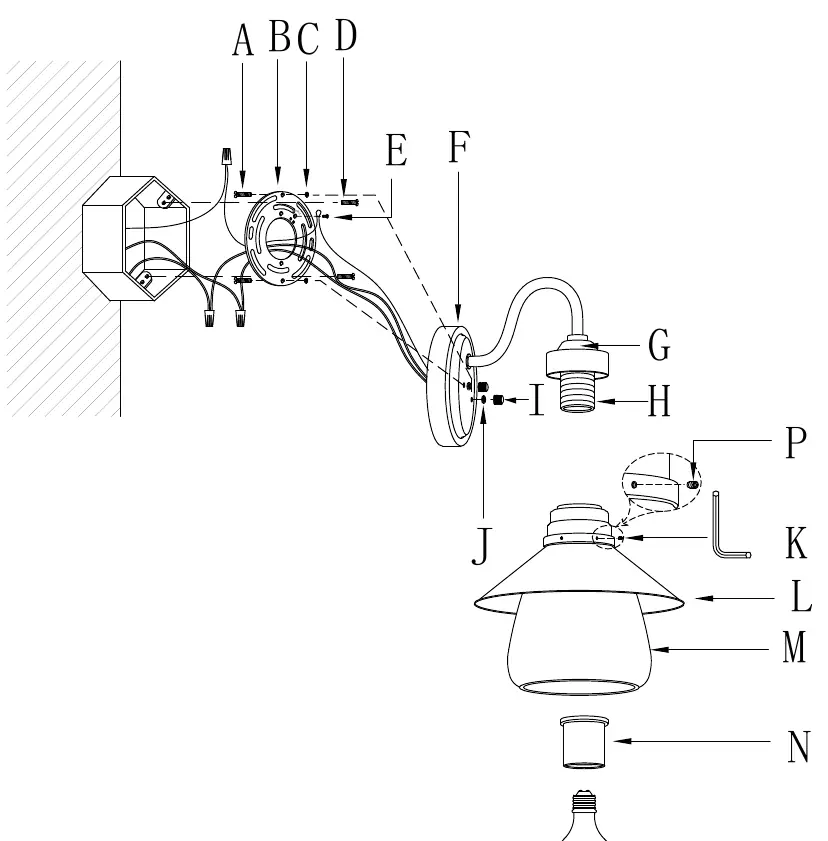
Carefully remove the fixture and the yellow bag containing all parts from the carton. Before installing, remove the old fixture and the old mounting strap from the wall. Ensure the mounting strap (B) is secured to the junction box using the provided mounting screws (D). The mounting screws (A) should be horizontal and aligned with the holes on the backplate (F).
Wiring Instructions
Have an assistant support the fixture's weight while you complete the wiring. Connect the fixture wires to the power supply wires from the junction box using wire connectors:
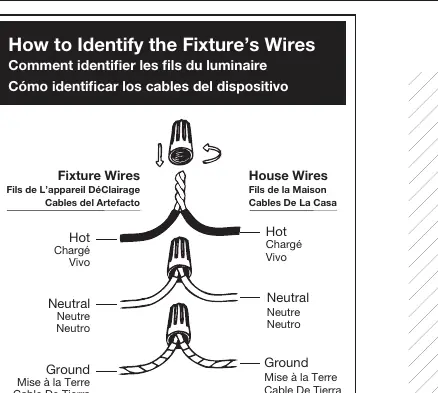
- Hot: Connect to the transparent wire with black inner thread, black wire, or smooth wire.
- Neutral: Connect to the transparent wire with white inner thread, white wire, or ribbed wire.
- Ground: Connect to the transparent wire with green inner thread, green wire, or copper wire.
If there is no house ground wire, wrap the fixture's ground wire around the ground screw (E) on the mounting bracket.
Final Assembly
Place the backplate (F) over the mounting strap (B) and secure it with the deco nuts (I) and washers (J). If the lampshade is not level, loosen the small screw (P) using the provided tool (K), adjust the level, and tighten the screw firmly. Attach the glass shade set (L & M) to the socket (H) and secure it with the socket ring (N). Install the light bulb (not included) according to the fixture's specifications.
Weatherproofing
After installation, apply silicone sealant caulking to seal the gap between the enclosure and the mounting surface. Crucial: Leave a gap unsealed at the bottom of the fixture to allow for the drainage of any water that might leak into the enclosure.
Manufacturer information
Golden Lighting
Practical help
Common problems
Fixture is not level
Loosen the small screw (P) using the provided tool (K), adjust the lampshade to the desired level, and tighten the screw firmly.
Water ingress or moisture buildup
Ensure silicone sealant is applied around the enclosure, but verify that the bottom section is left unsealed to allow for drainage.
Wiring identification
Follow the color-coded guide: Hot is smooth/black, Neutral is ribbed/white, and Ground is green/copper/bare metal.
Before use
- Turn off power at the circuit breaker.
- Ensure an accredited professional is performing the installation.
- Verify all parts are present in the yellow bag.
- Check that mounting strap holes align with the junction box.
- Have an assistant support the fixture weight during wiring.
Specs in practice
- Neutral Wire
- Ribbed, white, or transparent with white inner thread.
Images and diagrams
- Wiring Diagram: Illustrates how to connect house wires to fixture wires using wire connectors.
- Assembly View: Shows the mounting strap (B), backplate (F), and shade assembly (L, M, N).
Model compatibility
- Use only specified bulbs; do not exceed maximum wattage.
- Requires silicone sealant for outdoor installation.

Manual page author
Emily Carter
User documentation editor
Prepares concise manual descriptions and highlights the most useful setup, operation, and maintenance information for readers.