Electronics / RFID Barcode Scanners
User Manual for Honeywell Granit 1980i Industrial Area-Imaging Scanner
Quick start guide for the Honeywell Granit 1980i industrial area-imaging scanner. Includes instructions for cable connection, power supply assembly, scanning techniques, and configuration barcodes for USB and RS232 interfaces.
Table of contents
Manual images
Click an image to enlargeQuick Start Guide
This guide provides essential instructions for setting up and configuring the Honeywell Granit 1980i industrial area-imaging scanner. Always power off your computer before connecting the scanner and power it back on only after the connection is secure.
Power Supply Assembly
If your scanner kit includes a power supply, assemble it by attaching the appropriate plug adapter to the power brick. Note that the power supply may need to be ordered separately depending on your specific kit configuration.

Connecting the Scanner
Proper cable connection is critical for the scanner's operation. To connect the cable:

- Release the locking plate on the scanner base.
- Insert the cable connector firmly into the base.
- Slide the locking plate over the connector base to secure it.
- Tighten the screw to ensure the cable remains fixed in place.
Connection Types
The scanner supports different connection interfaces:

- USB Connection: Connect the USB cable directly to the computer's USB port.
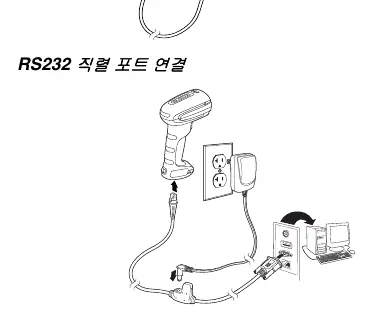
- RS232 Serial Connection: Connect the scanner cable to the RS232 port. This setup requires an external power supply connected to the scanner cable.
Scanning Techniques
The Granit 1980i is designed for both near and far scanning:
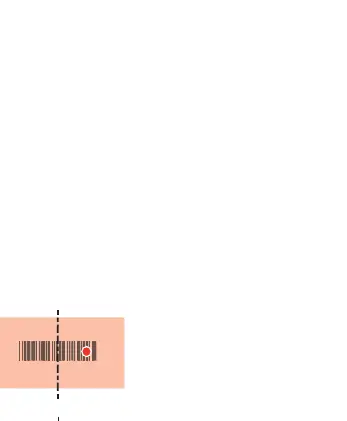
- Near Scan (under 30cm / 11.8 inches): Use the red illumination and center the scanner over the barcode. The laser aimer will appear to the right of the barcode center.
- Far Scan (up to 15.2m / 50 feet): Use the laser aimer to target the center of the barcode. The red illumination may be less visible at this distance.
- Reflective Barcodes: If a barcode is coated and highly reflective, tilt the scanner slightly to change the projection angle for better readability.
Configuration Barcodes
You can configure the scanner by scanning specific barcodes provided in this manual:
- Default Settings: Scan the "Standard Product Defaults" barcode to reset the scanner.
- USB Serial: Scan this to emulate an RS232 COM port. Windows users must download the driver from the Honeywell website.
- USB PC Keyboard: Scan this to set the scanner to act as a standard USB keyboard.
- Keyboard Layouts: Scan the "Country Code Programming" barcode followed by the numeric code for your region (e.g., 1 for Belgium, 0 for USA) and the "Save" barcode.
Advanced Settings
The scanner supports advanced data formatting:
- Suffix/Prefix: You can add a Carriage Return (CR) or Tab suffix, or add a Code ID prefix to all symbologies.
- Function Codes: Enable or disable the transmission of function codes.
- Data Format Editor: Follow the specific sequence of barcodes (Data Format Input, Format Type, Terminal Type, Code ID, Length, Editor Commands, Save) to customize data output.
Support and Warranty
For additional configuration options, software tools like EZConfig-Scanning, technical support, or warranty information, visit the official Honeywell website at www.honeywellaidc.com.
Official resources from the manual
Manufacturer information
Honeywell International Inc.
Practical help
Common problems
Scanner not reading barcodes
If the barcode is coated and reflective, tilt the scanner slightly to change the projection angle.
USB Serial connection not working on Windows
Ensure you have downloaded and installed the necessary driver from the Honeywell website.
Incorrect characters appearing when scanning
Scan the 'Country Code Programming' barcode followed by the numeric code corresponding to your keyboard layout.
Before use
- Power off the computer before connecting the scanner.
- Ensure the cable is securely locked into the scanner base.
- Tighten the locking screw on the cable connector.
- If using RS232, ensure the external power supply is connected.
- Verify the connection type (USB or RS232) matches your host device.
Specs in practice
- Near Scan Range
- Optimal for distances under 30cm (11.8 inches).
- Far Scan Range
- Capable of scanning up to 15.2m (50 feet).
Images and diagrams
- Cable locking mechanism: Shows how to release the locking plate, insert the cable, and tighten the screw.
- USB Connection: Illustrates direct connection to a PC USB port.
- RS232 Connection: Illustrates the connection path including the external power supply.
Model compatibility
- USB Serial mode requires driver installation on Windows PCs.
- Apple Macintosh computers automatically recognize the scanner as a USB CDC class device.

Manual page author
David Miller
Documentation analyst
Organizes user manual content into clear summaries, with attention to model details, product context, and everyday usability.