Power / Solar Inverters
User Guide for Huawei SUN2000 150K-MG0 Smart PV Controller
Quick guide for the Huawei SUN2000 150K-MG0 Smart PV Controller. Includes installation requirements, electrical connection diagrams, cable preparation, and commissioning steps.
Table of contents
Manual images
Click an image to enlargeQuick guide from the manual
This document provides essential installation and commissioning instructions for the Huawei SUN2000 150K-MG0 Smart PV Controller. Before installing, ensure you have read the full user manual for detailed safety precautions. Important Safety Warnings: Do not connect loads between the inverter and the AC switch to prevent switch tripping. Each inverter must be equipped with its own dedicated AC output switch; do not connect multiple inverters to the same switch. Ensure the AC switch specifications comply with local standards and company recommendations.
Installation Requirements
Ensure the installation site meets the following clearance requirements for proper heat dissipation and maintenance access:
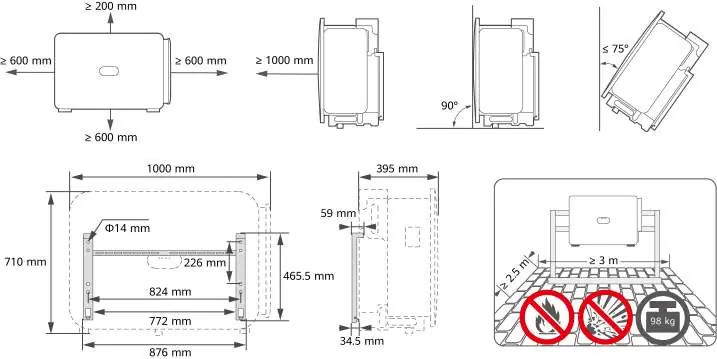
- Top: ≥ 200 mm
- Sides: ≥ 600 mm
- Front: ≥ 1000 mm
- Bottom: ≥ 600 mm
- Mounting Angle: ≤ 75°
Installing the Device
The device is mounted using the provided bracket. Ensure the mounting surface can support the weight of the unit (98 kg). Follow the steps to secure the bracket to the wall or support structure, then mount the inverter onto the bracket and secure it with the provided M6 screws.
Electrical Connections
Proper cable preparation is critical for system safety and performance:
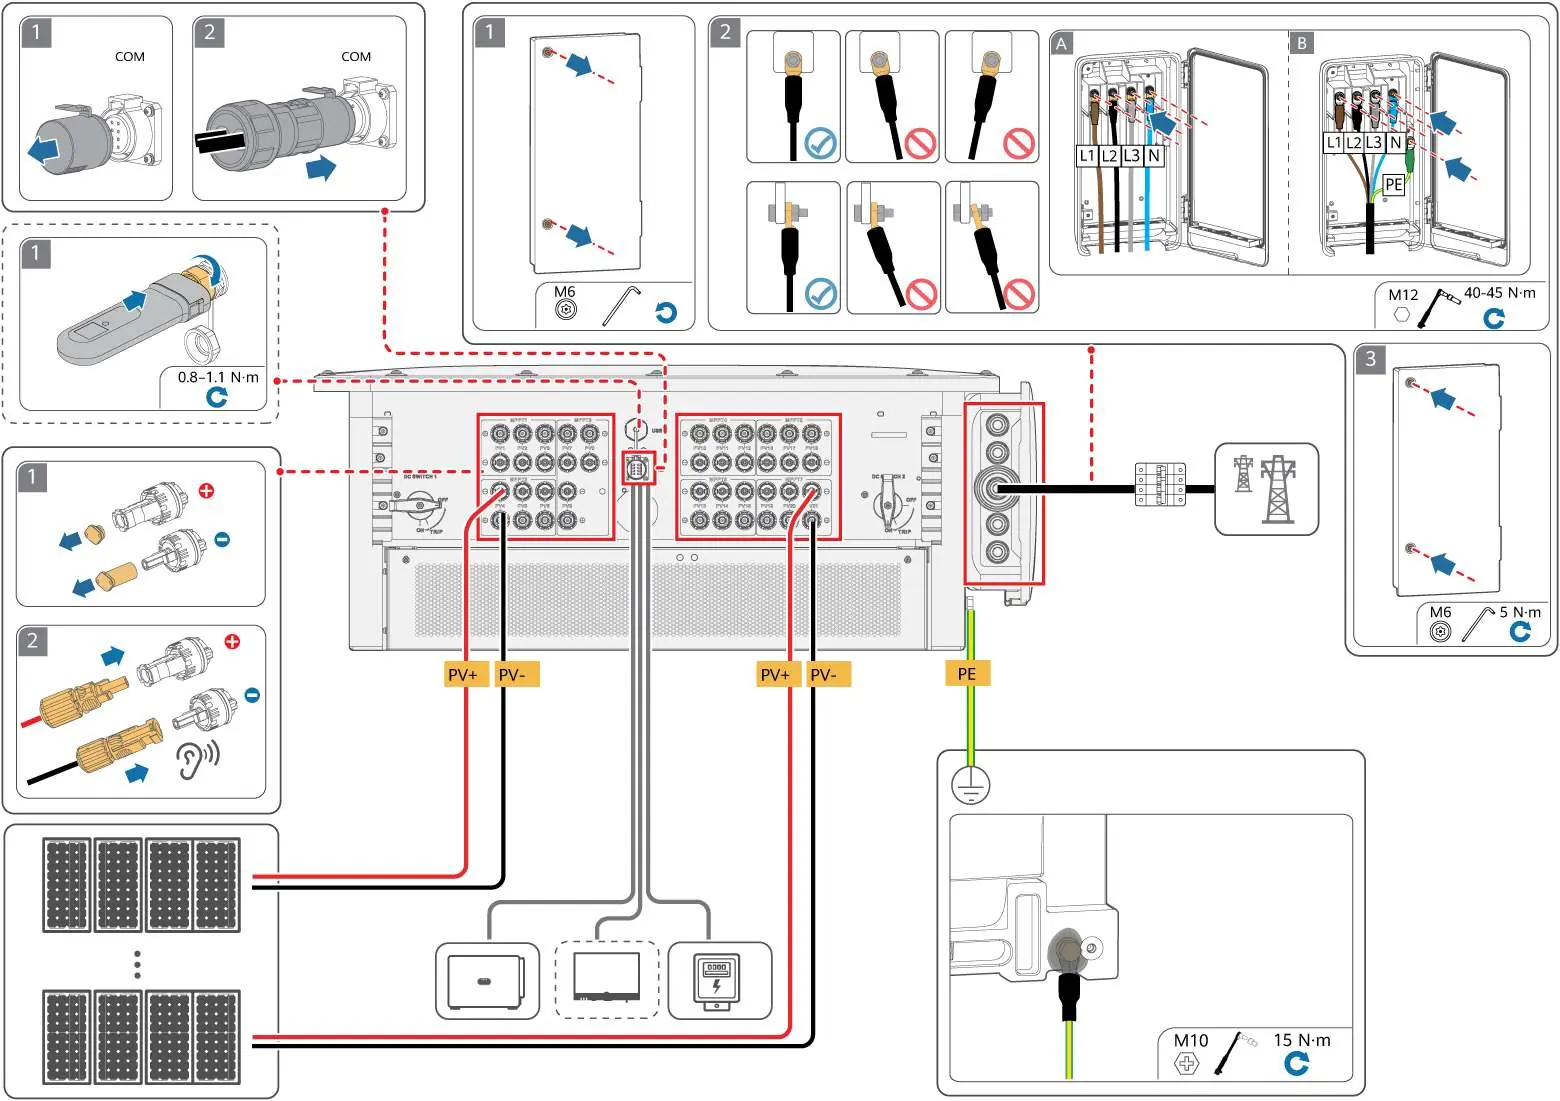
- PE Cable: Prepare the protective earth cable with a cross-section of 50-240 mm².
- DC Cables: Use the PV connectors delivered with the inverter. Ensure cables are stripped correctly (8-10 mm) and crimped using the specified tools (H4STC0001/CT75A-FJB10).
- AC Cables: Follow the specific stripping and crimping instructions based on the cable diameter (14-66 mm).
- Signal Cables: Connect RS485 cables according to the pinout diagram provided in the manual (RS485A IN/OUT, RS485B IN/OUT).
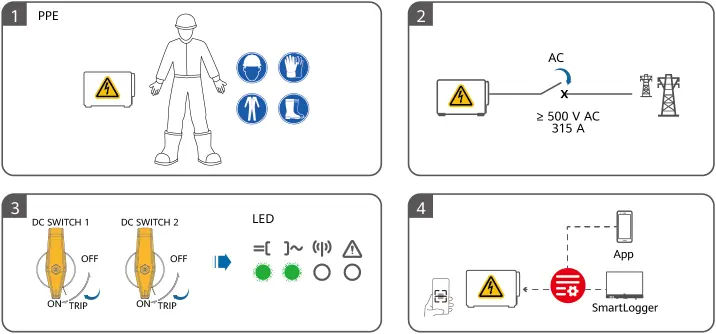
Power-On and Commissioning
Before powering on, ensure all personnel are wearing appropriate Personal Protective Equipment (PPE). Verify that the DC switches are in the OFF position. Once connected, use the SmartLogger or the mobile app to perform the commissioning process. Monitor the LED indicators on the front panel to verify the system status.
Manufacturer information
Huawei Technologies Co., Ltd.
Practical help
Common problems
AC switch trips unexpectedly
Ensure no loads are connected between the inverter and the AC switch.
AC switch fails to turn off during exceptions
Verify that the AC switch specifications meet local standards and company recommendations.
Multiple inverters connected to one switch
Each inverter must be equipped with its own dedicated AC output switch.
Before use
- Verify installation clearances (≥ 600 mm sides, ≥ 1000 mm front).
- Ensure mounting angle is ≤ 75°.
- Use only the PV connectors delivered with the inverter.
- Prepare PE cable with 50-240 mm² cross-section.
- Ensure a dedicated AC output switch is installed for each inverter.
- Wear appropriate PPE before starting electrical work.
Specs in practice
- Mounting Weight
- The unit weighs 98 kg; ensure the support structure is rated for this load.
Images and diagrams
- Installation: Shows bracket dimensions and required clearance distances.
- Wiring: Details the preparation of PE, DC, AC, and Signal cables.
- Commissioning: Illustrates PPE requirements and LED status indicators.
Model compatibility
- Use only Huawei-supplied PV connectors.
- Requires dedicated AC switch per inverter.

Manual page author
David Miller
Documentation analyst
Organizes user manual content into clear summaries, with attention to model details, product context, and everyday usability.