Baby / Baby Monitors
User Manual for ieGeek Baby 4 Smart Video Monitor
Quick guide for the ieGeek Baby 4 smart video monitor. Learn how to set up the camera, connect to the app and monitor, adjust settings, and troubleshoot common issues.
Table of contents
Manual images
Click an image to enlargeQuick Guide
The ieGeek Baby 4 is a smart video monitor that can be connected to both a dedicated monitor and the ieGeek Cam app. Important: The camera only supports 2.4GHz Wi-Fi networks; 5GHz networks are not supported. Ensure the SD card is inserted before powering on the device. If you encounter connection issues, the monitor and camera should be at least 1 meter apart to avoid interference (bee sound).
Overview
The system consists of a camera and a monitor. The camera features a status light, microphone, SD card slot, reset button, and a call/pair button. The monitor includes a screen, navigation buttons (Direction, OK, Back, Menu, Zoom, Call), volume controls, power button, and a screen holder.
App Connection
Download the ieGeek Cam app from the App Store or Google Play. You can add the camera using two methods:
- QR Code: Ensure your phone is on a 2.4GHz Wi-Fi network. Press the Reset button on the camera for 5 seconds until you hear a beep. Follow the app instructions to scan the QR code.
- Bluetooth: Enable Bluetooth on your phone. Press the Reset button on the camera for 5 seconds. In the app, select 'Add Device' and follow the prompts to connect.
Monitor Connection
The camera and monitor usually connect automatically. If they do not:
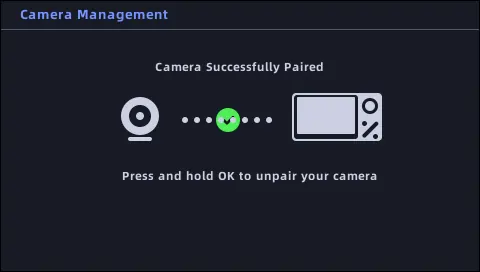
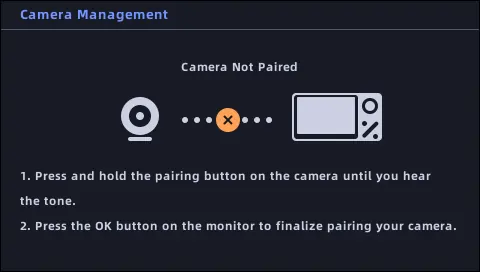
- Press the Reset button on the camera for 5 seconds until you hear a beep.
- On the monitor, press the Menu button and select Camera.
- Long press the camera's Pairing button until you hear a tone.
- Press the OK button on the monitor to finalize pairing.
The connection range is limited to 300 meters.
General Settings
Access the settings menu on the monitor by pressing the Menu button. Available settings include:
- Brightness: Adjust screen brightness.
- Date and Time: Set the system clock.
- Language: Change the display language.
- Sleep Mode: Set the screen to turn off after 1, 5, 10, 30, or 60 minutes to save battery.
- SD Card Management: View capacity and format the card. Note: Format the SD card to FAT32 or exFAT on a computer before use.
Troubleshooting
If you experience issues, try these steps:
- Monitor not previewing: Ensure the camera is paired.
- Monitor stuck: Reset the monitor using a needle and restart.
- No notifications: Ensure the app is running and permissions are enabled.
- SD card not recognized: Check that the card is a C10 brand, up to 32GB for the monitor or 128GB for the camera, and formatted correctly.
For further assistance, contact support at [email protected].
Manufacturer information
ieGeek
Practical help
Common problems
Monitor screen is stuck or unresponsive
Reset the monitor using a needle, then long-press the power button to restart.
Monitor makes a 'bee' sound
The monitor is too close to the camera. Move it at least 1 meter away.
SD card not recognized
Ensure the card is C10 class, formatted to FAT32 or exFAT, and inserted while the device is off.
No notifications on phone
Confirm the app is running, and that message notifications and permissions are enabled in your phone settings.
Before use
- Ensure your Wi-Fi network is 2.4GHz (5GHz is not supported).
- Download the 'ieGeek Cam' app.
- Insert the SD card before powering on the device.
- Charge the monitor battery.
- Ensure the camera and monitor are within 300m of each other.
Specs in practice
- Wi-Fi Compatibility
- Supports 2.4GHz networks only.
- Monitor SD Capacity
- Supports up to 32GB.
- Camera SD Capacity
- Supports up to 128GB.
- Connection Range
- Maximum 300 meters.
Images and diagrams
- Camera: Status light, microphone, SD card slot, reset button, and call/pair button.
- Monitor: Direction, OK, Menu, Back, Zoom, and Call buttons, plus volume and power controls.
Model compatibility
- SD card must be formatted to FAT32 or exFAT.
- Product does not support hot-swapping SD cards.

Manual page author
Michael Turner
Technical manual editor
Reviews PDF manuals for structure, safety notes, and practical product details so readers can find the right information quickly.