Furniture / Bedroom Furniture
Assembly Instructions for IKEA BRIMNES 2-Door Wardrobe
Step-by-step assembly guide for the IKEA BRIMNES 2-Door Wardrobe. Includes critical safety warnings, required tools, wall anchoring instructions, and hinge adjustment procedures.
Quick answers from the manual
Quick answer
- This manual provides instructions for assembling the IKEA BRIMNES 2-Door Wardrobe. It emphasizes critical safety steps, specifically the requirement to anchor the furniture to the wall to prevent tip-over accidents. p. 2, 26, 29
Key actions
- Anchor the wardrobe to the wall p. 26, 29, 30
- Adjust door hinges p. 35
Problems and fixes
Door alignment issues
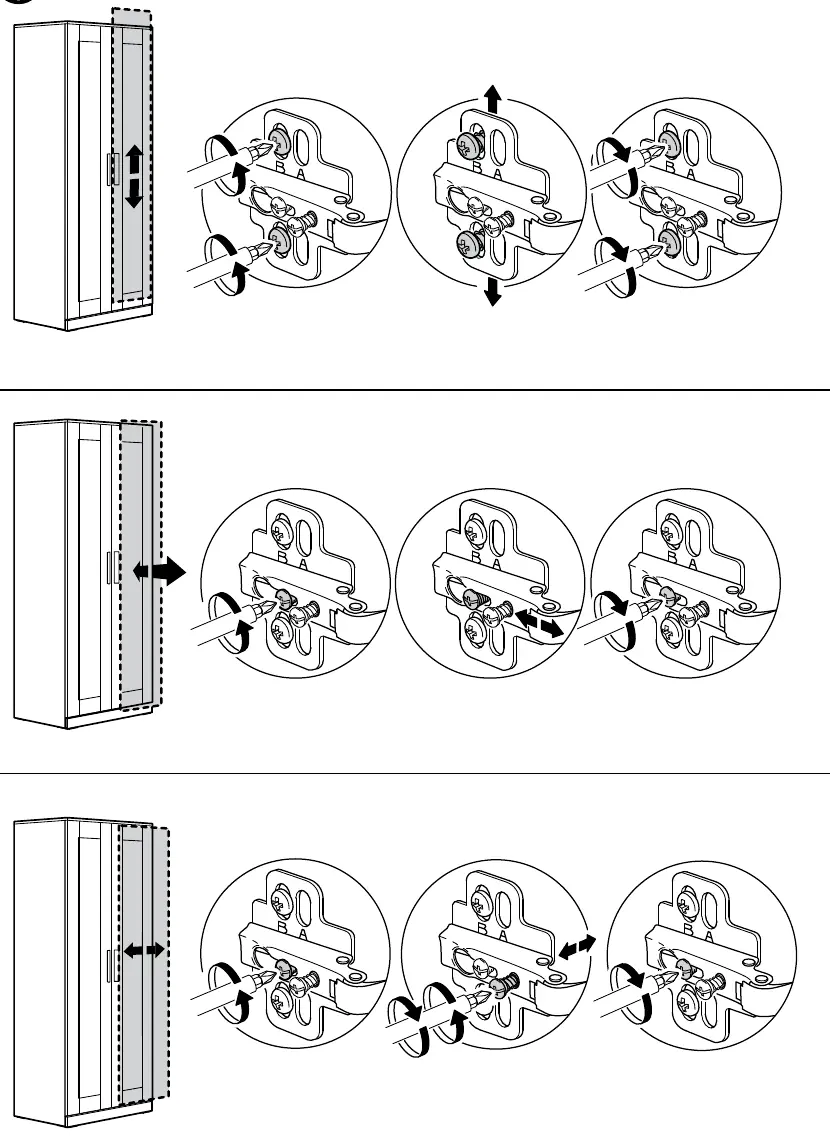
Adjust the hinge screws as shown on page 35.
p. 35Where to find it in the PDF
- Safety Warnings p. 2
- Tools Required p. 3
- Assembly Steps p. 7, 34
- Hinge Adjustment p. 35
Table of contents
Manual images
Click an image to enlargeImportant Safety Information
WARNING: Children have died from furniture tip-over. To reduce the risk of serious injury or death:
- ALWAYS install the provided tip-over restraint.
- NEVER put a TV on this product.
- NEVER allow children to stand, climb, or hang on drawers, doors, or shelves.
- NEVER open more than one drawer at a time.
- Place the heaviest items in the lowest drawers.
Tools Required
Before beginning assembly, ensure you have the following tools:
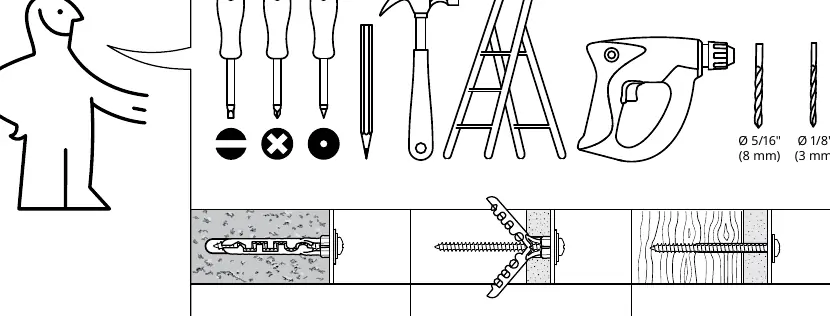
- Hammer
- Screwdriver (Phillips and flathead)
- Pencil
- Ladder
- Drill (with appropriate bits for your wall type)
Assembly Overview
The assembly process involves building the main frame, attaching the back panel, and securing the unit to the wall. It is recommended to assemble the unit on a soft surface to prevent scratching.
- Frame Assembly: Follow steps 1 through 39 to construct the wardrobe frame, including the base, sides, and internal shelving.
- Wall Anchoring: This is a critical safety step. Use the provided brackets (Step 40-44) to secure the wardrobe to the wall. The hardware provided is suitable for most solid and hollow walls, but you must ensure it is appropriate for your specific wall material. If you are uncertain, consult a professional.
- Final Assembly: Attach the doors and internal fittings (Steps 45-50).
Hinge Adjustment
If the doors are not aligned correctly, you can adjust them using the hinge screws. Refer to the diagrams on page 35 to adjust the door position vertically, horizontally, and in depth.
Manufacturer information
IKEA
Practical help
Common problems
Furniture tipping over
Always install the provided wall anchoring system. Do not allow children to climb on the unit.
Doors are misaligned
Use the adjustment screws on the hinges (shown on page 35) to align the doors.
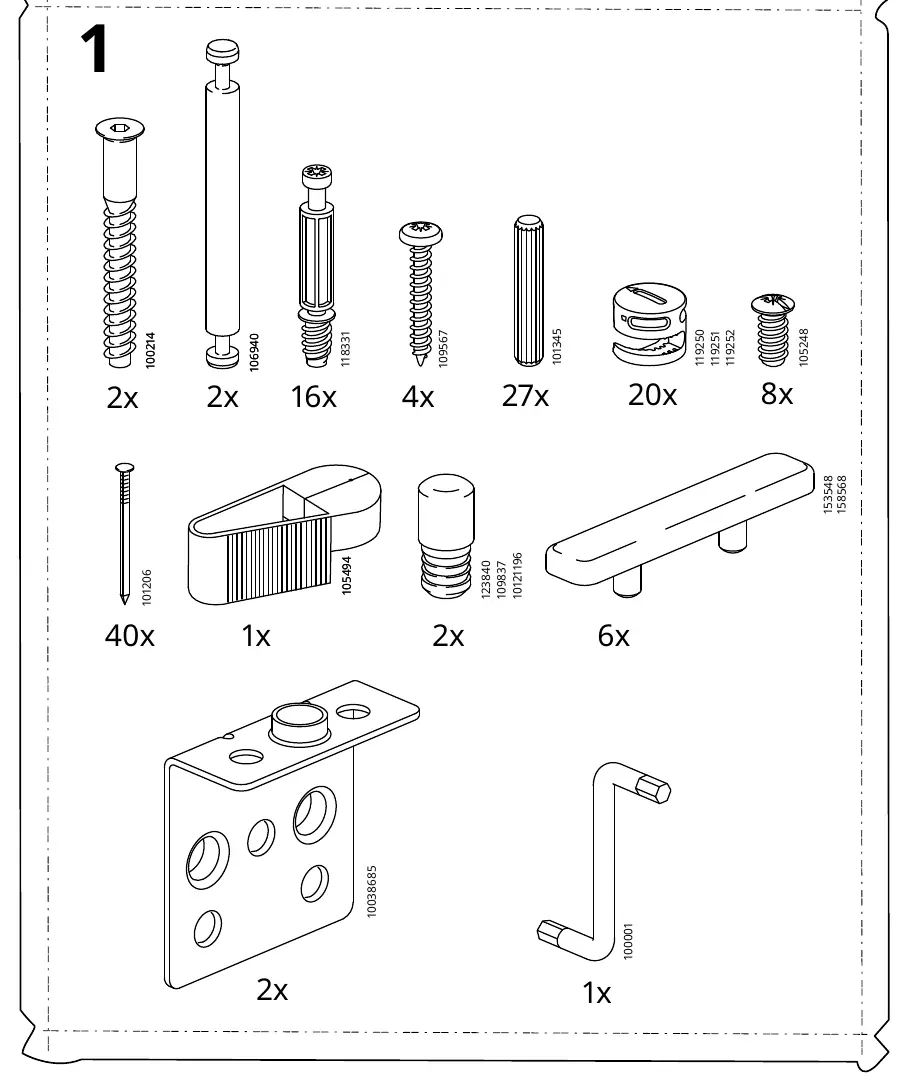
Before use
- Verify all parts are present according to the parts list.
- Ensure you have the correct tools: hammer, screwdriver, pencil, ladder, and drill.
- Clear a large, flat area for assembly.
- Check your wall type to ensure the provided anchoring hardware is suitable.
- Assemble with two people where indicated.
Images and diagrams
- Numbered steps indicate the sequence of assembly.
- Icons showing a person with a question mark indicate when to seek help or contact IKEA.
- Icons showing a hammer or screwdriver indicate the required tool for that step.
Model compatibility
- Wall mounting hardware is included but may not be suitable for all wall types. Consult a professional if you are unsure about your wall material.

Manual page author
Michael Turner
Technical manual editor
Reviews PDF manuals for structure, safety notes, and practical product details so readers can find the right information quickly.